Beef cheeks are cheek muscles from cattle—tough and gelatinous initially, but they’re your hidden weapon for incredible braised dishes. I brown them first to build flavor, then braise low and slow for 3–4 hours in beef stock with aromatics like garlic and thyme until fork-tender. The collagen breaks down into silky gelatin, creating a rich, glossy sauce that coats every bite. You’ll shrink them by about 50%, which is totally normal. Serve over creamy mashed potatoes to soak up those pan juices—and there’s plenty more to master about seasoning, sides, and clever leftovers.
What Are Beef Cheeks? Why Slow Cooking Wins

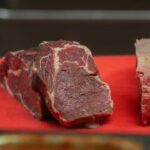
Ever wondered what makes beef cheeks the king of slow-cooking cuts? I’ll tell you why. Beef cheeks are the cheek muscles from cows—incredibly tough initially, but that’s where slow cooking works its magic. When you braise them low and slow, the heat breaks down connective tissue that normally makes meat chewy. Here’s the game-changer: beef cheeks absorb flavors beautifully from braising liquids while staying incredibly juicy. You’ll get that coveted pull-apart texture, not dry slices. Each cheek weighs roughly 8–16 ounces raw, though they’ll shrink during tenderization. The result? A melt-in-your-mouth bite that’s both economical and deeply flavorful. That’s why joining the slow-cooking community means discovering this underrated cut that transforms patience into perfection.
Where to Buy Beef Cheeks and What to Expect

Now that you’ve learned why beef cheeks transform into something special through slow cooking, finding them is your next step. You’ll likely need to buy from your local butcher since grocery stores rarely stock them consistently. Availability varies by location, so calling ahead saves you a trip. Each piece weighs 8–16 ounces, and since each cow provides only two cheeks, ordering ahead ensures you’ll get what you need. When braising beef cheeks, expect them to shrink roughly in half after cooking—that’s completely normal. Your butcher can explain pricing and help you select quality pieces. Building a relationship with a local butcher means they’ll remember your preferences and alert you when beef cheeks arrive, making you part of their community of serious home cooks.
Stock Your Pantry: What You’ll Actually Need

What ingredients transform tough beef cheeks into tender, flavor-packed meat? You’ll need the right pantry staples to make braising work its magic on this connective-tissue-rich cut.
Here’s what I stock before cooking beef cheeks:
- Beef stock or broth – This forms your braising liquid’s foundation, letting the meat absorb deep, savory flavors as it slowly cooks
- Aromatics and seasonings – Onions, garlic, bay leaves, and thyme build complexity in your braising liquid
- Cornstarch – After cooking, I use a simple slurry to thicken the braising liquid into a rich gravy
You’ll also want red wine, tomato paste, and salt on hand. These pantry essentials work together to break down the tough muscle fibers. When you’ve got these basics ready, you’re set to create restaurant-quality beef cheeks at home.
Wine, Aromatics, and the Flavor Triad

Why does wine matter so much when you’re braising beef cheeks? It’s simple: wine transforms your dish. I use full-bodied red wines like Merlot or Cabernet Sauvignon as my braising liquid. These wines deglaze the pan, lifting those browned bits—called fond—that pack serious flavor. When combined with aromatics like onions, garlic, and carrots, wine creates what I call the flavor triad: deep, rich, and cohesive.
Here’s the good news: you don’t need expensive bottles. End-of-bin specials work perfectly. I freeze portions for future cooking sessions. The wine mellows during slow cooking, melding with beef cheeks and other liquids into a velvety sauce. Italian reds are my go-to choice for maximum richness. This combination creates that restaurant-quality result you’re after.
Trimming and Seasoning Your Beef Cheeks

Before you sear those beef cheeks, I’m going to show you how to trim and season them so they cook up tender and flavorful. First, you’ll want to remove any thick, rubbery fat and connective tissue from the surface—think of it as giving your cheeks a quick cleanup—since this stuff won’t break down enough during braising and will just make things greasy. Once trimmed, rub each cheek generously with salt, pepper, onion powder, garlic powder, smoked paprika, and ground cumin, making sure the spice blend coats all sides evenly for maximum flavor.
Removing Excess Fat
Since beef cheeks come with a fair amount of fat and connective tissue wrapped around them, I’d recommend trimming before you cook. This step matters because excess fat prevents even browning and can make your final sauce greasy.
Here’s my approach to trimming fat:
- Remove the visible fat cap – I trim away thick, white fatty layers covering each cheek, leaving a thin layer for flavor
- Cut away connective tissue – I slice off silvery, stringy bits that won’t break down during braising
- Sear your trimmings – I cook these pieces first to render their flavor into the pan, building a better fond
Trimming helps your sauce stay emulsified instead of separating into puddles of grease. Each cheek cooks more uniformly too, which means better texture throughout your braise.
Applying Spice Blends
Now that your beef cheeks are trimmed and ready, it’s time to build flavor with a well-balanced spice blend. I combine 2 tsp kosher salt, ½ tsp black pepper, 1 tsp onion powder, 1 tsp garlic powder, 1 tsp smoked paprika, and ½ tsp ground cumin. You’ll rub this seasoning evenly across each cheek, layering it as you stack them in your slow cooker. For extra depth, I add dried thyme—it pairs beautifully with braising liquids. Here’s the secret: let your seasoned cheeks rest overnight in the refrigerator. This resting period allows the rub to penetrate deeply into the meat, maximizing flavor absorption. If you’re browning them first, dust lightly with cornstarch to help develop a slight crust.
Beef Cheek Cooking Methods: Oven, Stovetop, Slow Cooker

How’d you like to transform a tough, collagen-packed cut into something so tender it practically melts on your tongue? That’s what braising beef cheeks does for you. I’ll walk you through three methods that’ll make you a pro at tenderization:
- Oven braising: Brown your beef cheeks, then braise covered in a Dutch oven with stock or wine for 3.5 hours at steady heat.
- Stovetop braising: Sear on the stove, then simmer on low heat for about 2.5 hours, stirring occasionally until fork-tender.
- Slow cooker: Season and brown your beef cheeks (optional), then let them cook on LOW for eight hours—basically a set-it-and-forget-it situation.
After cooking, stir in a cornstarch slurry to thicken that braising liquid into gravy. You’ve got this.
Faster Option: Pressure Cooker Beef Cheeks in 1 Hour

Want to skip the hours-long wait without sacrificing that melt-in-your-mouth texture? I’ll show you how pressure cooking delivers fall-apart beef cheeks in roughly 60 minutes.
Here’s what I do: First, I sear the cheeks in a hot pot to develop deep browned flavor. Then I deglaze with beef stock and red wine—this builds your braising foundation. Next, I add the cheeks to a 6-quart pressure cooker and cook on high pressure for 45–60 minutes, using natural release for optimal tenderness.
The magic happens as pressure breaks down connective tissue, creating impossibly juicy meat that absorbs every ounce of flavor. Finally, I thicken the pan juices with a cornstarch slurry, creating a glossy gravy. Serve over mashed potatoes or polenta, and you’ve got a restaurant-quality meal that won’t keep you hovering over the stove all day.
How to Know When They’re Done (Fork Test & Beyond)

Testing beef cheeks for doneness is straightforward once you know what to look for. I’ll walk you through the fork test and visual cues that tell you when your braised beef cheeks have reached perfect tenderness.
Testing beef cheeks for doneness is straightforward once you know what to look for—fork test and visual cues guide you to perfect tenderness.
Signs Your Beef Cheeks Are Ready:
- Fork test passes easily – Pierce the meat with a fork; it should shred with minimal resistance, not fight back like it’s in a tug-of-war
- Collagen breaks down completely – The meat pulls apart cleanly along its fibers, creating that signature melting texture
- Sauce thickens noticeably – Juices emulsify into a rich, glossy liquid surrounding the tender meat
After 3–4 hours in the oven or 6–8 hours in a slow cooker, test your cheeks. If resistance remains, continue cooking and retest every 30–60 minutes. You’ll know when they’re perfect.
Turn Pan Drippings Into Rich, Silky Gravy

Once your beef cheeks are fork-tender and resting on a plate, don’t waste those flavorful pan drippings—they’re liquid gold waiting to become silky gravy. I’ll show you how to transform them.
First, deglaze your skillet with red wine or beef stock, scraping up those browned bits. This step lifts caramelized flavors right off the pan. Next, reduce the pan drippings by simmering for five to ten minutes. This concentration intensifies the roasted beef taste.
Now comes the thickening. I whisk together cornstarch and cold water, then slowly add it to the simmering liquid while stirring constantly. The gelatin from the beef cheeks helps emulsify with fat, creating that velvety texture you’re after.
Finally, strain everything through a fine mesh sieve. You’ll get glossy, grit-free gravy that coats your meat beautifully.
How to Serve Beef Cheeks: Best Side Dishes

Now that you’ve got that silky gravy ready, it’s time to think about what goes on the plate alongside your tender beef cheeks—because here’s the thing: these rich, saucy braised meat needs the right supporting cast to really shine. I’d recommend starting with a classic base like creamy mashed potatoes or polenta, which’ll soak up all those delicious pan juices without competing for attention. Then balance that richness with roasted vegetables like carrots or asparagus, maybe a simple arugula salad for brightness, and you’ve got yourself a well-rounded meal that won’t leave you feeling overstuffed.
Classic Mashed Potato Pairings
Mashed potatoes are the ultimate sidekick for beef cheeks—they’re like the perfect dance partner that knows exactly when to step back and let the star shine. I’ve found that this classic pairing works because creamy potatoes soak up those rich pan juices from slow cooking, creating balanced bites every time.
Here’s what makes this combination special:
- Creamy texture contrast – Fork-tender, shredded beef cheeks meet smooth, buttery potatoes for restaurant-quality comfort
- Flavor enhancement – Generous spoonfuls of pan sauce over both meat and potatoes unify everything on your plate
- Premium upgrades – Roasted garlic or horseradish cuts through richness, elevating your dish
You can also swap in mashed cauliflower or parsnip mash for lighter, low-carb options. Either way, you’re building a plate that feels both satisfying and sophisticated.
Vegetable Accompaniments And Options
What’s the secret to balancing beef cheeks’ rich, savory intensity? Fresh vegetables. I’ve found that adding colorful sides cuts through the heaviness and creates a well-rounded meal that everyone enjoys.
| Vegetable | Preparation | Why It Works |
|---|---|---|
| Carrots | Honey-glazed | Sweetness complements savory beef |
| Shallots | Caramelized | Deepens flavor complexity |
| Asparagus | Roasted | Adds elegant texture contrast |
| Broccoli | Steamed | Provides mild, clean taste |
| Arugula | Fresh salad | Offers peppery brightness |
I spoon the braising liquid over roasted vegetables to tie everything together. A simple cucumber-tomato salad alongside mashed potatoes provides that light, fresh contrast you’ll want. For lower-carb options, cauliflower rice or Paris mash absorbs the sauce beautifully while keeping things balanced. These vegetable accompaniments transform beef cheeks into a complete, satisfying dinner that’s honestly hard to beat.
Salad And Light Balance
After you’ve spent hours braising beef cheeks to tender perfection, the last thing you want is to serve them on a heavy, complicated plate. That’s where salad and light balance become your alternative weapons. I’ve found that pairing rich beef cheeks with fresh, acidic sides transforms the entire eating experience.
Here’s what I recommend:
- Arugula or cucumber-tomato salad with a bright vinaigrette cuts through the richness beautifully
- Crisp green salad with light dressing provides textural contrast that awakens your palate
- Simple greens with lemon juice adds acidity that balances the saucy beef without competing
The key is choosing salads that refresh your mouth between bites. That acidity works like magic, making each forkful taste even more satisfying. You’re not overcomplicating things—you’re creating harmony on your plate.
Make-Ahead Tips and Freezing Beef Cheek Leftovers
Why plan ahead when beef cheeks taste so good the first time around? I’ll tell you why: freezing leftovers means you’re joining the smart-cooking club. After you’ve braised your beef cheeks to tender perfection, let them cool completely. Then transfer both the meat and sauce into freezer-safe containers. They’ll keep frozen for up to three months, which is honestly game-changing for busy weeks ahead. When you’re ready to use them, thaw overnight in your refrigerator. I love reheating the cheeks gently on the stovetop, stirring occasionally to prevent sticking. The beauty here? Your leftover beef cheeks work beautifully in pies, rich ragu sauces, or served over creamy mashed vegetables. Make-ahead cooking doesn’t get easier than this.
Second-Life Recipes: Ragu, Pies, and Tacos

Once you’ve got a batch of tender, shredded beef cheeks in your freezer, the real fun begins—I like to transform that rich meat and its braising liquid into three completely different dishes that’ll make you wonder why you ever thought of them as “leftovers.” You can simmer the shredded beef with the reduced braising liquid to create a deep, savory ragu that clings to pasta or polenta, or fold it into buttery pie dough with some of that glossy sauce for a seriously satisfying hand pie. Tacos are where things get casual: just warm up your beef cheeks in a skillet, pile them into tortillas with a drizzle of the braising liquid, and you’ve got a weeknight dinner that tastes like you spent all day cooking.
Transforming Leftovers Into Ragu
When you’ve got leftover braised beef cheeks sitting in your fridge, you’re basically holding liquid gold for making ragu—a rich, meaty pasta sauce that’ll make you forget you’re eating yesterday’s dinner.
Here’s what makes this transformation so satisfying:
- Shred the beef cheeks into bite-sized pieces, breaking down the tender braising meat completely
- Combine with reduced pan juices and fresh tomatoes, simmering everything together for 20-30 minutes until flavors meld
- Adjust consistency by reducing the sauce further or adding a cornstarch slurry for gravy-like thickness
The beauty of ragu is that it rewards patient cooking. Those leftover braising liquids intensify as they reduce, creating deeper, more complex flavors. You’re not just reheating—you’re building something completely new from your beef cheeks. Toss this with pasta, and you’ve created a dish that tastes like you spent hours cooking.
Creative Pie And Taco Ideas
How many ways can you reinvent a single dish? I’ve discovered that shredded beef cheeks are incredibly versatile for second-life recipes. You can layer them into pie fillings with red wine sauce, using your pan juices as filling to skip extra prep. The meat works wonderfully in tacos, enchiladas, and burritos too. Here’s my approach: gently reheat shredded beef to prevent drying, then fold it into sauces or fillings. For pies, pair your beef cheeks with mashed cauliflower or creamy potatoes—the richness balances beautifully. Since you’ve already braised them, baking time shortens considerably with pre-cooked meat. Whether you’re building a comforting pie or casual tacos, these leftovers transform into entirely new meals that taste like you’ve cooked all day.
Mistakes That Ruin Beef Cheeks: Overcooking, Underseasoning, and Dry Results

Why do some beef cheeks turn into an unappetizing paste while others stay tender and flavorful? I’ve learned that three major mistakes wreck this dish faster than you’d think.
- Overcooking beyond fork-tenderness – Push past 2.5–3.5 hours, and you’ll lose structure entirely.
- Underseasoning the meat – A robust spice rub and ample braising liquid develop the depth this rich, gelatinous meat needs.
- Skipping the sear or braising dry – Without proper browning to render fat and collagen, or without sufficient liquid during braising, you’ll end up with tough, dry results instead of succulent beef cheeks.
The key? Slow, low-temperature braising paired with bold seasoning. Account for variable cheek sizes (8–16 oz each) when timing. Get these fundamentals right, and you’ll nail it.