

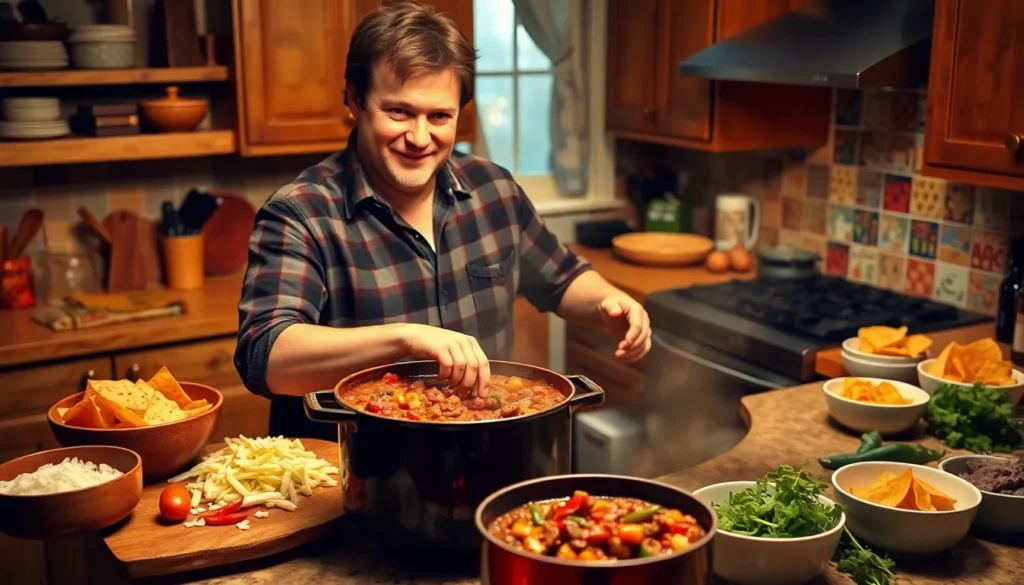
There’s nothing quite like a steaming bowl of hearty chili on a cold day, and our sausage and beef chili recipe takes comfort food to the next level. This protein-packed powerhouse combines the robust flavors of ground beef with the smoky richness of Italian sausage, creating a chili that’s guaranteed to satisfy even the heartiest appetites.
We’ve perfected this recipe through countless kitchen experiments, and the secret lies in the perfect balance of two meats. The ground beef provides that classic chili foundation, while the sausage adds incredible depth and a hint of spice that’ll make your taste buds dance. It’s the kind of recipe that transforms a simple weeknight dinner into something extraordinary.
Whether you’re feeding a crowd at your next game day gathering or just craving something soul-warming for dinner, this beef and sausage chili delivers maximum flavor with minimal fuss. Get ready to discover your new go-to chili recipe that’ll have everyone asking for seconds.
Ingredients
We’ve carefully selected each ingredient to create the perfect balance of flavors in our sausage and beef chili. Our combination ensures every spoonful delivers rich taste and satisfying texture.
For the Meat
- 1 pound ground beef (80/20 lean to fat ratio)
- 1 pound Italian sausage, casings removed
- 2 strips bacon, diced
For the Vegetables
- 1 large yellow onion, diced
- 1 large bell pepper, diced (red or green)
- 4 cloves garlic, minced
- 2 medium carrots, diced
- 2 celery stalks, diced
- 1 jalapeño pepper, seeded and minced
For the Spices and Seasonings
- 3 tablespoons chili powder
- 2 tablespoons ground cumin
- 1 tablespoon smoked paprika
- 2 teaspoons dried oregano
- 1 teaspoon cayenne pepper
- 1 teaspoon salt
- 1/2 teaspoon black pepper
- 1 bay leaf
For the Liquid Base
- 1 can (28 ounces) crushed tomatoes
- 1 can (15 ounces) tomato sauce
- 2 cans (15 ounces each) kidney beans, drained and rinsed
- 1 can (15 ounces) black beans, drained and rinsed
- 2 cups beef broth
- 2 tablespoons tomato paste
- 1 tablespoon Worcestershire sauce
- 1 bottle (12 ounces) dark beer (optional)
For the Garnish
- 1 cup shredded cheddar cheese
- 1/2 cup sour cream
- 1/4 cup fresh chives, chopped
- 1 avocado, diced
- Tortilla chips for serving
Equipment Needed

Creating our hearty sausage and beef chili requires the right tools to achieve optimal results. We recommend gathering these essential pieces of equipment before starting the cooking process.
Large Pot or Dutch Oven forms the foundation of our cooking setup. This vessel needs to accommodate large quantities of ingredients while providing even heat distribution throughout the cooking process. We suggest using a 6-quart capacity or larger to handle the full recipe comfortably.
Big Spoon or Wooden Spoon becomes crucial for stirring and breaking apart the meat during browning. The sturdy construction helps us effectively crumble the ground beef and sausage while preventing damage to our cookware’s surface.
Strainer or Lid serves an important purpose in managing excess fat after browning the meats. We use this tool to drain unwanted grease while retaining the flavorful meat for our chili base.
Crockpot or Slow Cooker offers an optional approach for those preferring longer cooking times. This equipment allows us to develop deeper flavors through extended simmering periods of 4 to 10 hours when time permits.
| Equipment | Purpose | Size/Capacity |
|---|---|---|
| Large Pot/Dutch Oven | Main cooking vessel | 6+ quarts |
| Wooden Spoon | Stirring and breaking meat | Standard size |
| Strainer/Lid | Fat drainage | Fits pot opening |
| Slow Cooker | Extended cooking option | 6+ quarts |
Having these tools ready ensures smooth preparation and cooking of our robust chili recipe. Each piece serves a exact function that contributes to the final quality and texture of our finished dish.
Prep Work

Proper preparation sets the foundation for our exceptional sausage and beef chili. We organize our ingredients and equipment before cooking to ensure smooth execution and optimal flavor development.
Preparing the Meat
We start by removing the casings from our Italian sausage if they haven’t been removed already. Our meat combination requires 1 pound ground beef and 1 pound ground sausage for the perfect balance of flavor and texture.
Next we brown both meats in our large Dutch oven over medium heat. Breaking the meat into small uniform pieces ensures even cooking and better texture in our finished chili. We cook until the meat is fully browned and no longer pink throughout.
After browning we drain off the excess grease to create a leaner final product. This step prevents our chili from becoming too oily while maintaining the rich flavors we want.
Chopping the Vegetables
We begin our vegetable prep by dicing one large yellow onion into uniform pieces. Bell peppers get chopped into similar sized pieces to ensure even cooking throughout.
Our garlic preparation requires mincing 3 to 4 cloves finely to distribute the flavor evenly. We keep the garlic separate since it cooks much faster than our other vegetables.
The vegetables cook in oil or bacon drippings over medium heat until the onions become translucent. This process takes about 5 minutes and builds the flavor base for our chili. We add the minced garlic during the final minute of cooking to prevent burning and maintain its sharp flavor.
Measuring Spices
We measure our spice blend carefully to achieve the perfect flavor profile. Our core spices include 1 to 2 tablespoons chili powder and 2 teaspoons each of garlic powder and onion powder.
Additional seasonings consist of 1 teaspoon each of paprika and cumin. We also prepare oregano, salt, and pepper according to our taste preferences. Optional additions like achiote powder or smoked paprika provide extra depth and complexity.
Beyond dry spices we measure 1 to 2 tablespoons of Worcestershire sauce for umami richness. Our tomato paste measurement of 2 tablespoons adds concentrated tomato flavor and helps thicken our chili base.
Instructions

We’ll build this incredible chili by browning our meats separately first and then layering flavors through each carefully timed step. This method ensures every ingredient contributes maximum taste to our final dish.
Browning the Sausage
We start by heating our large Dutch oven over medium-high heat. Remove the casings from 1 pound of Italian sausage and add it to the heated pot. Break the sausage into small bite-sized pieces using our wooden spoon and cook for 5-7 minutes until completely browned and cooked through. The sausage should develop a golden-brown color and release its flavorful oils. Transfer the browned sausage to a plate and drain off most of the excess fat from the pot while leaving about 1 tablespoon for the next step.
Browning the Beef
Add 1 pound of ground beef to the same pot with the reserved sausage fat. Break the beef apart with our wooden spoon and cook over medium-high heat for 6-8 minutes until thoroughly browned. We want to achieve a deep golden-brown color on the meat pieces to develop rich flavors. Drain off the excess fat using our strainer while keeping the browned bits stuck to the bottom of the pot since these will add incredible depth to our chili base.
Sautéing the Vegetables
Return our pot to medium heat and add 1 tablespoon of oil if needed. Add the diced onion and bell pepper to the pot and sauté for 3-4 minutes until they begin to soften. Add the minced garlic during the last minute of cooking to keep its flavor fresh and vibrant. The vegetables should become fragrant and slightly caramelized around the edges. Add the diced carrots and celery and cook for an additional 2-3 minutes until all vegetables are tender.
Building the Flavor Base
Sprinkle our spice blend over the sautéed vegetables including 2 tablespoons chili powder 1 tablespoon cumin 1 teaspoon smoked paprika and 1/2 teaspoon cayenne pepper. Stir the spices into the vegetables and cook for 1-2 minutes to bloom their flavors and create an aromatic base. Add 2 tablespoons of tomato paste and cook for another minute while stirring constantly. Pour in 1/2 cup of beef broth to deglaze the pot and scrape up all those flavorful browned bits from the bottom using our wooden spoon.
Simmering the Chili
Return the browned sausage and beef to the pot and stir to combine with our vegetable and spice mixture. Add the crushed tomatoes tomato sauce drained kidney beans drained black beans and remaining beef broth. Stir in 2 tablespoons of Worcestershire sauce and bring the entire mixture to a rolling boil over high heat. Reduce the heat to low and cover the pot partially with our lid. Simmer the chili gently for 45 minutes to 1 hour stirring occasionally to prevent sticking. The chili is ready when the flavors have melded together and the consistency has thickened to your preference. Taste and adjust salt pepper and spices as needed during the final 10 minutes of cooking.
Cooking Tips

Mastering the art of sausage and beef chili requires attention to detail and understanding key techniques. These expert tips will help you create a perfectly balanced and flavorful chili every time.
Achieving the Perfect Consistency
We recommend simmering your chili uncovered or partially covered to achieve the ideal thickness through natural evaporation. This technique allows the liquid to reduce slowly while the flavors concentrate and develop. The amount of liquid you add directly controls your final consistency – more beef broth or tomato sauce creates a soupier texture while less liquid produces a thick stew-like result.
Tomato paste serves as our secret weapon for adding both thickness and richness without diluting the flavor profile. We stir it in after browning the vegetables to cook out the raw taste before adding other liquids. Frequent stirring during the simmering process prevents sticking and ensures even consistency throughout the pot.
For chilis that need additional thickening we allow extra simmering time with the lid off. The natural starches from the beans also contribute to thickening as they break down during the long cooking process.
Adjusting Heat Levels
Building layers of heat starts with our foundation spices including chili powder cumin paprika and cayenne pepper. We adjust the chili powder quantity as our primary heat control method since it provides both spice and deep flavor complexity. Fresh or pickled elements like diced green chilies or jalapeños add brightness and varying heat levels to complement the dried spices.
Balancing heat requires more than just adding spicy ingredients. We incorporate acidic elements such as a splash of vinegar or lime juice along with a touch of sweetness from sugar or ketchup to create complexity without overwhelming spiciness. This balance prevents the heat from becoming one-dimensional and harsh.
Testing and adjusting heat levels should happen gradually during the simmering process. We taste frequently and add small amounts of hot sauce or fresh peppers until we reach the desired spice level. Remember that heat intensifies as the chili cooks and flavors concentrate.
Flavor Enhancement Techniques
Worcestershire sauce and beer introduce umami depth that transforms ordinary chili into something extraordinary. We add Worcestershire sauce during the building phase to allow its complex flavors to integrate fully. Beer can replace some of the beef broth for additional richness and subtle malty notes.
The Maillard reaction from properly browning our sausage and beef creates the foundation for deep complex flavors. We take time to brown each meat thoroughly breaking it into small pieces while developing those rich caramelized surfaces. Draining excess grease maintains balance while preserving the flavorful fond in the pot.
Slow simmering allows all ingredients to meld and develop their full potential. We maintain low heat for at least 30 minutes to 2 hours depending on our schedule. The longer cooking time rewards us with more integrated flavors and tender texture throughout.
Fresh finishing touches elevate the final dish significantly. We serve with fresh cilantro sour cream shredded cheese and pickled jalapeños to add textural contrast and bright flavors that complement the rich base.
Make-Ahead Instructions

This sausage and beef chili tastes best when made a day ahead to allow the rich flavors to fully develop and meld together. We strongly recommend preparing this hearty dish in advance for optimal taste and convenience.
After completing the cooking process cool the chili completely before storing it in the refrigerator. Transfer the cooled chili to airtight containers and refrigerate for up to 3 days. The extended resting time allows the spices to penetrate deeper into the meat while the tomato base becomes more concentrated and flavorful.
For longer storage we can freeze this chili for up to 3 months without compromising quality. Allow the chili to cool completely at room temperature before transferring it to freezer-safe containers or heavy-duty freezer bags. Leave about an inch of headspace in containers to account for expansion during freezing.
When ready to serve frozen chili thaw it overnight in the refrigerator for food safety. Reheat the thawed chili gently over medium-low heat stirring occasionally to prevent scorching. Add a splash of beef broth or water if the consistency becomes too thick during reheating.
We find that reheated chili often tastes even better than freshly made as the extended time allows all ingredients to integrate fully. Taste and adjust seasonings after reheating since flavors may become more concentrated during storage. The meat remains tender and the sauce develops a deeper more complex flavor profile that makes this make-ahead approach worthwhile for busy schedules or entertaining.
Storage and Reheating

Proper Storage Methods
We recommend storing our sausage and beef chili in airtight containers to maintain its quality and prevent contamination. Glass Tupperware containers work exceptionally well for refrigerator storage, while freezer-safe bags offer excellent options for longer-term preservation. Our chili maintains its best quality for approximately 5 days when stored in the refrigerator at consistent temperatures.
For extended storage, we freeze the chili in vacuum-sealed bags or sturdy freezer containers where it retains its flavor and texture for 2-3 months or longer. Laying freezer bags flat saves valuable freezer space and speeds up the thawing process significantly. This method allows us to portion the chili into meal-sized servings for convenient future use.
Effective Reheating Techniques
We prefer thawing frozen chili in the refrigerator before reheating for the most even temperature distribution. But, reheating directly from frozen on the stovetop works perfectly when time is limited. Medium or medium-low heat settings provide the best results while stirring frequently ensures even heating throughout the entire batch.
Stovetop reheating delivers superior results compared to microwave methods because it provides more even warming and maintains the chili’s ideal texture. We stir the chili regularly during reheating to prevent hot spots and ensure uniform temperature distribution. The reheating process typically takes 8-10 minutes for refrigerated chili and 15-20 minutes when starting from frozen.
Our leftover chili often tastes even better after sitting because the flavors continue to blend and develop complexity during storage. We add small amounts of beef broth or water if the consistency becomes too thick during reheating. This technique restores the chili to its original texture while maintaining the concentrated flavors we worked to develop.
Serving Suggestions

Our hearty sausage and beef chili shines when served piping hot with the right accompaniments that complement its rich flavors. We recommend letting the chili rest for 30 minutes before refrigeration if saving leftovers and always reheating thoroughly before serving.
Best Toppings
We love to elevate our chili with toppings that add both flavor and texture contrast. Shredded sharp cheddar or Monterey Jack cheese melts beautifully over the hot chili while adding a creamy richness that balances the spice.
Sour cream or Greek yogurt provides a cooling element that tames the heat and adds tangy brightness. Fresh cilantro leaves bring an herbaceous note that cuts through the richness of the meat.
Thinly sliced green onions or finely chopped red onions contribute a sharp bite that awakens the palate. Pickled jalapeños or sliced fresh chilies amp up the heat for those who crave extra spice.
Lime wedges offer a citrusy brightness when squeezed over the top. Diced avocado or a dollop of guacamole adds luxurious creaminess that pairs perfectly with the robust flavors.
Side Dish Pairings
We serve our chili with warm crusty bread or buttery crackers for dipping into every last drop. Cornbread or jalapeño cornbread creates a sweet and spicy balance that complements the savory chili beautifully.
Tortilla chips or Fritos provide satisfying crunch that contrasts with the tender meat and beans. These crispy additions also work as edible spoons for scooping up generous bites.
A simple green salad with tangy vinaigrette cuts through the richness and provides a fresh counterpoint to the hearty chili. Coleslaw made with light dressing offers refreshing contrast and crisp texture.
Mexican rice or cilantro lime rice transforms the chili into a complete meal while soaking up the flavorful sauce. These rice dishes add substance without competing with the starring flavors of our sausage and beef combination.
Recipe Variations

We love how adaptable this chili recipe is to different tastes and dietary needs. The beauty of combining sausage and beef lies in the endless possibilities for customization.
Spice Level Adjustments
We can easily control the heat level by adjusting our sausage selection and spice quantities. For a mild version, we recommend using mild Italian sausage and reducing the chili powder to 1 tablespoon while omitting jalapeños entirely. The medium heat level works perfectly with hot Italian sausage and our standard spice measurements, including one diced jalapeño with seeds removed.
When we want to create a spicy version, we increase the chili powder to 3 tablespoons and add fresh jalapeño seeds back into the mix. Red pepper flakes become essential at this level, and we often incorporate chipotle powder for its smoky heat. Cayenne pepper serves as our final heat booster, starting with just 1/4 teaspoon and adjusting to taste.
| Spice Level | Italian Sausage | Chili Powder | Jalapeños | Additional Heat |
|---|---|---|---|---|
| Mild | Mild variety | 1 tablespoon | None | None |
| Medium | Hot or sweet | 2 tablespoons | 1 (seeds removed) | Optional red pepper flakes |
| Hot | Hot variety | 3 tablespoons | 1-2 (with seeds) | Chipotle powder, cayenne |
Additional Ingredient Options
We frequently experiment with different protein combinations to create unique flavor profiles. Smoked sausage can replace Italian sausage entirely or work alongside ground beef for a deeper smoky taste. Bacon adds another layer of richness when we dice and cook it first, using the rendered fat to brown our other meats.
Our vegetable additions often include diced carrots and celery for extra texture and nutrition. Bell peppers in multiple colors create visual appeal while contributing subtle sweetness. We sometimes add corn kernels during the last 10 minutes of cooking for bursts of sweetness that complement the heat.
Liquid variations make important differences in our final flavor. Beer, particularly lager or Mexican varieties, replaces some of the beef broth for complexity and slight bitterness that balances the richness. We’ve found that dark beer works especially well with the smoky elements.
Bean combinations allow us to customize texture and protein content. Multiple bean types like kidney, pinto, and black beans create visual interest and varied textures. Some family members prefer bean-free versions, which we accommodate by increasing the meat quantities slightly.
Sweetness balance becomes crucial with acidic tomatoes, so we add 1-2 teaspoons of sugar or molasses depending on our tomato selection. Worcestershire sauce enhances the umami depth, while dried oregano and basil contribute Mediterranean notes that complement the Italian sausage perfectly.
Conclusion
We’ve shared everything you need to create this incredible sausage and beef chili that’ll become your go-to comfort food recipe. The combination of ground beef and Italian sausage delivers unmatched flavor depth that’s perfect for any occasion.
This recipe’s versatility means you can easily adapt it to your family’s preferences while still achieving restaurant-quality results. Whether you’re meal prepping for busy weekdays or entertaining guests this chili consistently delivers satisfaction.
The make-ahead friendly nature and excellent storage options make this dish a practical choice for any home cook. We’re confident this hearty chili will earn a permanent spot in your recipe rotation and create lasting memories around your dinner table.
Frequently Asked Questions
What makes this sausage and beef chili recipe unique?
This recipe combines ground beef with Italian sausage for exceptional depth and flavor. The dual-meat approach creates a perfect balance of richness and spice, while the carefully selected blend of vegetables and seasonings enhances the overall taste profile. The recipe has been refined through experimentation to achieve optimal flavor integration.
How long does it take to make this chili?
The active cooking time is approximately 30-45 minutes, including browning the meats and sautéing vegetables. The chili then needs to simmer for 1-2 hours to allow flavors to meld together. Total preparation and cooking time ranges from 2-3 hours for the best results.
Can I make this chili ahead of time?
Yes, this chili is excellent for make-ahead preparation. It can be prepared a day in advance and stored in the refrigerator for up to 3 days. The flavors actually improve over time, making reheated chili often taste better than freshly made.
What equipment do I need to make this chili?
You’ll need a large pot or Dutch oven (6-quart capacity or larger), a wooden spoon for stirring, and a strainer or lid for draining excess fat. Optional equipment includes a crockpot or slow cooker for longer cooking times to develop deeper flavors.
How should I store leftover chili?
Store cooled chili in airtight containers in the refrigerator for up to 3 days or freeze for up to 3 months. Use glass containers for refrigeration and vacuum-sealed bags for freezing. Always cool completely before storing to maintain quality and prevent contamination.
What are the best toppings for this chili?
Popular toppings include shredded cheddar cheese, sour cream, fresh chives, diced avocado, and pickled jalapeños. These additions provide flavor contrast and enhance the overall eating experience. Serve with tortilla chips or warm cornbread for a complete meal.
Can I adjust the spice level in this recipe?
Absolutely! Control heat by choosing mild, medium, or hot Italian sausage. Adjust chili powder amounts and modify jalapeño quantities to taste. You can also balance heat with sweet elements like sugar or molasses, and add acidic components to enhance flavor complexity.
What’s the best way to reheat leftover chili?
Reheat on the stovetop over medium-low heat for even warming and texture preservation. If the chili has thickened, add a splash of beef broth or water to restore consistency. Stir occasionally and adjust seasonings to taste before serving.


