

We’ve spent countless hours perfecting what we believe is the best beef brisket recipe you’ll ever try. This mouthwatering dish transforms a tough cut of meat into pure barbecue gold through low and slow cooking that breaks down every fiber into tender perfection.
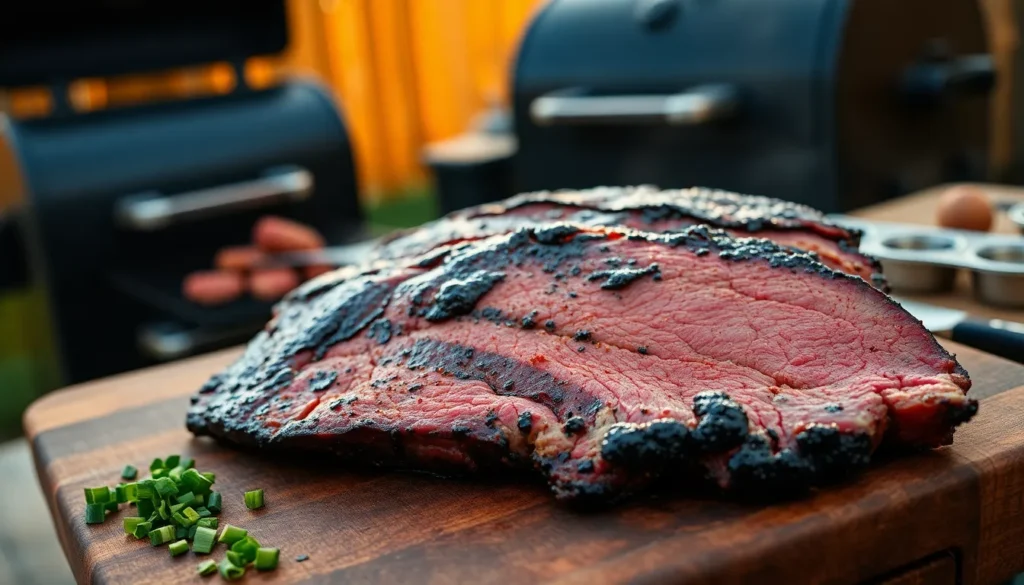
Our foolproof method delivers that coveted smoke ring and bark that’ll make your neighbors peek over the fence. Whether you’re firing up your smoker for the first time or you’re a weekend pitmaster, this recipe guarantees juicy, flavorful results every single time.
The secret lies in our signature dry rub blend and precise temperature control that creates that perfect balance of smoky crust and melt-in-your-mouth interior. We’ll walk you through every step to ensure your brisket becomes the star of your next backyard gathering.
Ingredients
We’ve carefully selected each ingredient to build layers of flavor that will penetrate deep into the meat and create that coveted bark. These components work together to transform your brisket into a masterpiece worthy of any barbecue competition.
For the Dry Rub
- 2 tablespoons kosher salt
- 2 tablespoons brown sugar
- 1 tablespoon black pepper (coarsely ground)
- 1 tablespoon paprika
- 1 tablespoon garlic powder
- 1 tablespoon onion powder
- 2 teaspoons chili powder
- 1 teaspoon cumin
- 1 teaspoon smoked paprika
- 1/2 teaspoon cayenne pepper
- 1/2 teaspoon mustard powder
For the Brisket
- 1 whole packer brisket (12-15 pounds, untrimmed)
- 2 tablespoons yellow mustard (as binder)
- Wood chips or chunks (oak, hickory, or apple)
For the Mop Sauce (Optional)
- 1 cup beef broth
- 1/4 cup apple cider vinegar
- 2 tablespoons Worcestershire sauce
- 1 tablespoon brown sugar
- 1 teaspoon garlic powder
- 1/2 teaspoon black pepper


Equipment Needed

Creating the perfect beef brisket requires exact tools that ensure optimal results throughout the cooking process. We recommend investing in quality equipment that will serve you well for years of barbecue adventures.
Essential Smoking Equipment
Our first priority is securing a reliable smoker or pellet grill for traditional Texas-style brisket preparation. These units provide the consistent heat and smoke circulation necessary for achieving that coveted bark and smoke ring. Pellet grills offer convenience with automated temperature control while offset smokers deliver authentic flavors that true pitmasters appreciate.
Cutting and Prep Tools
A sharp chef’s knife or carving knife forms the backbone of successful brisket preparation. We cannot overstate the importance of a razor-sharp blade for both trimming excess fat and achieving clean slices across the grain. Pair this with an extra-large cutting board measuring at least 18 x 24 inches to accommodate the brisket’s substantial size during prep and serving.
Temperature Monitoring
Accurate temperature control separates amateur cooks from barbecue masters. We rely on probe thermometers or instant-read models to monitor internal temperatures throughout the cooking process. These tools ensure we hit the perfect doneness range of 195-205°F without guesswork.
Handling and Wrapping Supplies
Large tongs provide safe handling of hot brisket during cooking and resting phases. We prefer butcher paper over aluminum foil for wrapping brisket at the stall phase since it maintains breathability while accelerating the cooking process. This paper allows moisture to escape while preserving the bark’s integrity.
Alternative Cooking Options
For those without access to smokers we include an oven-safe roasting pan as backup equipment. This option enables indoor brisket preparation while maintaining similar results to outdoor smoking methods.


Prep Instructions

Proper preparation sets the foundation for exceptional brisket that delivers maximum flavor and tenderness. We’ll guide you through the critical steps of trimming and seasoning your brisket for optimal results.
Trimming the Brisket
Start by removing excess fat from your brisket while leaving approximately 1/4 inch of fat cap to maintain moisture during the long cooking process. We focus on eliminating large hard fat deposits that won’t render properly but preserve the fat that adds flavor and prevents the meat from drying out.
Trim away any silver skin or tough connective tissue from the surface of the meat. This step allows our dry rub to penetrate deeper into the brisket and promotes more even cooking throughout. Use a sharp boning knife to make clean cuts and work systematically around the entire brisket.
Pay special attention to the point end where excess fat tends to accumulate. We recommend scoring the remaining fat cap in a crosshatch pattern to help with rendering and seasoning absorption. Remove any loose or hanging pieces of meat that could burn during cooking.
Applying the Dry Rub
Combine all dry rub ingredients in a large bowl and mix thoroughly to ensure even distribution of flavors. Our blend should include paprika brown sugar garlic powder onion powder chili powder salt black pepper cumin mustard powder chipotle powder thyme and optional cayenne for heat.
Apply the spice mixture generously over the entire surface of the trimmed brisket. We work the rub into every crevice and ensure complete coverage on all sides including the edges. Use your hands to massage the seasonings into the meat for better adhesion.
Wrap the seasoned brisket tightly in plastic wrap or place it in a large resealable bag. We allow the brisket to marinate with the dry rub for several hours or preferably overnight in the refrigerator. This extended contact time allows the salt to penetrate the meat and the spices to develop deeper flavors that will enhance the final product.


Make-Ahead Instructions

Planning ahead transforms your brisket cooking experience from stressful to seamless. We recommend preparing this dish up to 3 days before serving to maximize flavor development and reduce day-of-event pressure.
Cooling and Initial Storage
Allow the finished brisket to rest for 20-30 minutes after removing it from the smoker or oven. This resting period lets the juices redistribute throughout the meat while making it easier to handle. We find that cooling slightly before slicing prevents excessive juice loss and maintains the meat’s integrity.
Proper Slicing Technique
Slice the cooled brisket against the grain using a sharp carving knife. This cutting method breaks down the muscle fibers and ensures maximum tenderness when reheating. We always identify the grain direction before making our first cut to achieve consistent results across all slices.
Storage Guidelines
Store the sliced brisket with all cooking juices and sauce in airtight containers. The liquid keeps the meat moist during refrigeration and adds flavor when reheating. Refrigerated brisket maintains optimal quality for up to 3 days when properly stored.
| Storage Method | Duration | Temperature |
|---|---|---|
| Refrigerated | 3 days | 35-40°F |
| Frozen | 3 months | 0°F |
Freezing Options
Freezing extends your brisket’s shelf life without compromising taste or texture. Pack the sliced meat with sauce in freezer-safe containers or heavy-duty freezer bags. We remove excess air to prevent freezer burn and maintain quality during long-term storage.
Reheating Process
Reheat refrigerated brisket in a covered dish at 300-350°F until warmed through. Spoon reserved cooking juices over the slices before covering to maintain moisture. This gentle reheating method preserves the meat’s tenderness and prevents drying out.
Frozen brisket requires thawing in the refrigerator overnight before reheating. We never rush this process as gradual thawing maintains the meat’s texture and prevents uneven heating during the warming stage.


Cooking Directions

Now that we’ve prepared our brisket with the perfect dry rub, it’s time to begin the smoking process. The next several hours will transform our seasoned brisket into a tender, flavorful masterpiece through careful temperature control and patience.
Setting Up Your Smoker
We preheat our smoker to maintain a steady temperature between 225°F and 275°F, with most pitmasters targeting the 225-250°F range for optimal results. Oak serves as our primary hardwood base, and we often enhance the flavor profile by mixing in cherry or post oak. Our goal is to achieve consistent heat distribution throughout the cooking chamber while producing thin blue smoke rather than thick white smoke.
We ensure our smoker maintains stable temperature before placing the brisket inside. The wood chips should be producing clean smoke without excessive flame or heavy smoke output. We position our water pan if using an offset smoker to help regulate temperature and add moisture to the cooking environment.
Smoking the Brisket
We place our seasoned brisket fat side up on the smoker grates, allowing the rendered fat to naturally baste the meat during the cooking process. The point end of the brisket should face toward the heat source to ensure even cooking throughout both the flat and point sections. We resist the temptation to open the smoker lid for the first 3-4 hours, maintaining stable temperature and concentrated smoke flavor.
During the initial smoking phase, our brisket develops the crucial bark that seals in moisture and creates the signature texture. We maintain our target temperature consistently throughout this critical period. The smoking process typically takes about 8 hours for a 12-14 pound brisket before we begin checking for proper bark development.
Monitoring Temperature
We use a reliable meat thermometer to track the internal temperature, focusing our probe placement in the thickest part of the flat section. Temperature monitoring becomes crucial as we approach the various cooking milestones. We check our brisket’s progress without opening the smoker lid by using wireless thermometer systems when available.
Our target internal temperature markers guide us through the cooking process. We watch for the initial temperature rise during the first few hours of smoking. The meat temperature should climb steadily until it reaches approximately 150-170°F, where we encounter the stall phenomenon.
The Stall and Wrapping
We expect the stall to occur around 150-170°F, where the brisket’s internal temperature plateaus for several hours. During this phase, moisture evaporates from the meat surface, creating a cooling effect that slows the temperature increase. We exercise patience during this extended period, as rushing through the stall compromises the final texture.
When our brisket reaches 165-170°F and displays a well-developed bark, we wrap it tightly in butcher paper using the Texas Crutch method. We apply two full wraps to ensure complete coverage. Before wrapping, we generously pour liquified beef tallow over the brisket surface for enhanced moisture retention and flavor development.
We continue smoking the wrapped brisket until a probe thermometer inserts with minimal resistance, indicating proper tenderness. Our final internal temperature target ranges between 200°F and 208°F for perfect doneness. The wrapped brisket pushes through the stall more efficiently while maintaining the integrity of the bark we’ve worked to develop.


Resting and Slicing

After hours of careful smoking your brisket deserves the final crucial steps that transform it from good to exceptional. We’ll walk you through the essential resting and slicing techniques that ensure every bite delivers maximum tenderness and flavor.
Proper Resting Technique
We always allow our brisket to rest for at least 30 minutes before slicing to achieve optimal results. This resting period allows the juices to redistribute throughout the meat fibers making the brisket significantly more tender and moist.
We place the finished brisket on a large cutting board and tent it loosely with foil if needed to maintain warmth. The internal temperature will continue to rise slightly during this time which helps break down any remaining tough connective tissue.
We recommend extending the resting time to 45 minutes for larger briskets as this extra time allows the meat to reach its peak tenderness. During this waiting period we prepare our serving area and slice any accompaniments to make the most of this crucial resting phase.
How to Slice Brisket
We slice our brisket against the grain to ensure maximum tenderness with every bite. The grain refers to the direction of the muscle fibers which appear as parallel lines running across the surface of the meat.
We position our sharp knife perpendicular to these visible muscle lines and make clean cuts approximately 1/4 inch thick. This cutting technique breaks up the long muscle fibers making the brisket much easier to chew and more enjoyable to eat.
We start slicing from the flat end of the brisket and work our way toward the point maintaining consistent thickness throughout. The point section has a different grain direction so we adjust our cutting angle accordingly to continue slicing against the grain.
We use a sharp carving knife or electric knife to create clean cuts without tearing the meat. Each slice should hold together well while remaining tender enough to cut with a fork when properly sliced against the grain.


Serving Suggestions

We recommend serving our tender beef brisket with complementary sides that balance the rich, smoky flavors. Garlicky roasted red potatoes provide an earthy foundation that pairs beautifully with wine-braised brisket variations. The robust garlic notes enhance the meat’s complexity while the potatoes absorb those precious cooking juices.
Roasted asparagus makes an excellent vegetable accompaniment that cuts through the brisket’s richness. We find that this combination creates a well-rounded plate that satisfies without overwhelming the palate. The vegetables’ natural flavors complement rather than compete with our carefully crafted bark and smoke ring.
For barbecue-style presentations, we suggest incorporating corn-based sides that honor traditional BBQ culture. Corn fritters deliver a sweet crunch that contrasts beautifully with the tender meat texture. Corn casserole offers comfort food appeal while maintaining that essential sweetness that barbecue enthusiasts crave.
Refreshing salads provide necessary acidity to cleanse the palate between bites of rich brisket. We particularly enjoy crisp coleslaw or mixed greens with vinaigrette dressing. These lighter options prevent flavor fatigue during longer meals while adding textural variety to each forkful.
Baked sweet potatoes introduce natural sweetness that harmonizes with our dry rub’s brown sugar and spice blend. The creamy potato flesh absorbs the brisket’s rendered juices perfectly. We often serve these alongside our sliced brisket for guests who prefer sweeter flavor profiles.
Air fryer Moroccan-spiced carrots add international flair while maintaining the meal’s smoky essence. These flavorful vegetables bring warmth and complexity that enhances rather than masks the brisket’s carefully developed taste. Shredded Brussels sprouts provide another healthy option that balances the meal’s overall richness.
We love serving sliced brisket over creamy mashed potatoes with generous spoonfuls of cooking jus drizzled on top. This presentation transforms the dish into comfort food perfection while ensuring every drop of flavor reaches the plate. The starchy potatoes create an ideal base for showcasing our tender meat slices.
Toasted sandwich preparations offer casual serving alternatives that highlight the brisket’s versatility. We layer warm slices on crusty bread with melted cheese for satisfying handheld meals. These sandwiches work particularly well for informal gatherings where guests prefer portable options.
| Classic Sides | Modern Additions | Casual Options |
|---|---|---|
| Mashed potatoes with jus | Air fryer Moroccan carrots | Brisket sandwiches |
| Roasted red potatoes | Shredded Brussels sprouts | Corn fritters |
| Corn casserole | Mixed green salads | Toasted bread |
| Baked sweet potatoes | Coleslaw | Melted cheese |


Storage and Reheating Tips

Proper storage keeps our perfectly smoked brisket fresh and delicious for days after cooking. We always cool the brisket completely before wrapping it tightly in foil or placing it in an airtight container to lock in moisture. Refrigerated brisket stays fresh for up to 4 days when stored correctly.
Freezing extends storage life significantly. We wrap our brisket portions in heavy-duty foil or vacuum-sealed bags before freezing for up to 3 months. This method preserves both flavor and texture during long-term storage.
Reheating requires gentle heat to maintain the brisket’s tender texture. We preheat our oven to 250°F and wrap the brisket in foil with a splash of beef broth or water to prevent drying. This low and slow approach preserves the meat’s moisture and prevents the fibers from toughening.
Slow cookers offer another excellent reheating option. We place the wrapped brisket in the slow cooker on low heat with a small amount of liquid. Stovetop reheating works well too when we cover the meat and use gentle heat settings.
Microwave reheating should be avoided entirely. High heat from microwaves dries out the meat and creates tough, chewy fibers that ruin our carefully crafted brisket texture.
Resting after reheating makes a crucial difference. We let the reheated brisket sit for several minutes before slicing to allow the juices to redistribute evenly. Slicing against the grain remains essential even after reheating to ensure maximum tenderness in every bite.
Our storage approach maintains the brisket’s melt-in-your-mouth quality while preserving that robust smoky flavor profile we worked so hard to achieve.


Conclusion
We’ve shared everything you need to create restaurant-quality beef brisket right in your own backyard. This recipe transforms what seems like an intimidating cut of meat into something truly spectacular when you follow our proven techniques.
The key lies in patience and proper preparation. From our carefully crafted dry rub to the low-and-slow smoking process we’ve mastered over time creates layers of flavor that’ll have your guests asking for seconds.
Remember that great brisket isn’t rushed. Trust the process and let time work its magic. With these methods in your arsenal you’re ready to become the pitmaster your friends and family will rave about for years to come.
Frequently Asked Questions
What temperature should I maintain when smoking brisket?
Maintain a steady temperature between 225°F and 275°F throughout the smoking process. This low and slow approach ensures the tough connective tissues break down properly, resulting in tender, flavorful meat. Use a reliable thermometer to monitor your smoker’s temperature consistently.
How long should I let brisket rest after cooking?
Allow your brisket to rest for at least 30 minutes after cooking, with larger cuts resting up to 45 minutes. This resting period lets the juices redistribute throughout the meat, ensuring maximum tenderness and preventing juice loss when slicing.
Should I wrap my brisket during smoking?
Yes, wrapping your brisket in butcher paper (Texas Crutch method) helps retain moisture and enhances flavor development. Wrap when the bark has developed and the internal temperature stalls, typically around 160-170°F. Butcher paper is preferred over aluminum foil as it maintains bark integrity.
How do I slice brisket for maximum tenderness?
Always slice brisket against the grain using a sharp knife. Look for the direction of the muscle fibers and cut perpendicular to them. This technique breaks up the tough fibers, making each bite tender and easy to chew.
How long can I store cooked brisket?
Properly stored brisket lasts up to 4 days in the refrigerator or 3 months in the freezer. Store sliced brisket in airtight containers with cooking juices to maintain moisture. Cool completely before refrigerating and wrap tightly to prevent freezer burn.
What’s the best way to reheat leftover brisket?
Reheat brisket gently in a covered dish with a splash of beef broth or water to preserve moisture. Use an oven at low temperature or a slow cooker rather than a microwave. Allow the reheated brisket to rest briefly before serving.
Can I prepare brisket ahead of time?
Yes, you can prepare brisket up to 3 days in advance. Apply the dry rub and refrigerate the seasoned brisket to enhance flavor absorption. This make-ahead approach also reduces stress on serving day while improving the final taste.
What internal temperature should brisket reach when done?
Brisket is done when it reaches an internal temperature of 195-205°F and feels tender when probed. The meat should offer little resistance when a thermometer or probe is inserted, indicating the connective tissues have properly broken down.


