

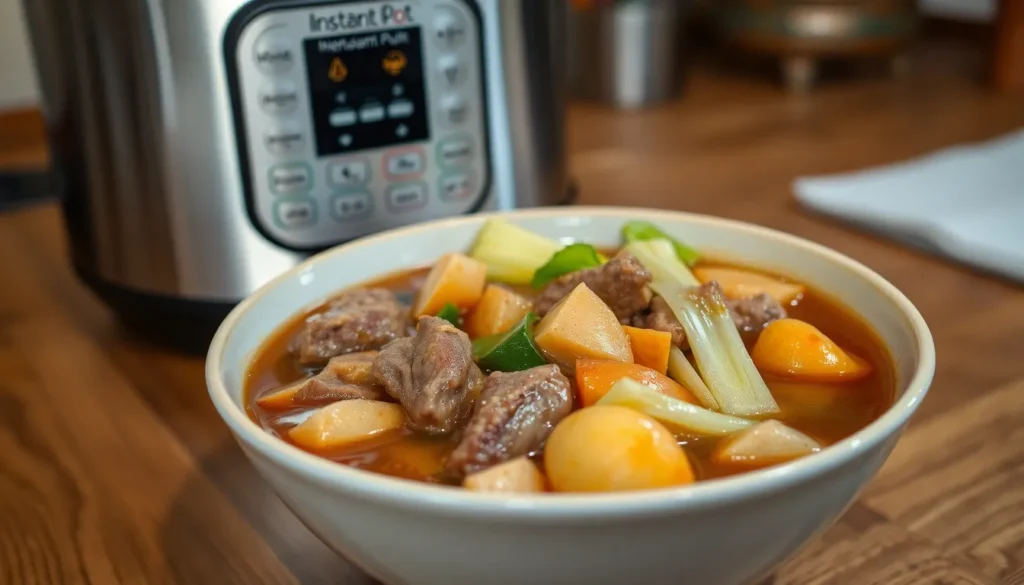
Nothing beats the soul-warming comfort of Filipino beef nilaga, especially when we can create this traditional soup in record time using our trusty Instant Pot. This beloved Filipino dish transforms tough cuts of beef into melt-in-your-mouth tender pieces swimming in a crystal-clear, flavorful broth that’s been simmering away the stress of any day.
We’ve perfected this pressure cooker version that delivers all the authentic flavors of grandma’s slow-cooked nilaga in just a fraction of the time. The magic happens when tender beef chuck meets perfectly cooked vegetables like corn cabbage and green beans – all infused with that signature peppercorn-kissed broth that makes nilaga so irresistible.
Ready to bring restaurant-quality Filipino comfort food to your dinner table tonight? Our foolproof Instant Pot beef nilaga recipe cuts hours off traditional cooking time while preserving every drop of that rich homestyle flavor your family craves.
Ingredients
We’ve carefully selected ingredients that deliver maximum flavor while keeping preparation simple for your Instant Pot. Our recipe combines traditional Filipino components with precise measurements for consistently delicious results.
For the Beef
- 2 pounds beef chuck roast, cut into 2-inch cubes
- 1 pound beef short ribs, cut into 2-inch pieces
- 1 large onion, quartered
- 4 cloves garlic, crushed
- 2 tablespoons vegetable oil
- 1 teaspoon salt
- 1/2 teaspoon black pepper
For the Vegetables
- 1 large daikon radish, peeled and cut into 2-inch chunks
- 4 medium potatoes, peeled and quartered
- 1 small cabbage, cut into large wedges
- 2 medium carrots, cut into 2-inch pieces
- 1 bunch bok choy, stems separated from leaves
- 6 green beans, trimmed and cut into 2-inch lengths
For the Broth
- 6 cups beef broth
- 2 bay leaves
- 1 tablespoon whole peppercorns
- 1 tablespoon fish sauce
- 2 teaspoons salt
- 1 beef bouillon cube
- 2 tablespoons soy sauce
Equipment Needed

Creating authentic beef nilaga becomes remarkably straightforward when we have the right tools at our disposal. Our Instant Pot serves as the cornerstone of this recipe, transforming what traditionally takes hours into a quick weeknight meal.
Essential Equipment:
- Instant Pot or electric pressure cooker – We rely on this appliance to tenderize tough beef cuts in a fraction of the traditional cooking time
- Sharp knife – Critical for cutting beef into uniform pieces and preparing vegetables
- Cutting board – We recommend using a large wooden or plastic board for safe food preparation
- Measuring cups and spoons – Accurate measurements ensure consistent flavor balance in our broth
- Wooden spoon or heat-resistant spatula – Perfect for sautéing aromatics and stirring ingredients without scratching the Instant Pot interior
Optional but Helpful Tools:
- Fine mesh strainer – Useful for skimming foam and impurities from the broth surface
- Ladle – Makes serving the finished nilaga much easier and cleaner
- Small bowls – We use these for organizing prepped ingredients before cooking begins
The beauty of pressure cooker nilaga lies in its simplicity. We don’t need specialized equipment or expensive gadgets to achieve restaurant quality results. Our standard Instant Pot handles everything from browning the beef to pressure cooking the final dish. This streamlined approach means less cleanup and more time enjoying our perfectly tender beef nilaga with family.
Prep Work

Proper preparation sets the foundation for tender beef and perfectly cooked vegetables in our nilaga. We’ll break down the process into manageable steps to ensure consistent results every time.
Preparing the Beef
We start by cutting our 2 pounds of beef chuck roast and 1 pound of beef short ribs into generous chunks. The bone-in pieces provide essential marrow that enriches our broth with deep flavor. Each piece should be roughly 2-3 inches to maintain texture during pressure cooking.
Pat the beef pieces completely dry with paper towels before seasoning. This step removes excess moisture that can prevent proper browning. Season all sides generously with kosher salt and freshly ground black pepper.
Select the sauté function on our Instant Pot and heat a tablespoon of cooking oil until shimmering. Brown the beef pieces in batches to avoid overcrowding. Each side needs 2-3 minutes to develop a rich golden crust that adds tremendous depth to the final broth.
Remove the browned beef and set aside on a plate. The fond left in the pot becomes the flavor base for our cooking liquid.
Preparing the Vegetables
We organize our vegetables by cooking time to ensure each maintains its ideal texture. Cut the daikon radish into 2-inch thick rounds since it takes longest to soften. Peel and quarter the potatoes into large chunks that won’t break apart during pressure cooking.
Slice the carrots into 1-inch diagonal pieces for even cooking. Cut the cabbage into thick wedges rather than shredding to prevent overcooking. Leave the core attached to keep each wedge intact.
Trim the bok choy stems and separate the leaves from the stalks. Cut the green beans into 2-inch lengths and remove any tough ends. These quicker-cooking vegetables will be added during the final pressure cooking stage.
Arrange the prepared vegetables in order of cooking time with the longest-cooking items ready to add first. This systematic approach prevents any vegetables from becoming mushy while ensuring others cook through completely.
Instructions

We’ll guide you through each step to create this flavorful Filipino comfort food using your Instant Pot. The pressure cooking method transforms tough beef into tender perfection while building rich, aromatic flavors.
Sautéing the Aromatics
Press the sauté button on your Instant Pot and heat a tablespoon of oil until shimmering. Add the diced onions and cook for 3-4 minutes until they become translucent and fragrant. The aromatics create our flavor foundation, so we want them softened but not browned. This step builds depth in our broth that pressure cooking alone cannot achieve.
Pressure Cooking the Beef
Add the seasoned beef chunks to the pot along with the beef short ribs if using. Pour in 6 cups of beef broth and add the bay leaves, whole peppercorns, and beef bouillon cube. The liquid should cover the meat by at least an inch. Secure the Instant Pot lid and set the valve to sealing position. Cook on high pressure for 30 minutes, allowing the tough connective tissues to break down completely. After cooking, let the pressure release naturally for 10 minutes before performing a quick release for any remaining pressure. Remove the lid carefully and skim any foam or excess fat from the surface using a ladle.
Adding the Vegetables
Switch your Instant Pot to sauté mode and bring the broth to a gentle simmer. Add the daikon radish and potatoes first, as these require the longest cooking time among our vegetables. Cook for 5 minutes before adding the carrots. After another 3 minutes, add the cabbage and green beans. Finally, add the bok choy during the last 2 minutes of cooking. Each vegetable maintains its ideal texture when added at the proper time.
Final Seasoning
Taste the broth and adjust the seasoning with fish sauce, starting with 2 tablespoons and adding more as needed. The fish sauce provides that authentic umami depth that makes Filipino nilaga so satisfying. Add salt and a splash of soy sauce if desired for additional flavor complexity. Remove the bay leaves before serving. Ladle the hot soup into bowls, ensuring each serving gets a generous portion of tender beef and vegetables alongside the rich, flavorful broth.
Instant Pot Settings and Timing

Getting the pressure cooker settings right transforms tough beef cuts into melt-in-your-mouth perfection. We’ve tested various timing combinations to bring you foolproof settings that deliver consistently tender results every time.
Initial Sauté Phase
Start by setting your Instant Pot to Sauté mode for the aromatics and beef browning process. This phase takes approximately 10 minutes total and builds the essential flavor foundation for your nilaga. We brown the beef in batches during this time to ensure each piece develops a rich caramelized exterior.
Primary Pressure Cooking Stage
Switch to Manual or Meat/Stew mode at high pressure for the main cooking period. Our testing shows that 30 minutes works perfectly for most beef cuts including chuck roast and short ribs. Tougher cuts like beef shank may require the full 45 minutes to achieve optimal tenderness.
| Cooking Phase | Instant Pot Setting | Time Duration | Pressure Level |
|---|---|---|---|
| Sauté aromatics and beef | Sauté mode | 10 minutes | N/A |
| Cook beef and broth | Manual/Meat Stew | 30-45 minutes | High pressure |
| Natural pressure release | N/A | 10 minutes | Natural release |
| Cook vegetables | Manual | 1 minute | High pressure |
| Wilt greens | Sauté mode | 1 minute | N/A |
Pressure Release Method
Allow for a natural pressure release lasting 10 minutes after the beef cooking cycle completes. This gradual pressure reduction prevents the meat from becoming tough and helps retain maximum juiciness. Follow with a quick release to finish venting any remaining pressure.
Vegetable Cooking Timing
Add your root vegetables and return to Manual mode for just 1 minute at high pressure. Quick release immediately after this short cycle to prevent overcooking the vegetables. We finish with a brief sauté phase lasting 1 minute to wilt the bok choy and other leafy greens.
Total Cooking Timeline
The entire Instant Pot beef nilaga process requires approximately 55 minutes of active cooking time. Factor in an additional 15 minutes for the pot to come to pressure and complete the natural release cycle. This streamlined approach delivers the same depth of flavor as traditional 3 hour stovetop methods in under 90 minutes total.
Natural Release vs Quick Release

Understanding the pressure release methods makes the difference between tender fall-off-the-bone beef and tough chewy meat in our beef nilaga. We always choose the natural release method for this recipe because it preserves the texture and juiciness of our beef cuts.
Natural release allows the pressure to decrease gradually on its own after cooking. We simply turn off the Instant Pot and wait for the pressure valve to drop naturally. This gentle process prevents the meat from toughening and helps it stay incredibly tender. Our beef becomes so soft it practically falls off the bone after this slow pressure release.
The natural release method also prevents our flavorful broth from splattering inside the pot. We typically wait 15 to 20 minutes for complete natural release with beef nilaga. This patience pays off with restaurant quality results every time.
Quick release rapidly forces the pressure out by manually turning the valve. While this method works well for vegetables and delicate ingredients we want to avoid overcooking it creates problems with tough beef cuts. The sudden pressure change causes meat fibers to contract quickly which results in tougher less tender beef.
We use quick release only when adding our vegetables during the final cooking phase. After our beef has finished its natural release cycle we add potatoes carrots and cabbage then use quick release for the 5 minute vegetable cooking time. This prevents our vegetables from becoming mushy while maintaining the perfect beef texture.
| Release Method | Time Required | Best Used For | Result |
|---|---|---|---|
| Natural Release | 15-20 minutes | Beef cooking phase | Tender fall-off-bone meat |
| Quick Release | 1-2 minutes | Vegetable cooking phase | Crisp tender vegetables |
The combination of natural release for beef and quick release for vegetables gives us the perfect balance of textures in our finished nilaga. Our beef stays incredibly tender while our vegetables maintain just the right amount of bite.
Serving Suggestions

We serve our Instant Pot beef nilaga hot with steamed white rice as the perfect foundation for this comforting Filipino soup. The fluffy rice soaks up the rich, savory broth while providing a neutral base that highlights the tender beef and vegetables.
Our favorite accompaniment includes a simple dipping sauce made from soy sauce mixed with fresh calamansi juice or white vinegar infused with minced garlic. This tangy condiment adds brightness to each bite of succulent beef and creates a perfect flavor contrast.
We recommend ladling generous portions into deep bowls, ensuring each serving contains plenty of tender beef chunks, colorful vegetables, and aromatic broth. The presentation becomes even more appealing when we arrange the vegetables artfully around the beef pieces.
Fresh ground black pepper should be available at the table for guests who prefer additional seasoning. We also keep extra fish sauce nearby for those who enjoy a more pronounced umami flavor in their soup.
For a complete Filipino dining experience, we often serve crispy fried garlic bits as a garnish, sprinkling them over the hot soup just before eating. The aromatic crunch adds textural interest and intensifies the overall flavor profile.
| Serving Component | Purpose | Quantity per Person |
|---|---|---|
| Steamed white rice | Base for absorbing broth | 1 cup |
| Dipping sauce (soy sauce + calamansi) | Flavor enhancement | 2-3 tablespoons |
| Fresh ground pepper | Seasoning to taste | As desired |
| Additional fish sauce | Extra umami depth | 1-2 teaspoons |
We find that serving the nilaga family style creates the most authentic experience, allowing everyone to customize their portions and seasonings according to personal preference. The communal aspect of sharing this hearty soup brings people together around the table, just as it has done in Filipino households for generations.
Storage and Reheating Instructions

Proper storage ensures our beef nilaga remains fresh and delicious for days after cooking. We recommend allowing the soup to cool completely at room temperature before transferring it to airtight containers. This prevents condensation from forming inside the container and diluting the rich broth we worked so hard to develop.
Refrigerator Storage: Store our cooled beef nilaga in the refrigerator within 2 hours of cooking to maintain food safety. The soup will keep well for 3-4 days when properly stored in sealed containers. We suggest using shallow containers rather than deep ones to help the soup cool more quickly and evenly.
Freezer Storage: For longer storage periods, we can freeze beef nilaga in freezer-safe containers for up to 2-3 months. Leave about an inch of space at the top of containers to allow for expansion during freezing. Label containers with the date to track freshness.
Reheating our beef nilaga correctly preserves the tender texture of the beef and vegetables we achieved through pressure cooking. We recommend thawing frozen nilaga overnight in the refrigerator before reheating to ensure even heating throughout.
Stovetop Reheating: Place the nilaga in a heavy-bottomed pot over medium heat. Stir occasionally to prevent sticking and ensure even heating. Add a small amount of water or beef broth if the consistency seems too thick after storage. Heat until the soup reaches a gentle simmer and the beef is heated through.
Microwave Reheating: Transfer individual portions to microwave-safe bowls and cover with a microwave-safe plate. Heat in 1-minute intervals, stirring between each interval, until thoroughly heated. This method prevents overheating that could make the beef tough.
Avoid boiling the reheated soup vigorously as this can cause the tender beef to become stringy and the vegetables to break apart. We want to maintain the perfect texture balance we created during the initial cooking process.
Recipe Variations

We love how adaptable this beef nilaga recipe is, allowing you to customize it based on your preferences or what ingredients you have on hand. The beauty of this Filipino comfort dish lies in its flexibility while maintaining that signature rich and savory broth.
Traditional Stovetop Method
For those who prefer the classic approach, the traditional stovetop method delivers exceptional depth of flavor through slow cooking. We use tougher cuts like beef shank or brisket, which require 2-3 hours of gentle simmering to become fork tender. The process begins by browning the beef in a heavy pot, then adding onions and whole peppercorns to simmer with the meat in water or beef broth. This extended cooking time allows the collagen in the bones to break down completely, creating a naturally rich and gelatinous broth. We add vegetables during the final 30 minutes of cooking to prevent them from becoming mushy. While this method requires constant monitoring and longer cooking time, it rewards you with incredibly tender meat that falls off the bone and a deeply flavorful broth that captures the essence of traditional Filipino cooking.
Vegetable Substitutions
The vegetable selection for beef nilaga can be completely customized based on seasonal availability and personal taste preferences. Instead of traditional potatoes and carrots, we often substitute kamote (sweet potatoes) for their natural sweetness that beautifully contrasts the savory broth. Saba bananas add a unique tropical flavor and creamy texture that melts into the soup. Chayote provides a crisp texture and mild flavor that absorbs the beef broth wonderfully. Long beans and napa cabbage offer different textures while maintaining the dish’s nutritional value. We particularly enjoy adding bok choy and baby corn for their distinctive flavors and appealing presentation. Corn on the cob remains a popular addition that brings natural sweetness and hearty substance to each bowl. The key is organizing vegetables by their cooking times, adding heartier root vegetables first and finishing with delicate greens like lettuce or bok choy to maintain their vibrant color and crisp texture.
Tips for Perfect Beef Nilaga

We’ve discovered several key techniques that elevate beef nilaga from good to exceptional when using the Instant Pot. Our experience shows that selecting the right beef cuts makes all the difference in achieving tender, flavorful results.
Choose the Best Beef Cuts
Neck bones, chuck roast, beef shank, and short ribs deliver the most tender meat and richest broth flavor. These tougher cuts benefit from the 30-45 minute pressure cooking time, transforming into melt-in-your-mouth pieces that fall off the bone. We recommend avoiding lean cuts like sirloin, which can become dry and tough under pressure.
Brown Your Meat First
Sautéing the beef before pressure cooking creates a deeper, more complex flavor profile. We use the Instant Pot’s sauté function to brown the meat in batches, ensuring each piece develops a rich caramelized surface. This extra step adds important depth to the final broth color and taste.
Never Skip the Deglazing Step
After browning the meat, we add a splash of water or broth to scrape up those flavorful browned bits from the bottom of the pot. This prevents the dreaded “burn” warning during pressure cooking while incorporating those savory fond flavors into the broth. We use a wooden spoon to gently release any stuck pieces.
Master the Pressure Release Technique
Natural pressure release keeps the meat tender and prevents juices from escaping too quickly. We allow the Instant Pot to naturally release pressure for 10 minutes after the beef cooking cycle, then perform a quick release for safety. This method ensures the meat stays juicy and doesn’t become stringy.
Time Your Vegetables Perfectly
Adding vegetables at the right moment prevents overcooking while ensuring proper doneness. We add firm vegetables like potatoes and carrots during the final 1-3 minutes of cooking, while leafy greens like cabbage and bok choy only need about 1 minute in the residual heat to wilt perfectly.
Season with Fish Sauce
Fish sauce (patis) provides the authentic umami depth that salt alone cannot achieve. We use 3-5 tablespoons throughout the cooking process, balancing the saltiness with the rich, savory flavor that defines traditional Filipino nilaga. Always taste and adjust the seasoning before serving.
Skim for Clarity
Removing excess fat and foam after pressure cooking creates a cleaner, more appealing broth. We use a ladle or fine mesh strainer to skim the surface, resulting in a clearer soup that looks as good as it tastes.
Customize Your Vegetable Selection
Beyond the traditional potatoes and carrots, we love experimenting with sweet potatoes, saba bananas, long beans, and chayote. Each vegetable adds its own unique texture and flavor while maintaining the dish’s authentic character. The key is adding vegetables based on their cooking times to achieve the perfect texture.
Serve Immediately Over Rice
Hot nilaga over steamed white rice allows the grains to absorb the savory broth, creating the perfect bite. We serve generous portions in deep bowls, ensuring each serving contains plenty of tender beef and colorful vegetables floating in the rich, aromatic broth.
Conclusion
We’ve shown you how to transform this beloved Filipino comfort food into a quick weeknight dinner without sacrificing any of the authentic flavors. The Instant Pot method delivers the same tender beef and rich broth that takes hours on the stovetop in just about 90 minutes total.
This recipe brings families together around the table just like traditional nilaga has done for generations. Whether you’re making it for a cozy Sunday dinner or meal prepping for the week ahead the results are consistently delicious.
Now it’s time to fire up your pressure cooker and experience the magic of homemade beef nilaga. Your kitchen will smell incredible and your family will be asking for seconds before they’ve finished their first bowl.
Frequently Asked Questions
What is beef nilaga and why is it popular in Filipino cuisine?
Beef nilaga is a traditional Filipino comfort soup made with tender beef chunks, fresh vegetables, and a rich, flavorful broth. It’s popular because it transforms tough beef cuts into melt-in-your-mouth pieces while creating a hearty, satisfying meal that brings families together. The dish represents the essence of Filipino home cooking with its simple yet deeply comforting flavors.
How long does it take to make beef nilaga in an Instant Pot?
Making beef nilaga in an Instant Pot takes approximately 55 minutes of active cooking time, plus additional time for pressure buildup and release. The total time is under 90 minutes, which is significantly faster than traditional stovetop methods that can take 2-3 hours while delivering the same authentic flavor and tender results.
What are the best cuts of beef for nilaga?
The best beef cuts for nilaga include chuck roast, beef short ribs, beef shank, and neck bones. These tougher cuts contain connective tissue that breaks down during pressure cooking, creating incredibly tender meat and adding richness to the broth. A combination of different cuts provides the most flavorful and textured results.
What vegetables are traditionally used in beef nilaga?
Traditional beef nilaga vegetables include daikon radish, potatoes, cabbage, carrots, bok choy, and green beans. You can also substitute with sweet potatoes, saba bananas, chayote, or corn on the cob based on preference and availability. The key is organizing vegetables by cooking time to ensure proper texture.
How should I store and reheat leftover beef nilaga?
Cool the nilaga completely before storing in airtight containers in the refrigerator for 3-4 days or freezer for 2-3 months. Reheat gently on the stovetop over medium heat or in the microwave, avoiding vigorous boiling to preserve the tender texture of beef and vegetables. Stir occasionally during reheating.
What’s the difference between natural and quick pressure release for nilaga?
Natural pressure release allows the Instant Pot to depressurize gradually, keeping the beef tender and juicy by preventing rapid temperature changes. Quick pressure release is used for vegetables to stop cooking immediately and maintain their crisp texture. This combination ensures perfect texture balance in the finished dish.
What should I serve with beef nilaga?
Serve beef nilaga hot over steamed white rice, which absorbs the rich broth beautifully. Provide a dipping sauce made from soy sauce and calamansi juice or garlic-infused vinegar. Offer fresh ground black pepper and extra fish sauce on the side for personal seasoning preferences.
Can I make beef nilaga without an Instant Pot?
Yes, you can make traditional beef nilaga on the stovetop using a heavy-bottomed pot. Brown the beef first, add broth and seasonings, then simmer for 2-3 hours until tender. Add vegetables in the final 30 minutes based on their cooking times. The process takes longer but yields equally delicious results.


