

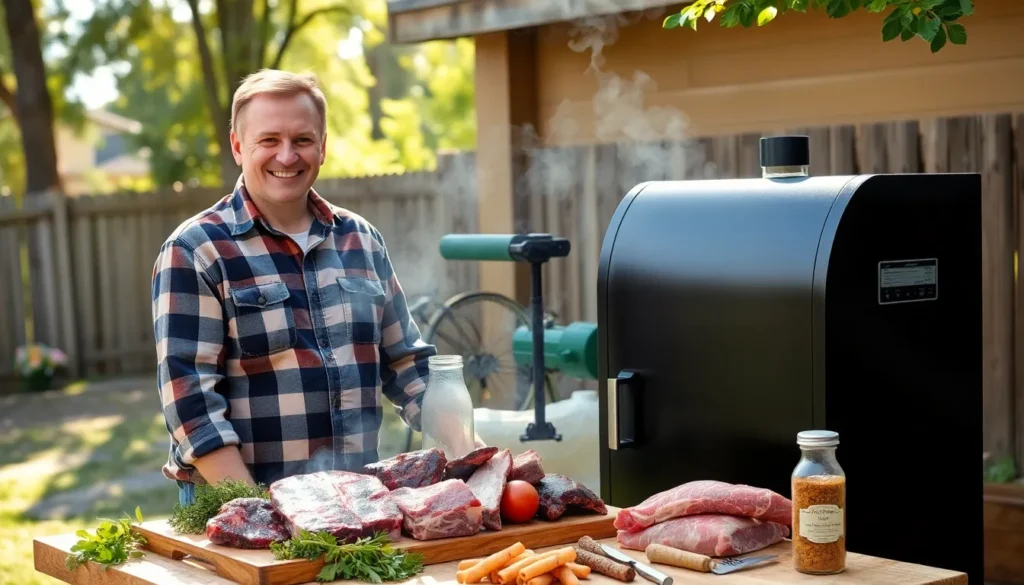
Nothing beats the satisfaction of making your own beef jerky at home, especially when you’ve got a smoker ready to work its magic. We’re about to transform ordinary beef into that perfect chewy, flavorful snack that disappears faster than you can make it.
Smoking beef jerky takes this beloved protein-packed treat to the next level. The low-and-slow smoking process infuses deep, smoky flavors that you simply can’t achieve with a dehydrator or oven. We’ve perfected this technique through countless batches, and now we’re sharing our foolproof method that delivers consistently delicious results every single time.
Our smoker beef jerky recipe combines the right cut of meat, a perfectly balanced marinade, and precise temperature control to create jerky that’s tender yet chewy with an irresistible smoky finish. Whether you’re prepping for hiking trips, stocking up for game day, or just want a healthy snack on hand, this homemade jerky will become your new obsession.
Equipment Needed
Having the right equipment makes the difference between mediocre jerky and restaurant-quality results. We’ll walk you through the essential gear that transforms your smoking session into a jerky-making masterpiece.
Smoker Setup
Our smoker serves as the foundation for creating exceptional beef jerky with that signature smoky flavor. Electric smokers work best for beginners because they maintain consistent temperatures without constant monitoring. Pellet smokers offer excellent temperature control and infuse amazing wood flavors throughout the smoking process.
We recommend setting up your smoker in a well-ventilated area away from overhanging structures. The ideal smoking temperature ranges between 160°F and 180°F for beef jerky. Temperature consistency matters more than the exact smoker type you choose.
Wood selection plays a crucial role in flavor development. Hickory provides bold smoky notes while apple wood delivers subtle sweetness. Cherry wood adds mild fruity undertones that complement beef beautifully. We suggest avoiding mesquite for jerky since its intense flavor can overpower the meat.
Essential Tools
Sharp knives are non-negotiable for proper jerky preparation. We use a high-quality chef’s knife or electric slicer to achieve uniform meat thickness. Consistent slicing ensures even drying and prevents some pieces from becoming too tough while others remain undercooked.
Digital thermometers help us monitor both smoker temperature and internal meat temperature accurately. Instant-read thermometers work well for quick checks while probe thermometers allow continuous monitoring throughout the smoking process.
Wire racks or jerky screens maximize airflow around each piece of meat. We place these racks directly on smoker grates to ensure proper air circulation. Aluminum foil underneath catches drippings and makes cleanup easier.
Food-safe gloves protect our hands during meat handling and make the slicing process more sanitary. We recommend nitrile gloves since they resist punctures better than latex alternatives.
Storage containers with tight-fitting lids keep finished jerky fresh for weeks. Vacuum sealing bags extend shelf life even further by removing air that causes spoilage.


Selecting the Right Cut of Beef

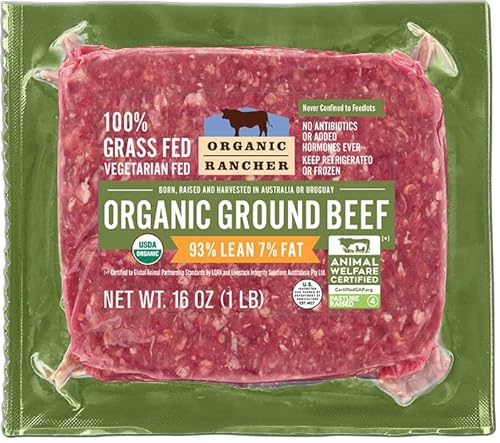
We need to prioritize leanness when choosing our beef for smoking jerky since fat content directly impacts the quality and shelf life of our final product. Fat does not dehydrate well and can cause spoilage much faster than lean meat. Professional jerky makers understand this principle and consistently select cuts with minimal intramuscular and intermuscular fat content.
Top round stands out as our go-to choice for smoked beef jerky. This cut comes from the upper inside leg muscle and offers the perfect balance of size, shape, and flavor that we need for consistent results. Professional jerky makers rely on top round because it processes efficiently for large batches while maintaining moderate tenderness throughout the smoking process.
Bottom round provides another excellent option from the upper outside of the rear leg. We find this cut delivers exceptional leanness at an affordable price point, though it requires slightly more attention due to its tougher connective tissue. The low fat content makes it ideal for our smoking and dehydrating process.
Eye of round offers superior texture and relative tenderness compared to other round cuts. We appreciate its lean profile, though it typically commands a higher price and may be less readily available than top round at standard grocery stores.
Sirloin tip represents the leanest option from the posterior round section. We recommend checking with local butcher shops if your grocery store doesn’t carry this cut, as it may require special ordering even though being less tender than eye of round.
| Cut | Location | Tenderness | Fat Content | Availability |
|---|---|---|---|---|
| Top Round | Upper inside leg | Moderate | Low | High |
| Bottom Round | Upper outside rear leg | Tough | Very Low | High |
| Eye of Round | Center rear leg | Tender | Low | Medium |
| Sirloin Tip | Posterior round | Less tender | Very Low | Low |
Flank steak and skirt steak can work for jerky when trimmed carefully, though we use these cuts less frequently than our preferred round options. These cuts offer good flavor but require more preparation time to remove excess fat and connective tissue.
Our selection process focuses on cuts from the round primal because they naturally balance the flavor, texture, and preservation qualities essential for successful smoked jerky. These lean roasts provide the foundation we need for creating jerky with optimal shelf stability and that distinctive smoky flavor we’re after.


Ingredients

Our smoked beef jerky recipe requires carefully selected ingredients to achieve that perfect balance of flavor and texture. We’ve organized everything you need into three categories to make preparation simple and efficient.
For the Beef
- 2.5 lbs Top Round, Flank Steak, or Beef Round (trimmed of all visible fat)
- Meat should be sliced into 1/4-inch thick strips against the grain
- Pro tip: Place the beef in the freezer for 1-2 hours before slicing to make cutting easier and more uniform
For the Marinade
- 1/2 cup soy sauce (provides umami base and tenderizing properties)
- 1/2 cup Worcestershire sauce (adds depth and complexity)
- 1/2 cup brown sugar (balances saltiness with subtle sweetness)
- 1/2 tbsp smoked paprika (enhances the smoky flavor profile)
- 1 tsp black pepper (freshly ground preferred)
- 1 tsp garlic powder
- 1 tsp onion powder
Optional Seasonings
- 1 tsp ginger powder (adds warmth and slight spice)
- Crushed red pepper flakes (adjust to taste for heat level)
- Honey (for additional sweetness and glossy finish)
- Sea salt (use sparingly as soy sauce provides important sodium)
- Meat tenderizer (helps break down tough fibers)
- Smoked chili powder (intensifies smoky notes)
- Ground coriander (adds citrusy undertones)


Prep Work

Before we start smoking our beef jerky, we need to properly prepare our meat through trimming, slicing, and marinating. These foundational steps ensure our jerky develops the perfect texture and flavor profile.
Trimming the Meat
We always start by selecting lean cuts like eye of round or top round since they contain minimal fat content. Fat doesn’t dry properly during the smoking process and can cause our jerky to spoil quickly. Using a sharp knife, we carefully trim off all visible fat from our beef cuts. This step significantly improves both the shelf life and texture of our finished jerky. Our goal is to have completely lean meat that will dehydrate evenly throughout the smoking process.
Slicing Techniques
We slice our trimmed beef into strips approximately 1/8 inch thick for optimal smoking results. The direction we slice depends on our texture preference – slicing against the grain creates tender jerky while slicing with the grain produces a chewier texture. For consistently thin slices, we use either a sharp knife or set our meat slicer to setting #3.
Partially freezing the meat for 1-2 hours before slicing makes this process much easier and helps us achieve uniform thickness. We maintain steady pressure while slicing to ensure each strip is evenly cut. Consistent slice thickness guarantees that all pieces will smoke and dry at the same rate.
Marinating Process
We create our flavorful marinade by combining soy sauce (preferably low sodium), bourbon or apple juice, dry rub seasonings, barbecue sauce, raw honey, and black pepper. Once our marinade is well mixed, we place our beef slices into the mixture and ensure every piece gets completely covered.
We marinate our beef in the refrigerator for 6 to 24 hours to allow the flavors to penetrate thoroughly. During this time, we massage the meat occasionally to redistribute the marinade evenly across all surfaces. The longer marinating time develops deeper flavors while the acids in our marinade help tenderize the meat fibers. We always use a non-reactive container like glass or food-grade plastic to prevent any metallic flavors from affecting our jerky.

Smoker Setup and Temperature Control

Achieving perfect beef jerky requires precise temperature control and proper smoker preparation. We focus on maintaining consistent heat and smoke levels to dehydrate the meat without overcooking it.
Preparing Your Smoker
We recommend preheating your smoker to the target temperature before placing the jerky inside. For most electric smokers like the Bradley model, we maintain temperatures between 165°F and 170°F during the entire drying process.
Our setup process begins with adding wood chips or chunks to generate smoke before laying down the meat strips. We suggest adding a small amount of water to the reservoir if your smoker has this feature to help maintain proper humidity levels.
We arrange the marinated beef strips on heatproof racks or grilling mesh with adequate spacing between each piece. This arrangement allows proper air circulation around every strip and ensures even drying throughout the smoking process. We avoid overcrowding the racks as this prevents uniform dehydration and can create uneven texture in the finished jerky.
Wood Selection
We prefer fruit woods like apple and cherry for smoking beef jerky as they provide rich, balanced smoke flavors without overwhelming the meat’s natural taste. Hardwoods such as hickory and oak also work excellently for creating deep, smoky profiles that complement the beef.
Our wood preparation involves adding chips or chunks at the beginning of the smoking process and replenishing them as needed to maintain steady smoke production. We monitor the smoke output throughout the drying period to ensure consistent flavor development in every batch.
Temperature Guidelines
We follow exact temperature ranges depending on our chosen smoking method. The table below outlines our recommended temperatures for different approaches:
| Smoking Method | Temperature Range | Notes |
|---|---|---|
| Hot Smoking | 160-180°F (71-82°C) | Ideal for dehydrating and flavor infusion |
| Cold Smoking | ~120°F (49°C) | Flavorful but requires post-heat treatment |
| Post-Drying Heating | 275°F (135°C) for 10 min | Ensures pathogen elimination after cold smoking |
We set temperature alarms on our smokers with low alerts around 155°F and high alerts at 185°F to maintain perfect drying conditions. This monitoring system prevents temperature fluctuations that could affect the jerky’s final texture and safety.
Our experience shows that avoiding frequent smoker opening is crucial during the process. Each time we open the smoker door, we lose both temperature and smoke levels, which extends the drying time and can create inconsistent results. We recommend checking progress only when absolutely necessary and keeping door openings brief.
Instructions

Follow these detailed steps to transform your marinated beef into perfectly smoked jerky. We’ll guide you through each stage to ensure consistent results every time.
Loading the Smoker
We start by preheating our smoker to the optimal temperature range of 160°F to 200°F based on your exact equipment type. Pellet smokers work best at 200°F while electric smokers perform optimally between 160°F and 180°F.
Remove the marinated beef strips from the refrigerator and arrange them on wire racks or grill grates with adequate spacing between each piece. Proper airflow circulation around every strip ensures even drying and smoke penetration throughout the process.
Position the loaded racks in your preheated smoker carefully to avoid overcrowding. Each piece needs room for air and smoke to circulate freely around all surfaces for uniform texture development.
Smoking Process
Begin smoking at your established temperature and maintain consistent heat throughout the entire process. Different smoker types require varying time commitments based on their heating methods and airflow design.
| Smoker Type | Temperature | Time Range | Check Point |
|---|---|---|---|
| Pellet Smokers | 200°F | 3-5 hours | Start checking at 3 hours |
| Electric Smokers | 160-180°F | 6-10 hours | Check after 6 hours |
Monitor the smoking environment by keeping vents partially open during the final drying stages to enhance airflow and accelerate moisture removal. Some recipes benefit from smoking for 2 hours initially then transferring to a dehydrator at the same temperature for an additional 5-6 hours to achieve optimal texture.
Resist the urge to open the smoker door frequently as this disrupts temperature stability and extends cooking time significantly.
Monitoring Progress
Test doneness by removing a single piece of jerky and allowing it to cool for 5-10 minutes before handling. Properly dried jerky bends and develops visible cracks without breaking completely in half when flexed.
Watch for white fibers appearing on the surface as another reliable indicator of proper drying completion. The texture should feel firm yet flexible rather than brittle or overly soft.
Avoid over-drying as this creates an unpleasantly tough final product that lacks the desired chewy consistency. Remove finished jerky promptly and place on paper towels or cooling racks before packaging for storage.
Checking for Doneness

The most critical moment in our smoking process arrives when we determine whether our jerky has reached the perfect texture. We need to look for exact visual and tactile cues that indicate our beef jerky is ready to come off the smoker.
The Bend Test Method
We recommend removing a test piece from the smoker and allowing it to cool for 5 to 10 minutes before checking doneness. The cooled jerky should bend easily without breaking in half when we apply gentle pressure. White fibers appearing along the bend indicate that our jerky has reached the ideal dryness level.
Temperature Guidelines
Our internal meat temperature should reach at least 165°F when measured with a digital thermometer. This temperature ensures food safety while maintaining the desired texture we want in our finished product.
Visual and Texture Indicators
Properly finished jerky displays a dry exterior while retaining slight flexibility throughout the piece. We should be able to bend our jerky without it snapping or crumbling apart. The surface appears darker and feels firm to the touch but not brittle.
Timing Considerations by Smoker Type
| Smoker Type | Temperature Range | Check Time |
|---|---|---|
| Pellet Smoker | 200°F | Start checking at 3 hours |
| Traditional Smoker | 160°F-180°F | Begin testing at 2-3 hours |
| Electric Smoker | 150°F-200°F | Check every hour after 2 hours |
Avoiding Common Mistakes
Overcooked jerky becomes brittle and breaks easily when bent. We want to avoid this texture because it indicates we have removed too much moisture from our meat. The jerky should crack slightly when bent but never snap completely in half.
Final Assessment
Our jerky is ready when it feels leathery but remains pliable. The piece should return to its original shape after bending without leaving permanent creases or breaks. We know we have achieved success when the jerky tears rather than breaks cleanly when pulled apart.


Storage and Shelf Life

Proper storage techniques determine how long our homemade smoked beef jerky maintains its quality and flavor. Following the right storage methods ensures we can enjoy our jerky for weeks or even months after smoking.
Proper Storage Methods
We recommend storing completely cooled jerky in airtight containers to maintain freshness and prevent moisture absorption. Zip-top bags work well for short-term storage while vacuum-sealed bags provide superior protection for longer periods.
Refrigeration extends the shelf life significantly compared to room temperature storage. We place our sealed jerky containers in the refrigerator immediately after cooling to maximize freshness. For extended storage periods we freeze the jerky in sealed bags to preserve quality.
Food-safe storage containers prevent contamination and maintain the jerky’s texture. We avoid storing jerky in containers that previously held other foods unless they have been thoroughly cleaned and sanitized.
How Long It Keeps
Our properly stored smoked beef jerky maintains quality for exact timeframes depending on storage conditions:
| Storage Method | Duration |
|---|---|
| Refrigerated (airtight container) | 2-3 weeks |
| Frozen (sealed bags) | Several months |
| Room temperature (thoroughly dried and sealed) | Short periods only |
Refrigerated jerky typically keeps well for 2 to 3 weeks when stored in airtight containers. The cold temperature slows bacterial growth and maintains the jerky’s chewy texture.
Frozen jerky maintains quality for several months without important deterioration in taste or texture. We wrap individual portions in freezer-safe bags to prevent freezer burn and make it easy to thaw only what we need.
Room temperature storage works only for short periods and requires thoroughly dried jerky sealed in moisture-proof containers. We avoid extended room temperature storage because moisture promotes spoilage and reduces the jerky’s shelf life significantly.
Troubleshooting Tips

We understand that smoking beef jerky can present unique challenges that may affect your final product. Addressing these common issues will help you achieve consistently excellent results every time.
Heavy White Smoke
When we notice thick white smoke billowing from our smoker it indicates poor wood combustion. This type of smoke can create bitter flavors in your jerky and should be avoided. We need to adjust airflow by opening vents and ensure our wood is burning correctly to produce clean blue smoke instead.
Jerky Sticking to Racks
Our jerky strips often adhere to smoking racks during the dehydration process. We recommend lightly oiling the racks before placing meat or brushing a thin layer of oil directly onto the meat slices. This simple step prevents tearing and ensures easy removal once smoking is complete.
Moisture Not Evaporating Properly
Trapped moisture can prevent proper dehydration and lead to spoilage. We must keep all smoker vents wide open throughout the smoking process to allow moisture to escape efficiently. Poor ventilation extends smoking time and can result in improperly dried jerky.
Uneven Drying Patterns
Inconsistent thickness in meat slices creates uneven drying where some pieces finish before others. We need to cut all strips uniformly at 1/8 to 1/4 inch thickness and arrange them with adequate space between each piece on the rack. This ensures consistent airflow around every strip.
Excessive Fat Content Issues
Fat reduces shelf life and can cause rancidity in finished jerky. We should use only the leanest cuts like top round or bottom round and trim away all visible fat before marinating. Even small amounts of fat can compromise the quality and storage life of our jerky.
Temperature Control Problems
Maintaining the ideal temperature range between 150°F and 170°F requires constant monitoring. We recommend using digital thermometers to track both smoker temperature and internal meat temperature. Temperatures above 180°F cook the meat too quickly while temperatures below 140°F may not adequately dehydrate or eliminate pathogens.
Cleaning Difficulties
Cleanup becomes manageable when we line drip pans with aluminum foil and place foil sheets above heating elements. This preparation catches drippings and prevents buildup that requires intensive scrubbing later. We save important time and effort with this simple preventive measure.
Flavor Variations

We can transform our basic smoked beef jerky recipe into countless delicious variations by adjusting the marinade ingredients. These flavor profiles allow us to customize our jerky to match different taste preferences and occasions.
Spicy Jerky Options
We recommend adding crushed red pepper flakes as the foundation for creating spicy jerky variations. Cayenne pepper provides intense heat that penetrates deep into the meat during the marinating process. Smoked paprika delivers both heat and complementary smoky notes that enhance the overall flavor profile.
Hot sauce works exceptionally well when mixed directly into our marinade base. We suggest incorporating extra black pepper for a more complex spicy flavor that builds gradually. Smoked ghost pepper creates an extreme heat level for those seeking maximum intensity in their jerky.
These spicy additions should be adjusted according to personal heat tolerance levels. We typically start with smaller amounts and increase gradually during future batches.
Sweet and Savory Blends
Brown sugar creates the perfect foundation for sweet jerky variations by balancing the saltiness of soy sauce. Honey adds natural sweetness while helping the marinade adhere better to meat surfaces. Maple syrup provides unique flavor depth that pairs exceptionally well with smoked meats.
We combine these sweet elements with Worcestershire sauce to maintain savory complexity in our jerky. Garlic powder and onion powder add essential aromatic components that complement both sweet and salty flavors. Liquid smoke intensifies the overall smokiness when we want more pronounced wood flavors.
| Sweet Ingredient | Recommended Amount | Flavor Profile |
|---|---|---|
| Brown Sugar | 2-3 tablespoons | Caramelized sweetness |
| Honey | 1-2 tablespoons | Floral sweetness |
| Maple Syrup | 1-2 tablespoons | Rich, complex sweetness |
These sweet and savory combinations work particularly well with hickory or apple wood chips during the smoking process. We find that cherry wood also complements sweet marinades by adding subtle fruity undertones to the finished jerky.


Conclusion
We’ve shared everything you need to master the art of smoking beef jerky at home. From selecting the perfect cut of meat to achieving that ideal leathery texture we all crave in quality jerky.
The beauty of this recipe lies in its flexibility – you can adjust seasonings create your own signature flavors and experiment with different wood combinations. Whether you’re preparing snacks for camping trips or looking to impress friends and family this method delivers consistently outstanding results.
Remember that patience is key when smoking jerky. Don’t rush the process and always prioritize food safety by monitoring temperatures closely. With practice you’ll develop an intuitive feel for when your jerky reaches that perfect balance of moisture and chewiness.
Start your first batch this weekend and discover why homemade smoked beef jerky beats store-bought versions every time.
Frequently Asked Questions
What temperature should I use to smoke beef jerky?
The optimal temperature range for smoking beef jerky is between 160°F and 180°F. Some smokers can handle up to 200°F, but staying within the lower range ensures better texture and prevents overcooking. Electric smokers are recommended for beginners due to their consistent temperature control, making it easier to maintain the precise heat needed for perfect jerky.
Which cut of beef is best for making jerky?
Top round is the preferred cut for smoking jerky due to its ideal balance of size, shape, and flavor. Bottom round and eye of round are also excellent choices because of their leanness and texture. Sirloin tip offers the leanest option but may require special ordering. All these cuts come from the round primal, which provides optimal flavor and preservation qualities.
How long should I marinate the beef before smoking?
Marinate the beef for 6 to 24 hours to allow the flavors to penetrate the meat thoroughly. The marinade should include soy sauce, Worcestershire sauce, brown sugar, and various seasonings. Longer marinating times result in deeper flavor penetration, but avoid exceeding 24 hours as the meat can become too salty or the texture may break down.
What type of wood should I use for smoking jerky?
Hickory, apple, and cherry woods are ideal for smoking jerky as they provide excellent flavor enhancement without being overpowering. Avoid mesquite wood as it can create an overpowering taste that masks the beef’s natural flavor. Fruit woods like apple and cherry offer milder, sweeter smoke profiles, while hickory provides a stronger, traditional smoky flavor.
How do I know when my beef jerky is done?
Use the Bend Test Method to check doneness. Properly finished jerky should bend easily without breaking and display white fibers along the bend. The internal temperature must reach at least 165°F for food safety. The jerky should feel leathery yet pliable, not brittle or overly dry. Visual cues include a dark, consistent color throughout.
How should I store homemade smoked beef jerky?
Store completely cooled jerky in airtight containers. Use zip-top bags for short-term storage (up to one week at room temperature) and vacuum-sealed bags for longer periods. Refrigerated jerky lasts 2-3 weeks, while frozen jerky maintains quality for several months. Always ensure the jerky is completely dry before storage to prevent spoilage.
How thick should I slice the beef for jerky?
Slice the beef into strips approximately 1/8 to 1/4 inch thick for optimal results. Cut against the grain to ensure tenderness in the final product. For easier and more uniform slicing, place the beef in the freezer for 1-2 hours before cutting. Consistent thickness ensures even drying and prevents some pieces from being over or under-dried.
What equipment do I need to make smoked beef jerky?
Essential equipment includes an electric smoker (recommended for beginners), sharp knives for uniform slicing, digital thermometers for temperature monitoring, and wire racks for proper airflow. Food-safe gloves maintain hygiene during preparation, while vacuum-sealing bags help preserve the finished product. Quality tools significantly improve the final jerky’s texture and flavor.
Can I add different flavors to my jerky recipe?
Yes, you can customize your jerky with various flavor profiles. Create spicy jerky by adding crushed red pepper flakes, cayenne pepper, or hot sauce to the marinade. For sweet and savory blends, incorporate brown sugar, honey, and maple syrup. Optional seasonings include ginger powder, smoked chili powder, and ground coriander to enhance complexity and match your taste preferences.
What are common mistakes to avoid when smoking jerky?
Avoid overcrowding the smoker racks, which prevents proper airflow and even drying. Don’t overcook the jerky, as this creates a brittle texture instead of the desired leathery feel. Ensure you trim all visible fat from the meat to improve shelf life and texture. Monitor temperatures consistently and avoid using too much mesquite wood, which can overpower the beef’s natural flavor.


