

We know you’re looking for that perfect comfort food that’ll have your family gathering around the dinner table with anticipation. Beef arm roast delivers exactly that – a budget-friendly cut that transforms into fork-tender perfection when cooked with patience and the right technique.
This underrated gem from the chuck section packs incredible flavor that rivals more expensive roasts. We’ve discovered the secret lies in slow cooking methods that break down those tough fibers into melt-in-your-mouth goodness. Whether you’re feeding a crowd or meal prepping for the week this versatile cut won’t disappoint.
What makes our beef arm roast recipe special is how we maximize flavor while keeping things simple. You’ll get restaurant-quality results using ingredients you probably already have in your pantry. The rich gravy that develops during cooking is just the cherry on top of this satisfying meal.
What Is Beef Arm Roast
Beef arm roast comes from the chuck primal cut located in the shoulder area of the cow. We find this particular cut between the neck and the rib section where the animal carries important weight and does considerable work throughout its life.
The muscle fibers in arm roast develop extensive connective tissue and marbling due to constant use. This tough exterior transforms into incredible tenderness when we apply proper slow cooking techniques. Our experience shows that the collagen breaks down during extended cooking times creating that signature fall apart texture.
Butchers typically cut arm roast from the upper portion of the front leg near the shoulder blade. We often see this cut sold with the bone in which adds extra flavor during cooking. The bone also helps the meat retain moisture throughout the long braising process.
Weight ranges for arm roast typically fall between 3 to 5 pounds making it perfect for family meals. We appreciate how this size feeds 6 to 8 people generously while leaving plenty for leftovers. The marbling throughout the meat provides rich beefy flavor that develops beautifully with slow cooking methods.
Many grocery stores label this cut as “chuck arm roast” or simply “arm roast.” We sometimes find it marketed as “round bone roast” due to the distinctive circular bone that runs through the center. This bone creates the characteristic appearance that makes arm roast easy to identify at the butcher counter.
The meat itself displays a deep red color with white streaks of fat running throughout. We notice the grain runs in multiple directions which requires proper slicing technique after cooking. This cross grain cutting ensures each bite remains tender and easy to chew.
Equipment Needed

Creating the perfect beef arm roast requires exact equipment that ensures proper searing, braising, and temperature monitoring throughout the cooking process. We recommend gathering these essential tools before starting your recipe to achieve the best results.
Dutch oven or heavy ovenproof pot with lid serves as our most critical piece of equipment. This versatile cookware allows us to sear the roast on the stovetop and then transfer it directly to the oven for slow braising. The heavy construction provides even heat distribution while the tight fitting lid traps moisture and flavors.
Tongs or large fork become indispensable when turning the roast during the searing process. These tools help us achieve that beautiful golden brown crust on all sides without piercing the meat and losing precious juices.
Meat thermometer ensures we cook our roast to the proper internal temperature. While braised arm roasts are typically cooked until fork tender well beyond 145°F, monitoring the temperature helps us track the cooking progress and avoid overcooking.
Cutting board and sharp knife are essential for both preparation and serving. We use these tools to trim excess fat before cooking and slice the finished roast properly against the grain for maximum tenderness.
Measuring cups and spoons provide accuracy when adding liquids like red wine and beef stock, as well as seasonings that create our flavorful braising liquid.
Oven mitts protect our hands when handling the hot Dutch oven throughout the cooking process. Safety remains paramount when working with heavy, hot cookware.
Barbecue thermometer probe with long cord and digital display offers an optional upgrade for precise temperature monitoring. This advanced tool allows us to track the roast’s internal temperature without opening the oven door and losing heat during the slow cooking process.
Ingredients

Our beef arm roast recipe requires carefully selected ingredients that work together to create maximum flavor and tenderness. We’ve organized everything you need into three simple categories for easy preparation.
For the Roast
- 2.25 to 3 pounds beef arm roast (bone-in or boneless)
- 2 tablespoons olive oil
- 1 to 2 tablespoons unsalted butter
- 4 to 6 garlic cloves, peeled and smashed
- 1 cup dry red wine (such as cabernet) or 1/3 cup balsamic vinegar for a different flavor
- 32 to 40 ounces beef stock (or broth)
- Fresh herbs: sprigs of rosemary and thyme (or dried herbs if fresh unavailable)
- 2 to 3 bay leaves
- Salt and freshly ground black pepper to taste
For the Seasoning Rub
- 1 tablespoon kosher salt or coarse salt
- 2 teaspoons freshly ground black pepper
- 1 tablespoon onion powder or granulated onion (optional)
- 1 teaspoon total dried thyme, rosemary, oregano (optional)
For the Vegetables
- 2 to 3 carrots, cut into chunks
- 1 yellow or white onion, sliced
- Russet or red potatoes, cut into chunks (if desired)
Prep Work

Getting our beef arm roast ready for cooking involves several essential steps that set the foundation for a perfectly tender and flavorful meal. We’ll focus on properly preparing the meat, organizing our vegetables, and creating a simple yet effective seasoning rub.
Preparing the Meat
We start by removing our beef arm roast from the refrigerator and allowing it to come to room temperature for about 30 minutes before cooking. Pat the roast completely dry with paper towels to ensure proper searing later. Liberally season all sides of the roast with kosher salt and freshly ground black pepper, pressing the seasoning into the meat surface. Let the seasoned roast rest while we prepare our other ingredients.
Next, we heat olive oil and butter in our Dutch oven over medium-high heat until the mixture becomes hot and shimmering. The combination of oil and butter provides excellent browning while preventing the butter from burning. We’ll sear the arm roast for 3 to 5 minutes on each side until a golden brown crust forms on all surfaces. Remove the roast from the pot but keep those flavorful browned bits (fond) in the bottom for building our braising liquid.
Preparing the Vegetables
Our vegetables require proper sizing and timing to achieve the best results in this recipe. Cut carrots into 2-inch pieces, slice onions into thick wedges, and halve baby potatoes or quarter larger potatoes into uniform chunks. The key to perfectly cooked vegetables lies in adding them at the right moment during the cooking process.
We add our prepared vegetables to the Dutch oven during the last hour of cooking time. This timing prevents the vegetables from becoming mushy while ensuring they absorb the rich flavors from the braising liquid. When using the full 3 to 3.5 hour cooking time, vegetables go into the pot after approximately 2.5 hours of cooking.
Making the Seasoning Rub
Our seasoning rub keeps things simple yet effective with just a few key ingredients. Combine 2 tablespoons of kosher salt with 1 tablespoon of freshly ground black pepper as our base. Add 1 teaspoon of onion powder and 1 teaspoon of dried thyme for enhanced flavor depth if desired.
Mix all seasoning ingredients thoroughly in a small bowl before applying to the meat. The salt draws out moisture initially but then helps the meat reabsorb those concentrated flavors during the resting period. Apply the rub generously to all surfaces of the roast, pressing gently to ensure good adhesion before the searing process begins.
Instructions

We transform our seasoned beef arm roast into a tender masterpiece through a three-step process of searing, braising, and slow cooking. Each stage builds layers of flavor while breaking down tough connective tissue for melt-in-your-mouth results.
Searing the Roast
We heat our Dutch oven over medium-high heat and add olive oil along with a pat of butter. Once the oil shimmers, we carefully place the seasoned roast into the hot pot. The roast needs to sear for approximately 4 minutes per side, creating a beautiful golden-brown crust on all surfaces.
During this searing process, we develop deep flavors through the Maillard reaction while locking in the meat’s natural juices. We avoid moving the roast too frequently, allowing each side to develop that essential caramelized exterior. The searing creates the foundation for our rich, complex flavor profile.
Adding Vegetables and Liquid
We reduce our heat to low and add smashed garlic cloves directly to the pot. These aromatics cook gently for 1 to 2 minutes, releasing their fragrant oils without burning. Next, we pour in red wine to deglaze the pot, scraping up all those flavorful browned bits from the bottom with our wooden spoon.
We allow the wine to reduce for 1 to 2 minutes before returning our seared roast to the pot. Beef stock gets added until the meat sits partially covered in liquid. Fresh herbs and bay leaves join the braising liquid to infuse additional layers of flavor throughout the cooking process.
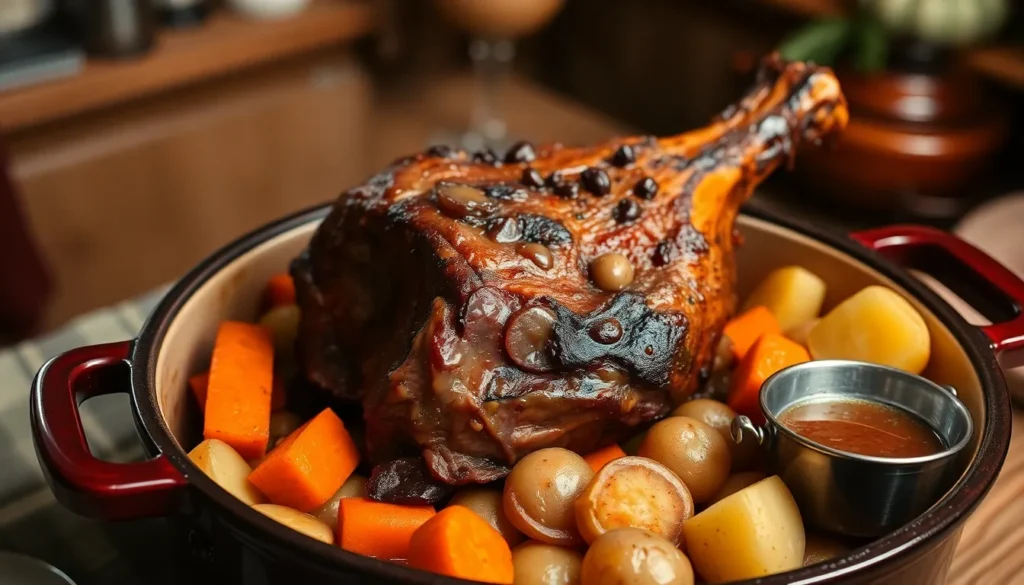
Our prepared vegetables wait until the final hour of cooking. We add potatoes, carrots, and onions in large pieces so they become tender while absorbing the rich braising liquid without turning mushy.
Slow Cooking Process
We cover our Dutch oven with a tight-fitting lid and transfer it to our preheated 300°F oven. The roast braises slowly for 3 to 3½ hours until the meat becomes fork-tender and easily shreds.
This gentle, moist heat environment allows tough connective tissue to break down completely. We resist the temptation to check frequently, as maintaining consistent temperature ensures optimal results. The slow cooking method transforms our budget-friendly cut into restaurant-quality tenderness.
Once our roast reaches perfect doneness, we remove both meat and vegetables from the pot. The remaining cooking liquid can be strained and thickened with a cornstarch slurry to create an incredibly rich gravy that complements our finished dish perfectly.
Cooking Tips for Perfect Results

Mastering the beef arm roast requires attention to exact techniques that transform this economical cut into restaurant-quality results. We’ve refined our approach through countless kitchen experiments to bring you the most effective methods.
Searing creates the foundation for exceptional flavor development. Heat your Dutch oven over medium-high heat and add both olive oil and butter for optimal browning. The combination of fats prevents burning while creating a beautiful caramelized crust that locks in natural juices. We recommend searing each side for exactly 4 minutes to achieve the perfect golden exterior.
Temperature control determines success throughout the cooking process. Keep your oven at a steady 300°F for slow braising that breaks down tough connective tissues without drying out the meat. Higher temperatures cook the exterior too quickly while leaving the interior tough and chewy.
Timing your vegetable additions prevents mushy results that disappoint diners. Add potatoes, carrots, and onions during the final hour of cooking so they absorb rich flavors while maintaining their structure. Root vegetables continue cooking from residual heat even after removing from the oven.
Heavy-bottomed cookware distributes heat evenly across the entire roast surface. Dutch ovens with thick bases eliminate hot spots that can cause uneven cooking or burning. Cast iron and enameled cast iron provide the best heat retention for consistent results.
Deglazing captures concentrated flavors from the browned bits stuck to your pot bottom. Pour balsamic vinegar or red wine into the hot pan after searing and scrape up those caramelized pieces with a wooden spoon. These fond particles add incredible depth to your final gravy.
Resting preserves precious juices that make each bite succulent and tender. Cover your finished roast with foil and let it rest for 10 minutes before slicing or shredding. Cutting too early releases all the flavorful liquids onto your cutting board instead of staying in the meat.
Internal temperature monitoring ensures perfect doneness without guesswork. Use a meat thermometer to check that your roast reaches 145°F for medium doneness before the resting period. The temperature will continue rising during rest time to reach the ideal serving temperature.
Gravy enhancement utilizes every drop of the cooking liquid for maximum flavor impact. Strain the pan juices through a fine mesh strainer and whisk in flour over medium heat until thickened to your desired consistency. This rich gravy complements both the roast and vegetables perfectly.
How to Check for Doneness

Determining when our beef arm roast reaches perfect doneness requires multiple assessment methods working together. We need to check both tenderness and internal temperature to ensure our roast delivers the melt-in-your-mouth texture we’re seeking.
Fork Tenderness Test
The most reliable indicator involves testing with a fork inserted into the thickest part of the roast. Our beef arm roast should pull apart easily when properly cooked. The meat fibers will separate effortlessly with gentle pressure from the fork tines. This hands-on approach tells us immediately whether the connective tissues have broken down sufficiently during our slow braising process.
Internal Temperature Guidelines
We recommend using an instant-read thermometer inserted into the center of the roast’s thickest section. While traditional guidelines suggest 145°F for medium doneness, our braised arm roast benefits from higher internal temperatures that ensure complete tenderness. The low and slow cooking method transforms tough connective tissues into gelatin, making tenderness more important than hitting exact temperature targets.
Timing Considerations
Our 3 to 3½ hours of cooking time serves as a baseline, though actual doneness depends on several factors. Oven temperature variations, roast size, and individual appliance differences all influence cooking duration. We check for doneness starting at the 3-hour mark, then every 15 minutes until achieving desired tenderness.
Visual Cues
The roast surface should appear deeply caramelized from our initial searing, while the cooking liquid will have reduced and concentrated around the meat. We notice the roast pulling away slightly from any bones present, and the surrounding vegetables will be fork-tender when properly cooked.
Resting Period
Once our roast passes all doneness tests, we cover it with foil and let it rest for 10 to 15 minutes. This crucial step allows juices to redistribute throughout the meat fibers, preventing moisture loss when we slice or shred the finished roast. The internal temperature will continue rising slightly during this resting period, completing the cooking process perfectly.
Resting and Carving

Once our beef arm roast emerges from the oven perfectly tender and aromatic, we need to complete two crucial final steps before serving. These techniques ensure our roast maintains its juiciness and presents beautifully at the table.
Resting the Meat
After removing our roast from the oven, we immediately cover it loosely with aluminum foil to retain heat while preventing steam buildup. The resting period allows the internal juices to redistribute throughout the meat fibers, preventing them from running out when we slice.
We recommend resting the arm roast for 10 to 30 minutes before carving. This timeframe gives the muscle fibers time to relax and reabsorb the cooking juices that concentrated in the center during the long braising process. Some recipes suggest extending the rest period up to 2 hours for maximum tenderness and flavor development.
During this waiting period, we can prepare our gravy using the strained cooking liquid and arrange our serving platter with the braised vegetables. The covered roast will maintain its temperature while developing even better texture and moisture distribution.
Carving Techniques
We transfer our rested roast to a stable cutting board or shallow dish to catch any remaining juices. Using a sharp carving knife ensures clean cuts without tearing the tender meat fibers that we worked so hard to develop.
Before making our first cut, we identify the direction of the muscle grain by looking for the parallel lines running through the meat. The grain in beef arm roast runs in multiple directions due to the various muscle groups in this shoulder cut.
We slice across the grain rather than with it, creating shorter muscle fibers that are much easier to chew. For serving, we cut the roast into slices ranging from thin to thick based on our preference and presentation needs.
When the roast has become exceptionally tender from our slow cooking process, we can opt to shred the meat instead. Using two forks, we pull the meat apart into bite-sized pieces, which works particularly well for sandwiches or casual family-style serving.
We serve the sliced or shredded meat immediately alongside our braised vegetables and pour the thickened cooking liquid over everything for a complete, satisfying meal.
Serving Suggestions

We recommend serving our perfectly braised beef arm roast with classic comfort food sides that complement its rich flavors. Mashed potatoes stand as the traditional favorite since they absorb the savory gravy beautifully and create the ultimate comfort food experience.
Our braised vegetables from the cooking process make excellent accompaniments alongside the roast. The carrots, onions, and potatoes have already absorbed those incredible flavors during the slow cooking process. We suggest arranging these on your serving platter around the sliced roast for an attractive presentation.
Roasted root vegetables provide another wonderful option for your table. We love preparing roasted carrots, parsnips, and onions as additional sides that echo the earthy flavors in our braised dish. Oven-roasted potatoes or roasted cauliflower work exceptionally well when you want to add variety to your meal.
The rich gravy made from our braising liquid deserves special attention on your table. We always pour this flavorful sauce generously over both the sliced roast and mashed potatoes to add moisture and enhance every bite. This gravy transforms simple sides into restaurant-quality accompaniments.
For convenience during busy weeknight dinners, we often cook baby carrots and whole small onions directly with the roast during that final hour of braising. This approach creates a complete one-pot meal that requires minimal additional preparation while maximizing flavor integration.
We find this slow-braised beef arm roast particularly satisfying during colder months when hearty comfort food brings families together. The combination of tender, fork-ready meat with vegetables and creamy mashed potatoes creates a complete dinner that satisfies even the heartiest appetites.
When serving larger gatherings, we recommend slicing the roast and arranging it on a large platter with the braised vegetables. This family-style presentation allows everyone to help themselves while keeping the meat moist under a generous ladle of that incredible pan gravy.
Storage and Reheating

After enjoying our tender beef arm roast we often find ourselves with delicious leftovers that deserve proper care. Following the right storage and reheating methods ensures we can savor this comfort food meal again without compromising its exceptional flavor and texture.
Storing Leftovers
We need to cool our leftover roast to room temperature within 2 hours of cooking to maintain food safety. Our beef arm roast and vegetables should be stored in airtight containers in the refrigerator where they’ll stay fresh for 3 to 4 days.
For longer storage we can freeze the leftovers in airtight containers or heavy-duty freezer bags for up to 3 months. We always label our containers with the date before placing them in the freezer to track freshness. The rich gravy should be stored separately in the refrigerator and can be frozen in ice cube trays for convenient portioning.
| Storage Method | Temperature | Duration |
|---|---|---|
| Refrigerator | 40°F or below | 3-4 days |
| Freezer | 0°F or below | Up to 3 months |
| Room Temperature | Cool within | 2 hours maximum |
Reheating Instructions
We thaw frozen leftovers in the refrigerator overnight before reheating to ensure even warming. Our preferred method involves gentle reheating on the stovetop by placing the roast and vegetables in a covered pot with some beef broth and heating over low to medium heat until warmed through.
For oven reheating we place the meat in a baking dish and cover with foil to retain moisture then warm at 300°F for about 20 to 30 minutes. We avoid overheating to prevent the meat from drying out and losing its tender texture. The gravy should be reheated separately in a small saucepan over low heat and stirred frequently to prevent separation.
We always check that our reheated roast reaches an internal temperature of 165°F for food safety. Adding a splash of beef broth during reheating helps restore moisture and maintains the succulent quality we worked so hard to achieve during the original cooking process.
Recipe Variations

The beauty of beef arm roast lies in its adaptability to different cooking methods. We can achieve the same tender, flavorful results using modern appliances that offer convenience without sacrificing taste.
Slow Cooker Method
We love the slow cooker approach for its hands-off convenience that delivers consistently tender results. Start by seasoning your 2.25 to 3-pound arm roast with salt and pepper, then heat 2 tablespoons of olive oil in a large skillet over medium-high heat. Sear the roast on all sides until golden brown, which takes about 8 to 10 minutes total and creates essential flavor development.
Transfer the browned roast to your slow cooker and add 2 cups of beef broth, 4 minced garlic cloves, 2 bay leaves, and your choice of fresh herbs like thyme or rosemary. We recommend adding 1 large diced onion and 3 large carrots cut into 2-inch pieces at this stage for an 8-hour cook time. Pour in ½ cup of red wine or balsamic vinegar for depth of flavor.
Set your slow cooker to low and cook for 8 hours, or until the meat shreds easily with a fork. Add 1 pound of small red potatoes during the final 2 hours if desired. The low temperature ensures the connective tissue breaks down completely, creating fall-apart tender meat with rich, flavorful gravy.
Instant Pot Method
The Instant Pot dramatically reduces cooking time while maintaining the same tender results we expect from traditional braising. Select the sauté function on your Instant Pot and add 2 tablespoons of olive oil and 1 tablespoon of butter. Season your arm roast with salt and pepper, then sear it on all sides until golden brown, approximately 3 to 4 minutes per side.
Add 4 minced garlic cloves directly to the pot and sauté for 30 seconds until fragrant. Pour in ½ cup of red wine or beef stock to deglaze, scraping up any browned bits from the bottom. Add 1½ cups of beef stock, 2 bay leaves, fresh thyme sprigs, and your prepared vegetables including 1 large diced onion, 3 large carrots cut into chunks, and 1 pound of quartered potatoes.
Secure the lid and set the valve to sealing position. Cook on high pressure for 90 minutes for a 3-pound roast, adjusting the time to 60 minutes for smaller cuts. Allow natural pressure release for 15 minutes before manually releasing any remaining pressure. This method preserves moisture while achieving the same fork-tender texture in a fraction of the traditional cooking time.
Conclusion
We’ve shown you that creating a restaurant-quality beef arm roast at home doesn’t require expensive cuts or complicated techniques. With proper searing, slow braising, and careful attention to timing, this affordable cut transforms into a tender, flavorful centerpiece that’ll impress your family and guests.
The beauty of this recipe lies in its simplicity and reliability. Whether you’re planning a Sunday dinner or prepping meals for the week ahead, our method delivers consistent results every time. The rich gravy and perfectly cooked vegetables make this a complete meal that satisfies even the heartiest appetites.
Remember that patience is your greatest tool here. Let the low heat work its magic, and you’ll be rewarded with meat that falls apart at the touch of a fork. We’re confident this recipe will become a staple in your kitchen repertoire.
Frequently Asked Questions
What is beef arm roast and where does it come from?
Beef arm roast comes from the chuck primal cut in the shoulder area of the cow, between the neck and rib section. It’s characterized by extensive connective tissue and marbling, typically weighs 3-5 pounds, and is often sold bone-in. You’ll find it labeled as “chuck arm roast” or “round bone roast” with deep red color and white fat streaks.
Why is slow cooking essential for beef arm roast?
Slow cooking is crucial because beef arm roast contains extensive connective tissue that needs time to break down into gelatin. This process transforms a tough cut into tender, melt-in-your-mouth meat. Cooking at 300°F for 3-3½ hours allows the collagen to dissolve, creating incredibly flavorful and tender results.
What equipment do I need to cook beef arm roast?
Essential equipment includes a Dutch oven for even heat distribution, tongs for turning the roast, an instant-read meat thermometer, and a sharp knife with cutting board. You’ll also need measuring cups and spoons for liquids and seasonings, plus oven mitts for safety. An optional barbecue thermometer probe helps monitor temperature without opening the oven.
How do I know when my beef arm roast is done?
Check for doneness using the fork tenderness test – the meat should pull apart easily when pierced. Use an instant-read thermometer to ensure proper internal temperature. Visual cues include a caramelized surface and reduced cooking liquid. The roast typically takes 3-3½ hours at 300°F, but timing varies based on size.
How should I slice beef arm roast for maximum tenderness?
Always slice across the grain to create shorter, more tender pieces. Since the grain runs in multiple directions on arm roast, identify the muscle fibers and cut perpendicular to them. Let the roast rest 10-30 minutes before carving to allow juices to redistribute, ensuring moist, flavorful slices.
What are the best side dishes for beef arm roast?
Classic comfort sides work best: mashed potatoes absorb the rich gravy beautifully, while the braised vegetables (carrots, onions, potatoes) from cooking make excellent accompaniments. Roasted root vegetables add variety. The homemade gravy from braising liquid is essential for completing this hearty, satisfying meal.
How long can I store leftover beef arm roast?
Store cooled leftovers in airtight containers in the refrigerator for 3-4 days or freeze for up to 3 months. Cool to room temperature within 2 hours for food safety. When reheating, thaw frozen portions overnight in the refrigerator and reheat gently to 165°F internal temperature, adding beef broth if needed to restore moisture.
Can I cook beef arm roast in a slow cooker or Instant Pot?
Yes! Both methods work excellently. For slow cooker: sear first, then cook on low 6-8 hours. For Instant Pot: sear using sauté function, then pressure cook 90 minutes with natural release. Both methods maintain the tender, flavorful results while offering convenience and reduced active cooking time.


