

Creating the perfect outdoor BBQ smoker area transforms your backyard into a culinary paradise where friends and family gather for unforgettable meals. We’ve discovered that the right setup isn’t just about the smoker itself – it’s about designing a functional outdoor kitchen space that enhances your grilling experience and becomes the heart of your outdoor entertaining.
Whether you’re working with a spacious patio or a compact corner of your yard, we’ll show you how to maximize your outdoor cooking potential. From clever storage answers and weather protection to creating comfortable seating areas and proper ventilation, the possibilities are endless when you know what elements to include.
The best BBQ smoker areas blend practicality with style, ensuring you can cook like a pitmaster while keeping your guests comfortable and engaged. We’re excited to share innovative design ideas that’ll turn your outdoor space into the ultimate grilling destination that neighbors will envy.
Create a Dedicated BBQ Smoker Station with Built-In Storage
Building a dedicated BBQ smoker station transforms your outdoor cooking experience into a professional-grade operation. We recommend planning your station around the smoker’s dimensions to ensure optimal workflow and storage efficiency.
Design Custom Cabinetry for Tools and Accessories
Custom cabinetry maximizes storage while keeping essential tools within arm’s reach of your smoker. We suggest installing deep drawers for bulky items like wood chips, charcoal bags, and spare grill grates. Pull-out shelves work perfectly for organizing smaller accessories such as thermometers, tongs, spatulas, and cleaning supplies.
Vertical dividers inside cabinets help separate different wood types like hickory, apple, and cherry chips. We recommend adding hooks on cabinet doors for frequently used items like oven mitts and basting brushes. Door-mounted spice racks keep your rub collection organized and easily accessible during long smoking sessions.
Soft-close hinges and weather-resistant finishes ensure your cabinetry withstands outdoor conditions year-round. Stainless steel hardware resists rust and maintains its appearance even though exposure to heat and moisture from the smoker.
Install Weather-Resistant Countertops for Prep Space
Weather-resistant countertops provide essential workspace for food preparation and serving areas near your smoker. We prefer granite or quartz surfaces because they handle temperature changes and resist stains from marinades and sauces. Concrete countertops offer a modern aesthetic while providing durability against outdoor elements.
Strategic placement of prep surfaces on both sides of your smoker creates an efficient workflow triangle. We recommend installing a minimum 24-inch depth for adequate workspace to handle large cuts of meat like briskets and pork shoulders. Rounded edges prevent injuries during busy cooking sessions and make cleanup easier.
Built-in cutting boards that slide out from underneath the countertop save space and provide dedicated areas for different food types. Undermount sinks integrated into the countertop design enable easy cleanup without leaving your cooking station.
Add Electrical Outlets for Temperature Controllers
Electrical outlets positioned strategically around your smoker station power essential monitoring equipment and accessories. We recommend installing GFCI-protected outlets at counter height for easy access to temperature controllers and wireless thermometers. Multiple outlets prevent the need for extension cords that create tripping hazards.
Weather-resistant outlet covers protect electrical connections from rain and moisture during extended smoking sessions. USB charging stations integrated into the outlet design keep smartphones and tablets powered for monitoring apps and recipe references.
Dedicated circuits for high-wattage accessories like electric smoker elements or pellet augers prevent overloading your home’s electrical system. We suggest consulting with a licensed electrician to ensure proper installation that meets local building codes and safety requirements.
Build a Rustic Outdoor Kitchen Around Your Smoker

Creating a rustic outdoor kitchen around your BBQ smoker transforms your backyard into an authentic cooking destination. Natural materials and weathered finishes give your space that timeless appeal while maintaining functionality for serious outdoor cooking.
Incorporate Natural Stone or Brick Elements
Natural stone countertops provide the perfect foundation for your rustic smoker area. Stone materials like granite, slate, or sandstone offer exceptional durability while adding rich texture and earthy colors that complement your outdoor environment. Brick backsplashes create visual interest and protect your outdoor kitchen walls from heat and smoke damage.
Building your smoker island base with natural stone or brick establishes a sturdy foundation that matches your rustic aesthetic. These materials naturally weather over time, developing a beautiful patina that enhances rather than detracts from their appearance. Stone surfaces also provide excellent heat resistance, making them ideal for areas near your smoker where temperatures can fluctuate dramatically.
Combining different stone textures adds depth to your design while maintaining the cohesive rustic theme. Rough-hewn limestone paired with smooth granite countertops creates visual contrast without overwhelming the space. Natural materials blend seamlessly into outdoor surroundings, making your kitchen feel like an organic extension of your industry rather than an artificial addition.
Include a Sink Station for Easy Cleanup
Installing a sink near your smoker area dramatically improves your cooking workflow and maintains proper hygiene standards. We recommend positioning the sink within easy reach of your smoker to minimize steps during food preparation and cleanup. Stainless steel utility sinks work exceptionally well in outdoor environments due to their durability and resistance to weather damage.
Running hot and cold water lines to your outdoor sink station allows for thorough cleaning of utensils, cutting boards, and your hands throughout the cooking process. Professional outdoor cooks understand that convenient access to running water eliminates the need for constant trips inside your house. This setup keeps your outdoor cooking area self-sufficient and functional.
Adding a soap dispenser and paper towel holder near your sink creates a complete cleanup station. Undermount sinks integrated into stone countertops provide a sleek appearance while making cleanup easier since debris can be swept directly into the basin. Proper drainage connections ensure your sink station operates efficiently without creating standing water issues around your cooking area.
Design Bar Seating for Guest Interaction
Bar seating adjacent to your smoker creates an captivating social atmosphere where guests can interact with the cook. Positioning bar stools or counter seating along your outdoor kitchen island allows friends and family to watch the smoking process while maintaining comfortable conversation. This design makes your outdoor area more inviting and transforms cooking from a solitary activity into a shared experience.
Counter height seating typically measures 36 inches, providing optimal viewing angles for guests to observe your smoking techniques. Natural wood or stone bar tops complement your rustic theme while offering convenient surfaces for guests to place drinks and plates. Weatherproof cushions on bar stools add comfort during longer gatherings.
Creating multiple seating zones around your smoker area accommodates different group sizes and preferences. Some guests prefer to stand and move around while others want to sit and relax. L-shaped or U-shaped kitchen layouts provide ample space for both cooking workflow and social seating arrangements, making your outdoor kitchen perfect for memorable entertaining experiences.
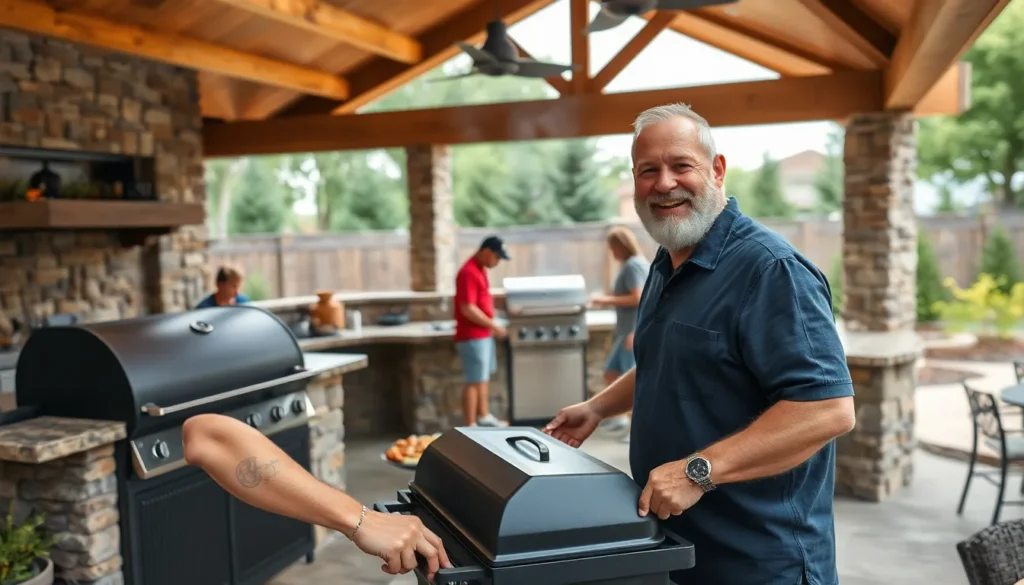
Design a Covered Pavilion for Year-Round Smoking

Building a covered pavilion transforms your BBQ smoker area into an all weather cooking sanctuary. This dedicated shelter protects both you and your equipment from the elements while creating a defined outdoor kitchen space.
Timber frame pavilions offer the most durable and elegant solution with their mortise and tenon joinery construction. These structures provide a rustic aesthetic that complements natural outdoor settings while delivering exceptional longevity. Vinyl pavilions deliver modern appeal with minimal maintenance requirements, featuring vinyl wrapped posts and customizable designs that suit contemporary backyard layouts. Traditional wood pavilions present the most affordable option, utilizing large posts with shingle or metal roof choices for straightforward protection and functionality.
Square or rectangular pavilion designs work best for organizing smoker and kitchen elements around the perimeter effectively. Open gable roofs and single slope designs provide excellent aesthetics while maximizing functional space beneath the structure.
Choose Proper Ventilation for Smoke Management
Effective ventilation prevents smoke buildup and maintains comfortable cooking conditions throughout your smoking sessions. Open sides or large openings allow natural airflow to carry smoke away from the cooking area without creating stagnant pockets. Roof vents and ridge vents enable smoke to rise naturally and escape through the pavilion’s upper areas.
Strategic placement of ventilation openings helps control smoke direction based on prevailing wind patterns. Automatic or manual screens can open or close depending on wind conditions and smoke direction, providing controlled ventilation while keeping insects out of your cooking space.
Install Ceiling Fans for Air Circulation
Ceiling fans improve air movement throughout the pavilion, reducing smoke stagnation and dispersing heat more effectively. These fans help maintain pleasant cooking temperatures while preventing odors from lingering in the covered space. Variable speed settings provide flexibility for different weather conditions and smoking intensities.
Outdoor rated ceiling fans withstand moisture and temperature fluctuations better than indoor models. Multiple fans work best in larger pavilions to ensure consistent air circulation across the entire cooking area.
Add Weather Protection with Retractable Screens
Retractable screens shield your smoking area from rain, wind, and insects without permanently enclosing the space. These flexible barriers adapt to changing weather conditions and seasonal needs, allowing your pavilion to function as either an open air or protected cooking environment. Manual operation provides simple control over screen positioning based on immediate weather conditions.
Automatic screen systems offer hands free convenience, responding to wind sensors or remote controls for instant weather protection. Many pavilion kits include screen options that integrate seamlessly with the overall structure design, improving both comfort and year round usability.
Construct a Multi-Level Deck System for Your BBQ Area

Multi-level decking transforms your outdoor BBQ smoker area into a sophisticated cooking and entertaining space. Raised platforms help define different functional areas while creating visual interest and improved workflow throughout your outdoor kitchen setup.
Create Separate Zones for Cooking and Dining
Designate distinct cooking zones to maintain efficient workflow and comfortable guest interaction during your BBQ sessions. Position your smoker, grill, and prep counters on the elevated deck section to create a dedicated culinary workspace that keeps heat and smoke away from dining areas.
Establish your dining zone on the lower deck level with weather-resistant furniture and adequate shade protection. We recommend maintaining at least 3 feet of walkway space between cooking and dining zones for safe movement while carrying hot dishes and serving guests.
Install ample countertop space around your smoker station to handle food preparation and essential grilling tools. Built-in prep surfaces eliminate the need to carry ingredients back and forth from indoor kitchens, making your outdoor cooking process more efficient.
Position seating strategically to encourage social interaction while keeping guests at a comfortable distance from active cooking areas. Bar-height seating along the cooking zone perimeter allows friends and family to engage with the grilling process without interfering with your culinary workflow.
Build Integrated Planters for Herb Gardens
Incorporate built-in planters around your BBQ deck system to grow fresh herbs like basil, thyme, rosemary, and oregano that complement your grilled dishes. Position these herb gardens near your prep zone for quick access while seasoning meats and vegetables.
Use materials consistent with your decking design to maintain visual cohesion throughout the outdoor space. Composite lumber planters or stone-veneer boxes blend seamlessly with most deck styles while providing excellent drainage for herb cultivation.
Create raised garden beds at varying heights to add dimension to your multi-level design. Elevated planters reduce bending while harvesting herbs and create natural barriers between different functional zones in your outdoor kitchen area.
Select heat-tolerant herbs that thrive near BBQ smoker areas where temperatures can fluctuate significantly. Mediterranean herbs like sage, oregano, and thyme handle heat exposure well while providing aromatic enhancement to your grilling experience.
Install Proper Lighting for Evening Cooking
Layer your lighting design to ensure both cooking safety and inviting ambiance during evening BBQ sessions. Task lighting over smoker and prep areas requires focused LED spotlights or strip lights, while ambient lighting in dining zones benefits from string lights and decorative lanterns.
Position path lights along walkways and deck stairs to ensure safe navigation between cooking and dining zones after dark. Solar-powered options eliminate electrical installation complexity while providing reliable illumination throughout your multi-level deck system.
Install dimmer switches for adjustable brightness levels that adapt to different entertaining needs. Bright task lighting supports detailed food preparation, while softer ambient settings create comfortable dining atmospheres for extended outdoor gatherings.
Consider energy-efficient LED fixtures with weather-resistant housings designed for outdoor use. These lighting answers withstand heat, smoke, and moisture exposure while providing consistent illumination for your BBQ smoker area activities throughout the evening hours.
Transform Your Patio into a BBQ Entertainment Hub

Creating an inviting outdoor BBQ smoker area transforms your patio into the ultimate gathering spot for friends and family. Strategic placement of your smoker combined with thoughtful design elements creates a functional entertainment space that enhances every grilling experience.
Position Smoker Away from High-Traffic Areas
Placing your smoker in quieter sections of your patio ensures both safety and guest comfort. We recommend situating the smoker away from main walkways and primary seating zones to prevent interference with foot traffic. This strategic positioning allows guests to move freely throughout the space without encountering smoke or excessive heat.
Dedicated BBQ shacks or shelter structures provide excellent separation while maintaining accessibility. Building a designated cooking zone keeps the smoker functional yet aesthetically integrated into your overall patio design. Positioning your smoker at least 10 feet from dining areas reduces smoke disturbance while maintaining easy access for the cook.
Add Comfortable Seating Areas for Guests
Creating cozy seating zones near your smoker encourages relaxation and conversation during cooking sessions. Rattan chairs, outdoor stools, and cushioned sofas positioned strategically around the cooking area invite guests to gather while maintaining comfortable distances from heat sources. We suggest placing seating 6-8 feet from the smoker to balance social interaction with comfort.
Kitchen islands with raised eating bars provide excellent casual seating options adjacent to your grilling area. These elevated countertops allow guests to interact with the cook while providing additional workspace for food preparation. Bar height seating creates natural conversation spots that keep the social energy flowing throughout your BBQ gatherings.
Separating dining tables from cooking zones improves both functionality and guest comfort. This arrangement allows for uninterrupted dining experiences while keeping the cooking process visible and captivating for your guests.
Include Shade Structures for Hot Days
Incorporating pergolas and retractable awnings over your BBQ area shields both cooks and guests from direct sunlight. These structures significantly improve comfort during summer gatherings by reducing heat exposure around the cooking zone. Built roofs over dining areas provide consistent weather protection that extends your entertaining season.
Shade answers protect your cooking equipment and outdoor furnishings from weather damage. UV protection extends the lifespan of your smoker, seating, and other outdoor investments while maintaining their appearance throughout multiple seasons. Strategic shade placement reduces surface temperatures on countertops and seating areas by up to 15-20 degrees during peak sun hours.
Establish a Backyard BBQ Pit with Fire Features

Creating a unified BBQ pit design that integrates both your smoker and fire features transforms your outdoor space into the ultimate cooking and entertainment destination. This approach combines practical functionality with atmospheric elements that’ll keep your guests engaged throughout the entire cooking process.
Combine Smoker with Fire Pit for Ambiance
Position your smoker adjacent to a fire pit to create a social gathering spot where guests can enjoy both the aromatic cooking process and mesmerizing firelight. This strategic placement allows you to maintain both heat sources simultaneously while creating distinct zones for different activities.
Design your fire pit to serve dual purposes as both a heat source and visual focal point that adds warmth and atmosphere to your outdoor space. When positioned within 12×16 feet of your smoker, the fire pit creates a cohesive cooking environment that encourages guests to linger and socialize.
Integrate complementary fuel sources by using hardwood for both your smoker and fire pit, creating consistent aromas that enhance the overall BBQ experience. This unified approach also simplifies your fuel storage and management needs.
Create Circular Seating Around the Cooking Area
Arrange seating in a circular or semi-circular pattern around your fire pit and smoker combination to encourage natural conversation flow among your guests. This configuration creates an intimate atmosphere where everyone can participate in discussions while staying engaged with the cooking process.
Maintain adequate walkways of at least 3 feet wide around all seating and cooking areas to prevent crowding and ensure safe movement throughout your BBQ space. Proper spacing allows you to navigate between your smoker, fire pit, and guests without disrupting conversations or compromising safety.
Choose between built-in stone benches or movable outdoor chairs depending on your space constraints and style preferences. Built-in options provide permanent seating that complements your fire features, while movable chairs offer flexibility for different group sizes and activities.
Calculate your seating capacity by allowing 24-30 inches of bench space per person for comfortable seating around your circular arrangement. This measurement ensures everyone has adequate room while maintaining the intimate atmosphere that makes BBQ gatherings memorable.
Use Heat-Resistant Materials for Safety
Install concrete pavers, brick, or natural stone flooring instead of wood surfaces to prevent warping and eliminate fire hazards around your BBQ pit area. These materials withstand high temperatures while providing stable, level surfaces for both cooking equipment and foot traffic.
Select granite, stainless steel, or slate countertops for any prep surfaces near your smoker and fire pit combination. These heat-resistant materials resist thermal shock and provide easy-to-clean surfaces that maintain their appearance even though exposure to high temperatures and outdoor elements.
Maintain minimum clearance distances of 3 feet between your smoker, fire pit, and any fences, trees, or flammable furniture to prevent accidental ignition. Always keep a fire extinguisher within easy reach of your cooking area for emergency situations.
Consider wind direction patterns when positioning your smoker to prevent smoke from blowing directly onto your seating areas. Strategic placement ensures guest comfort while maintaining proper ventilation for both safety and cooking performance.
Design a Portable BBQ Smoker Setup for Flexibility

Flexibility transforms your outdoor cooking experience by allowing you to adapt to different locations and events. We can create smoker systems that move with our needs while maintaining cooking quality.
Choose Mobile Cart Answers for Easy Movement
Mobile carts enhance our smoker’s transportability and let us wheel the entire setup to different backyard spots or outdoor events. Sturdy wheels become essential features that support the smoker’s weight while providing smooth movement across various terrain types like grass, gravel, and pavement.
Loading and unloading mechanisms simplify the process of moving heavy smokers onto trailers or elevated surfaces. We’ll find that carts with adjustable heights and reinforced platforms make positioning much easier during setup and breakdown phases.
Small trailers designed specifically for smokers accommodate multiple units along with coolers, beverage setups, and fuel storage compartments. These trailer answers prove reliable and cost effective for hauling smokers to different events while keeping all essential supplies organized in one mobile unit.
Integrated cooking platforms expand our workspace by combining the cart function with additional prep areas. Built in cutting boards, utensil holders, and condiment stations transform basic mobility carts into complete outdoor cooking stations.
Create Modular Storage Options
Modular storage systems organize fuel supplies, cooking utensils, food ingredients, and beverages in easily accessible compartments. Stackable coolers maximize vertical space while allowing us to separate different food types and maintain proper temperatures throughout long cooking sessions.
Dedicated fuel compartments keep wood chunks, charcoal, and wood chips properly sorted and protected from moisture. We can design these storage areas with ventilation slots that prevent condensation buildup while maintaining easy access during cooking.
Beverage holders integrated into trailers or cart systems ensure drinks stay secure during transport and readily available during events. These holders accommodate different container sizes from water bottles to beverage coolers.
Tool organization becomes streamlined with modular drawer systems that separate tongs, thermometers, brushes, and other essential equipment. Quick release mechanisms allow us to remove entire storage modules for cleaning or reconfiguration based on exact cooking needs.
Plan for Different Seasonal Locations
Seasonal positioning strategies help us optimize smoker performance throughout the year by considering weather patterns and sun exposure. Winter setups benefit from protected areas that shield equipment from snow and ice while summer locations require adequate shade and ventilation.
Wind direction assessment becomes crucial for smoke management and cooking efficiency across different seasons. We’ll position smokers where prevailing winds carry smoke away from seating areas while maintaining consistent airflow for proper combustion.
Shelter considerations include portable canopies, pergolas, or existing structures that protect both equipment and cooks from rain, snow, and excessive sun exposure. These protective elements extend our cooking season and improve comfort during extended smoking sessions.
Detachable components and lightweight materials help seasonal moves between different yard locations or storage areas. Smokers designed with removable parts store more efficiently in garages or sheds during extreme weather periods while maintaining quick reassembly capabilities.
Build an Outdoor Bar and Grill Combination Area

Creating a combined outdoor bar and grill space elevates your BBQ smoker area into the ultimate entertainment destination. This integrated approach maximizes both functionality and social engagement by bringing cooking and socializing together in one cohesive zone.
Install a Built-In Smoker with Bar Counter
Built-in smokers like the Coyote Asado kamado cooker deliver authentic smoky flavors while seamlessly integrating into your bar design. Position your smoker adjacent to the bar counter to create a natural flow between cooking and entertaining. Consider an L-shaped or island layout that allows you to monitor your smoking process while mixing drinks and chatting with guests.
Bar stools around the counter transform your cooking area into a social hub. We recommend installing the counter at 42 inches high for comfortable bar stool seating. Granite or stainless steel countertops provide excellent heat resistance and durability for this high-use area.
Gas grills can coexist with your smoker in this setup for maximum cooking versatility. Install both units with proper spacing to ensure safe operation and easy access for maintenance.
Add Refrigeration for Beverages and Ingredients
Outdoor refrigeration keeps beverages cold and ingredients fresh without constant trips indoors. Compact outdoor fridges integrated directly into your grill island or bar area streamline your cooking workflow significantly. These units support long smoking sessions where maintaining ingredient freshness becomes crucial.
Stainless steel outdoor refrigerators withstand weather conditions while providing reliable performance. We suggest choosing models with adjustable shelving to accommodate both beverage bottles and food prep containers. Built-in units create a seamless appearance that enhances your overall design aesthetic.
Strategic placement of refrigeration units reduces movement and increases efficiency during cooking. Position your outdoor fridge within arm’s reach of both the smoker and prep areas for optimal workflow.
Include Ice Wells and Beverage Dispensers
Ice wells built directly into your bar counter provide convenient access to ice for drinks and food storage. These recessed compartments eliminate the need for separate ice buckets and keep ice contained within your workspace. Stainless steel construction ensures easy cleaning and long-lasting performance.
Beverage dispensers offer self-serve convenience that enhances the guest experience. Mount dispensers at comfortable heights along your bar counter to encourage guests to help themselves. This feature minimizes interruptions to your cooking process while keeping everyone hydrated.
Drainage systems for ice wells prevent water accumulation and maintain cleanliness. Install proper drainage connections that direct melted ice away from your cooking and prep areas. We recommend including removable drain plugs for easy maintenance and cleaning.
Create a Garden-Integrated BBQ Smoker Space

Merging your BBQ smoker area with your garden creates a harmonious outdoor cooking environment that elevates both functionality and aesthetics. This integration transforms your backyard into a farm-to-table paradise where fresh ingredients meet exceptional smoking techniques.
Position Smoker Near Vegetable and Herb Gardens
Positioning your BBQ smoker close to your vegetable and herb garden provides unmatched convenience for accessing fresh ingredients during cooking. We recommend placing the smoker within 15-20 feet of your garden beds to maintain easy access while ensuring proper smoke dispersion. Fresh herbs like rosemary, thyme, and oregano become readily available for seasoning meats mid-cook, while vegetables can be harvested minutes before serving for optimal freshness.
Proximity to your garden also creates a natural workflow that enhances the cooking experience. You’ll find yourself moving seamlessly between tending the smoker and gathering ingredients, making the entire process more captivating and efficient. Consider the prevailing wind direction when positioning your smoker to prevent smoke from damaging delicate plants or overwhelming your garden workspace.
Strategic placement near raised garden beds offers additional benefits for food preparation. These elevated surfaces can serve as temporary prep stations for washing vegetables or holding harvested herbs, extending your outdoor kitchen functionality without requiring additional infrastructure.
Design Pathways Between Garden and Cooking Area
Designing well-defined pathways between your garden beds and smoker area improves both accessibility and visual appeal. We suggest using natural materials like flagstone, gravel, or decomposed granite to create paths that blend seamlessly with your garden’s aesthetic while providing stable footing for frequent trips between spaces.
Pathways should measure at least 3 feet wide to accommodate comfortable movement while carrying cooking supplies or harvested produce. Consider incorporating subtle lighting along these walkways using solar-powered path lights or low-voltage LED strips to ensure safe navigation during evening cooking sessions.
Curved pathways create a more organic feel that complements garden landscapes better than straight lines. These gentle curves encourage a leisurely pace between garden and cooking areas, making the journey part of the overall outdoor experience rather than just functional transit.
Strategic pathway placement can also help organize your outdoor space into distinct zones. Well-planned routes naturally guide foot traffic away from active cooking areas while connecting key elements like herb gardens, vegetable plots, and the smoker station in an intuitive flow.
Use Landscaping to Define the Cooking Zone
Utilizing landscaping elements to outline your cooking area creates a dedicated outdoor kitchen feel while maintaining garden harmony. We recommend using shrubs, raised planter boxes, or decorative stone borders to visually separate the smoker zone from other garden areas without creating harsh boundaries.
Raised planter boxes filled with heat-tolerant herbs serve dual purposes as both functional ingredients and attractive boundaries. Plants like sage, lavender, and mediterranean herbs thrive near cooking areas and can withstand occasional heat exposure while providing natural aromatic barriers.
Low hedges or ornamental grasses can effectively define cooking spaces without blocking sightlines or airflow. Consider drought-resistant options like boxwood, ornamental sage, or fountain grass that require minimal maintenance while providing year-round structure to your outdoor kitchen design.
Incorporating seating areas within your landscaped cooking zone enhances both functionality and social interaction. Built-in stone benches or strategically placed outdoor furniture near the defined cooking area creates natural gathering spots where guests can engage with the cooking process while staying comfortably within the garden-integrated space.
Conclusion
We’ve explored countless ways to transform your outdoor space into the ultimate BBQ smoker destination. From rustic outdoor kitchens to covered pavilions and portable setups each approach offers unique benefits for your exact needs and budget.
The key lies in balancing functionality with style while considering factors like weather protection storage answers and guest comfort. Whether you choose a permanent installation or a flexible portable design your smoker area should reflect your cooking style and entertaining preferences.
Remember that the best BBQ smoker area is one that brings people together. By incorporating thoughtful design elements like proper seating comfortable gathering spaces and efficient workflows you’ll create an outdoor kitchen that becomes the heart of your backyard entertaining for years to come.
Frequently Asked Questions
What essential elements should I include when designing a BBQ smoker area?
A successful BBQ smoker area requires more than just the smoker itself. Include dedicated storage for tools and supplies, weather-resistant countertops for food prep, proper electrical outlets for monitoring equipment, comfortable seating for guests, and adequate ventilation for smoke management. Consider adding a sink station for improved workflow and weather protection like a pavilion or pergola.
How can I maximize my BBQ smoker setup in a small backyard?
Focus on vertical storage solutions with pull-out shelves and deep drawers to keep tools organized. Use modular components that can be moved as needed, and consider a portable smoker setup with mobile carts. Create multi-level decking to separate cooking and dining zones, and utilize wall-mounted storage to save floor space while maintaining functionality.
What materials work best for outdoor BBQ smoker countertops?
Granite and quartz are ideal choices for outdoor smoker countertops due to their durability and heat resistance. Natural stone materials like slate also work well and complement rustic designs. These materials are easy to clean, weather-resistant, and can withstand high temperatures from nearby smokers while providing ample prep space for food preparation.
How do I ensure proper ventilation around my BBQ smoker?
Install your smoker in an area with open sides and good airflow. Consider adding roof vents if using a covered pavilion, and position ventilation openings strategically to manage smoke direction. Ceiling fans can improve air circulation, and always account for wind direction when placing your smoker to prevent smoke from affecting seating areas.
What safety considerations should I keep in mind for my BBQ smoker area?
Maintain proper clearance distances around your smoker and use heat-resistant materials for nearby surfaces. Install GFCI-protected electrical outlets with weather-resistant covers. Position the smoker away from high-traffic areas and consider wind patterns for smoke management. Use non-slip flooring materials and ensure adequate lighting for evening cooking sessions.
How can I create an all-weather BBQ smoker space?
Build a covered pavilion using timber frame, vinyl, or traditional wood construction to protect your smoker and cooking area from the elements. Add retractable screens for wind and rain protection while maintaining ventilation. Consider square or rectangular pavilion designs for better organization of kitchen elements and include ceiling fans for comfort during hot weather.
What’s the best way to integrate seating into my BBQ smoker area?
Create bar seating adjacent to your smoker for guest interaction during cooking. Use circular seating arrangements around fire features to encourage conversation. Establish separate dining zones on multi-level decks to improve workflow. Consider both high bar stools for active engagement and comfortable lounge seating for relaxation in shaded areas.
How do I incorporate storage solutions into my BBQ smoker design?
Install custom cabinetry with deep drawers and pull-out shelves for easy access to tools and supplies. Add vertical dividers to organize different wood types for smoking. Include modular storage options that can be moved as needed, and consider built-in storage compartments in your smoker station to keep everything organized and within reach.
Can I combine my BBQ smoker area with other outdoor features?
Yes, integrate your smoker with garden areas for easy access to fresh herbs and vegetables. Combine it with fire pit areas for enhanced ambiance and social interaction. Create outdoor bar areas with refrigeration units and beverage dispensers. Consider positioning near outdoor kitchens with sinks and additional cooking equipment for a complete culinary experience.
What lighting options work best for evening BBQ smoking?
Use layered lighting with task lighting directly over cooking areas for safety and precision. Add ambient lighting in dining and seating zones for atmosphere. Install adequate lighting along pathways between garden and cooking areas. Consider both functional lighting for food preparation and decorative lighting to create an inviting evening entertainment space.


