

Nothing ruins a perfect barbecue like unexpected rain or scorching sun beating down on our grilling session. We’ve all been there – watching the weather forecast nervously or squinting through smoke while the sun blazes overhead. That’s exactly why building a DIY BBQ shelter can transform our outdoor cooking experience from stressful to spectacular.
Creating our own barbecue shelter doesn’t require professional construction skills or a massive budget. With some basic materials and weekend dedication we can build a functional shelter that protects our grill and keeps us comfortable year-round. Whether we’re dealing with sudden downpours spring allergies or intense summer heat a well-designed shelter extends our grilling season significantly.
The best part? We can customize every aspect to match our backyard’s style and our exact needs. From simple lean-to designs to elaborate pavilion-style structures there’s a DIY solution that’ll work perfectly for our space and skill level.
Build a Simple Lean-To BBQ Shelter Using Basic Materials
Building a lean-to shelter offers the perfect beginner-friendly project that delivers maximum protection with minimal materials. This versatile design requires just one supporting wall or fence, making it ideal for most backyard configurations.
Choose the Right Location for Your Lean-To
Select a spot with existing vertical support like your house wall, garage, or sturdy fence to anchor the high end of your shelter. We recommend positioning the shelter so the opening faces away from prevailing winds, typically southeast or southwest depending on your local weather patterns.
Measure at least 8 feet of clearance from your chosen wall to accommodate both the grill and comfortable movement space. The National Fire Protection Association requires minimum 10-foot clearance from combustible structures, so factor this distance into your planning.
Check for level ground or prepare to level the area with gravel or pavers. Uneven surfaces create structural problems and make the shelter unstable during windy conditions.
Consider utility access for electrical connections if you plan to add lighting or outlets later. Running conduit after construction costs significantly more than including it during the initial build.
Gather Essential Tools and Materials
Purchase pressure-treated lumber for the frame structure to resist moisture and insects. You’ll need 4×4 posts for vertical supports, 2×8 boards for the main beam, and 2×6 rafters for the roof frame.
Acquire corrugated metal roofing panels or polycarbonate sheets for weather protection. Metal panels cost approximately $3-5 per square foot while polycarbonate runs $8-12 per square foot but offers better light transmission.
Collect basic hardware including galvanized carriage bolts, deck screws, metal roofing screws, and post anchors. Galvanized materials prevent rust and extend the shelter’s lifespan significantly.
Gather essential tools such as a circular saw, drill, level, measuring tape, and post-hole digger. Most homeowners already own these tools, but rentals typically cost $30-50 per day for specialized equipment.
Step-by-Step Construction Process
Dig post holes 2 feet deep and 6 inches wider than your posts using a post-hole digger or shovel. Set posts in concrete for maximum stability, allowing 24 hours for curing before continuing construction.
Install the main support beam by attaching a 2×8 board horizontally between the house wall and your new posts. Use galvanized lag bolts to secure the wall end and carriage bolts for post connections.
Cut and install rafters at 16-inch intervals, angling them from the main beam down to a lower beam attached to the posts. Each rafter should extend 6-12 inches beyond the lower beam to create an overhang that protects from rain.
Attach roofing material starting from the bottom edge and working upward, overlapping each row by at least 2 inches. Use specialized roofing screws with rubber washers to prevent leaks at penetration points.
Add finishing touches like gutters to manage water runoff or side panels for additional wind protection. These optional elements increase both functionality and the shelter’s overall value.
Construct a Freestanding Canopy Cover for Ultimate Flexibility

Building beyond permanent structures opens up endless possibilities for your outdoor grilling setup. Freestanding canopy covers offer the freedom to position your BBQ shelter anywhere in your yard without relying on walls or existing structures.
Design Your Portable Canopy Framework
Creating a portable framework starts with selecting lightweight yet durable materials like aluminum or steel tubing. We recommend choosing rectangular or square shapes with crossbars to provide optimal support for your canopy fabric. Modular designs work exceptionally well for DIY projects since they feature detachable parts that make transport and storage effortless.
Height plays a crucial role in your framework design, so we suggest building the frame tall enough to allow proper ventilation. Open sides remain essential for letting smoke and heat escape safely from your grill area. Consider incorporating adjustable leg heights to accommodate uneven terrain and ensure stability across different locations.
Steel tubing offers excellent durability for frequent assembly and disassembly, while aluminum provides superior portability for those who move their setup regularly. Corner joints should use reinforced connectors to handle wind stress and maintain structural integrity during use.
Select Weather-Resistant Fabric Options
Weather-resistant fabrics form the backbone of effective canopy protection against sun, rain, and wind. Polyester with PVC coating delivers exceptional waterproofing while maintaining flexibility in various weather conditions. Canvas treated for waterproofing provides a classic look with robust protection against light rain and intense sunlight.
UV-resistant synthetic blends prevent fading and deterioration from prolonged sun exposure, extending your canopy’s lifespan significantly. We’ve found that acrylic coatings on polyester fabrics offer the best balance of weather resistance and visual appeal for most BBQ applications.
Fabric weight matters when selecting materials, as heavier options provide better wind resistance but may stress your framework. Consider fabrics with reinforced edges and grommets to prevent tearing at attachment points during windy conditions.
Assembly and Setup Instructions
Site preparation begins with choosing a flat, stable area that’s clear of overhead obstacles like tree branches or power lines. We always verify the ground can support your framework and check for proper drainage to prevent water pooling.
Frame assembly follows your exact plans or kit instructions, ensuring each connection point is secure before proceeding. Double check that all joints are tight and the structure remains level throughout the building process. Anchor points become necessary in windy areas, so consider ground stakes or weighted bases for added stability.
Fabric attachment requires systematic securing with ties, hooks, or Velcro straps along all frame edges. Start from one corner and work your way around to maintain even tension across the entire canopy surface. Avoid over-tightening, which can stress both fabric and frame components.
Ventilation checks ensure adequate airflow around your grill to prevent dangerous smoke buildup and heat damage to your canopy. We recommend maintaining at least 3 feet of clearance between your grill and any fabric surfaces. Final stability testing involves gently shaking the structure and reinforcing any weak points before your first use.
Create a Pergola-Style BBQ Shelter for Permanent Coverage

Building a pergola-style shelter offers the perfect balance of permanent protection and aesthetic appeal for your outdoor grilling space. This classic design provides excellent coverage while maintaining an open, airy feel that enhances your backyard’s visual appeal.
Plan Your Pergola Dimensions and Layout
Planning your pergola starts with measuring your available space and determining the ideal size for your grilling needs. A 4×8 feet dimension works perfectly for most standard grills while providing ample prep space around the cooking area. We recommend sketching your layout on paper first, marking where each post will be positioned and calculating the total roof coverage area.
Consider your grill’s placement within the structure to ensure adequate clearance on all sides. Mark the exact locations for your posts, keeping them evenly spaced for optimal structural support. Factor in any existing industry features, utility lines, or property boundaries that might affect your pergola’s positioning.
Install Sturdy Posts and Beam Structure
Installing the foundation begins with selecting durable 4×4 posts that can withstand outdoor conditions and heavy loads. Anchor these posts securely into the ground using concrete footings or post anchors for maximum stability. Each post needs proper bracing during installation to maintain perfect vertical alignment throughout the construction process.
Connect your posts using sturdy support beams, securing them with joist hanger screws for superior joint strength. Level each post carefully using a carpenter’s level to ensure your entire structure maintains proper alignment. The beam connections form the backbone of your shelter, so take time to make these joints as strong as possible.
Add Roofing Materials for Weather Protection
Choosing the right roofing material determines how well your shelter protects against rain, sun, and other weather elements. Popular options include treated wood slats for a traditional look, corrugated metal panels for durability, or polycarbonate sheets for translucent coverage. Order your roof panels to exact measurements, such as 78-inch lengths, to ensure perfect fit across your pergola frame.
Install roofing materials with proper pitch to help water runoff, with a 4:12 roof pitch being the most common choice for effective drainage. Pre-stain or treat all lumber before assembly to maximize weather resistance and extend your shelter’s lifespan. Apply outdoor wood stain to enhance durability and maintain the natural beauty of your pergola structure.
| Pergola Component | Recommended Material | Key Specifications |
|---|---|---|
| Posts | 4×4 pressure-treated lumber | Concrete footings required |
| Beams | Pressure-treated lumber | Joist hanger screw connections |
| Roofing | Metal panels/polycarbonate | 4:12 pitch for drainage |
| Dimensions | 4×8 feet standard | Accommodates most grill sizes |
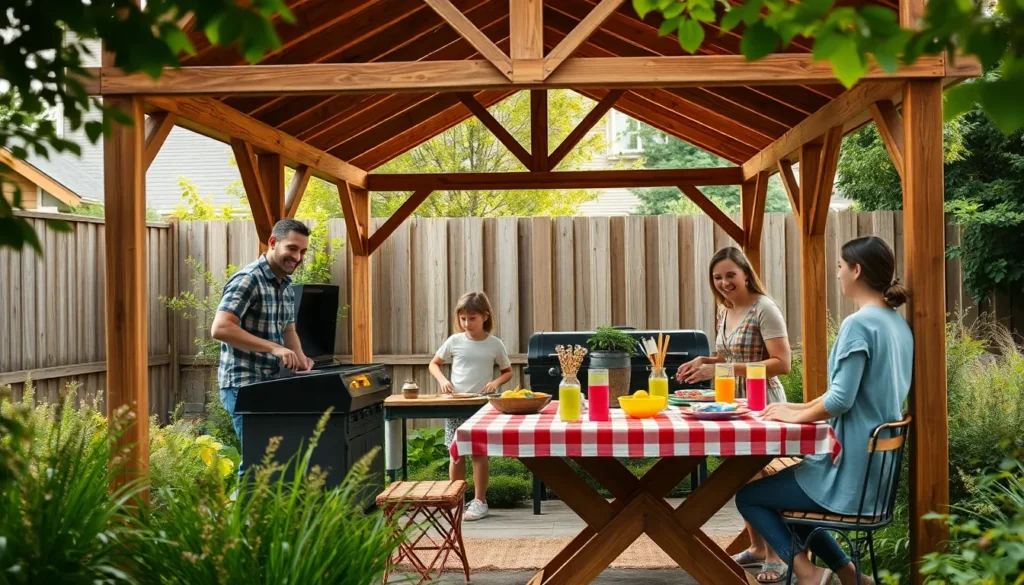
Design a Gazebo BBQ Shelter for Complete Outdoor Dining

Creating a full gazebo structure elevates your outdoor cooking experience by providing a dedicated dining and grilling space that protects against all weather conditions. This comprehensive shelter option transforms your backyard into a year-round entertainment hub.
Choose Between Octagonal or Square Gazebo Designs
Octagonal gazebos provide an elegant and spacious feel that works exceptionally well in open backyard layouts. These traditional designs offer 360-degree functionality and create a natural gathering space around your grill. We recommend octagonal styles when you have ample yard space and want to showcase the structure as a focal point.
Square gazebos deliver practical advantages with their simpler construction process and efficient use of materials. They fit perfectly against existing walls or fences, maximizing your available space while reducing material costs. Construction becomes more straightforward with square designs since all angles are 90 degrees, making measurements and cuts easier for DIY builders.
Space requirements vary significantly between styles, with octagonal designs needing more clearance on all sides compared to square structures that can use corner placement. Consider your yard’s layout and future landscaping plans when selecting between these two popular gazebo shapes.
Build the Foundation and Floor Structure
Digging post holes requires precise spacing and depth measurements to ensure structural integrity. We dig holes approximately 3 feet deep for gazebo posts, spacing them according to your chosen dimensions such as 6×10 feet for a practical BBQ shelter size.
Concrete mixing and pouring creates the stable base your gazebo needs to withstand weather and regular use. Pour concrete into each hole while inserting post anchors into the wet mixture, ensuring they remain vertical and properly aligned using a level. Allow concrete to set partially before proceeding to the next step.
Post mounting involves securing each vertical support using temporary braces to maintain plumb positioning throughout the construction process. Attach horizontal 2×6 beams to post tops using lag screws, ensuring beam tops remain level with approximately 12-inch overhangs on each side for proper roof support.
Foundation accuracy determines the success of your entire gazebo project, so we recommend double-checking all measurements and levels before concrete fully cures.
Install Walls and Roof Components
Rafter installation begins with cutting 2×4 rafters to size and creating birdsmouth cuts at each end. These cuts allow rafters to sit securely on wall plates while distributing roof loads evenly across the structure. Position rafters at 24-inch intervals on center and secure them with screws after drilling pilot holes to prevent wood splitting.
Wall construction offers flexibility based on your exact needs and local weather patterns. Open designs maximize ventilation while providing wind and rain protection, whereas partially enclosed walls can offer more privacy and weather resistance. Consider your primary use patterns when deciding on wall configurations.
Roofing materials should prioritize durability and weather protection for year-round use. Shingles provide traditional aesthetics and excellent water resistance, while metal roofing offers longevity and easy maintenance. Install appropriate underlayment before your chosen roofing material to ensure complete weather protection.
Temporary bracing with 2×4 lumber helps maintain structural alignment during assembly and should remain in place until all permanent connections are secure. This step prevents costly misalignment issues that could compromise your gazebo’s stability and appearance.
Repurpose Existing Structures Into Functional BBQ Shelters

Building from scratch isn’t always necessary when you already have structures that can serve as excellent BBQ shelters. We can transform existing outdoor features into functional grilling spaces with minimal investment and construction time.
Transform Carports Into BBQ Cooking Spaces
Carports offer ready-made shelter that we can easily convert into dedicated BBQ areas. We’ll find the existing roof provides immediate protection from sun and rain while maintaining proper ventilation for grilling safety.
Start by adding a designated grill station along one wall where we can install permanent mounting brackets for stability. Create prep surfaces by building countertops from weather-resistant materials like concrete or marine-grade plywood with laminate finish. Storage answers work best when we install weatherproof cabinets underneath the counter space for grilling tools and supplies.
Ventilation becomes crucial when we add cooking elements to enclosed spaces. Install ceiling fans or ridge vents to ensure proper airflow during grilling sessions. Consider adding electrical outlets along the walls for lighting and small appliances that enhance our cooking experience.
Side panels can transform open carports into more enclosed cooking spaces. We recommend removable panels made from vinyl or canvas that allow flexibility based on weather conditions and seasonal needs.
Convert Sheds Into Multi-Purpose Outdoor Kitchens
Sheds provide enclosed spaces that we can transform into fully functional outdoor kitchens with proper modifications. These structures offer weather protection for both equipment and cooks while doubling as storage for grilling accessories.
Begin by installing proper ventilation systems including exhaust fans and intake vents to handle cooking fumes safely. We need to cut ventilation openings in walls and roof areas while maintaining structural integrity through proper framing techniques.
Interior modifications require removing interior walls if necessary to create open cooking space. Install countertops along multiple walls to maximize prep area using materials like stainless steel or tile that handle outdoor conditions well. Add a sink by running water lines from the main house or installing a gravity-fed system with storage tanks.
Built-in grill stations work excellently when we create dedicated alcoves with proper clearances. We recommend installing fire-resistant materials like cement board around cooking areas for safety. Electrical work should include outlets for appliances and overhead lighting for evening cooking sessions.
Storage maximization happens when we install wall-mounted cabinets and open shelving systems. Keep grilling tools organized with pegboard systems and drawer units that protect equipment from moisture and pests.
Modify Patio Covers for Grilling Areas
Patio covers and pergolas provide excellent foundations for BBQ shelters that we can enhance with targeted modifications. These existing structures already offer partial protection while maintaining the open-air grilling experience.
Weather protection improves dramatically when we add side panels or curtains to existing patio covers. Install track systems that allow panels to slide or fold back for flexibility during different weather conditions. Canvas panels work well for wind protection while clear vinyl panels maintain visibility during rain.
Cooking stations integrate seamlessly when we build permanent platforms underneath existing roof structures. Create dedicated grill areas using concrete pads or stone platforms that provide stable, fire-safe foundations. Add prep counters along the perimeter using materials that complement the existing structure design.
Utility additions enhance functionality when we run electrical lines for lighting and outlets. Install pendant lights or track lighting systems that illuminate cooking and dining areas effectively. Consider adding ceiling fans to improve air circulation during hot weather grilling sessions.
Customization options expand when we add built-in features like sinks, refrigeration units, or storage cabinets. These additions transform basic patio covers into comprehensive outdoor kitchens while preserving the open, airy feeling that makes outdoor cooking enjoyable.
Install Retractable Awning Systems for Adjustable Protection

Retractable awnings provide the ultimate flexibility for our BBQ shelter setup, allowing us to adjust protection from sun or rain exactly when we need it. We can extend full coverage during storms and retract them completely on perfect weather days.
Select Manual or Motorized Awning Options
Manual awnings offer a budget-friendly solution that uses a simple hand crank mechanism to extend and retract the fabric cover. We’ll find these systems typically cost 40-60% less than motorized versions while providing the same weather protection capabilities. Hand crank operation requires minimal physical effort and gives us complete control over positioning without depending on electrical power.
Motorized systems deliver maximum convenience through remote control operation, allowing us to adjust coverage from anywhere in our outdoor cooking area. These systems feature weather sensors that automatically retract during high winds and can integrate with smart home systems for scheduled operation. We should expect to invest 2-3 times more than manual options, but the ease of use makes motorized awnings ideal for frequent adjustments throughout our grilling sessions.
Mount Brackets and Support Hardware
Secure bracket installation forms the foundation of our retractable awning system and requires mounting to a stable, flat surface near our BBQ area. We need to ensure our mounting surface can support the awning’s weight plus wind loads, typically requiring concrete walls, solid wood beams, or steel framework rated for outdoor use. Bracket spacing should match manufacturer specifications, usually ranging from 6-8 feet apart for residential awnings.
Support hardware must be rated for our exact awning size and local weather conditions, with stainless steel or galvanized components providing the best corrosion resistance. We’ll need to use appropriate fasteners for our mounting surface, such as concrete anchors for masonry walls or heavy-duty lag bolts for wooden structures. Proper installation includes checking that all brackets align perfectly to prevent binding during extension and retraction.
Maintain Your Retractable System
Regular bracket and hardware inspections prevent wear and loosening that can compromise our awning’s safety and performance. We should check all mounting points monthly, tightening bolts and screws as needed while looking for signs of corrosion or stress cracks. Hardware maintenance includes lubricating moving parts according to manufacturer recommendations and replacing worn components before they fail.
Fabric cleaning according to manufacturer instructions prevents mildew buildup and UV fading that can shorten our awning’s lifespan. We’ll typically need to wash the fabric 2-3 times per season using mild soap and water, allowing complete drying before retracting to prevent mold growth. For motorized systems, we should inspect electrical components annually and test smooth operation regularly to catch issues before they require expensive repairs.
Build a Rustic Wooden BBQ Pavilion for Traditional Appeal

A rustic wooden pavilion brings timeless charm to your BBQ area while providing excellent weather protection. This traditional approach combines natural materials with straightforward construction techniques that deliver both functionality and aesthetic appeal.
Source Reclaimed Wood and Natural Materials
Reclaimed wood serves as the foundation for authentic rustic character in your BBQ pavilion. Pallet slats offer an excellent starting point, as many DIY builders strip nails from discarded pallets and repurpose the weathered timber for their structures. Weathered barn wood, old fence posts, and salvaged lumber from construction sites provide natural texture and vintage appeal at minimal cost.
Cost effectiveness makes reclaimed materials particularly attractive for budget conscious builders. We’ve found that sourcing materials from local demolition projects or online marketplaces significantly reduces expenses compared to purchasing new lumber. Natural patina and existing wear patterns eliminate the need for artificial aging treatments, giving your pavilion an immediately established look.
Sustainability benefits accompany the use of reclaimed materials, as repurposing existing wood reduces waste and environmental impact. Pine, cedar, and oak reclaimed boards work exceptionally well for pavilion construction due to their durability and natural weather resistance. Combining different wood types creates visual interest while maintaining structural integrity throughout your build.
Create Open-Air Design With Rustic Charm
Open air design maximizes ventilation while allowing smoke to dissipate naturally during cooking sessions. A simple wooden frame structure with dimensions of 4×8 feet provides adequate shelter for standard grills while maintaining easy access from all sides. Post and beam construction using 4×4 pressure treated lumber creates a sturdy foundation that can support various roofing materials.
Pitched roof design with a 4:12 slope allows rain runoff while preventing wind damage during storms. We recommend positioning support posts at least 8 feet apart to accommodate grill placement and movement around the cooking area. Cross bracing between posts adds stability without compromising the open feel of the structure.
Natural flow between indoor and outdoor spaces enhances the rustic appeal of your pavilion design. Raised construction, elevated 6 to 8 inches off the ground, prevents moisture damage while creating visual separation from surrounding industry elements. Simple joinery techniques using mortise and tenon or basic bolt connections maintain the handcrafted aesthetic while ensuring long term durability.
Finish With Weatherproofing Treatments
Weatherproofing treatments protect your rustic pavilion from moisture damage while preserving its natural appearance. Wood sealants penetrate deep into the grain, creating a barrier against water infiltration without altering the original color or texture of reclaimed materials. Clear polyurethane finishes provide excellent protection while allowing the natural wood character to shine through.
Staining options enhance the rustic look while adding an extra layer of weather resistance. We suggest using semi transparent stains that highlight wood grain patterns while providing UV protection against sun damage. Interior surfaces benefit from lighter stain applications that brighten the space while maintaining protection against moisture and temperature fluctuations.
Roofing materials require special attention to ensure complete weather protection for your BBQ area. Asphalt shingles offer traditional appeal and reliable water resistance, while metal roofing provides superior durability and heat reflection. Regular maintenance schedules including annual inspections and touch up treatments extend the life of your weatherproofing system significantly.
Applied treatments should cure completely before exposing the structure to weather conditions, typically requiring 24 to 48 hours of dry conditions. Proper ventilation during the curing process prevents moisture trapping that could compromise the effectiveness of your protective finishes.
Construct a Modern Metal Frame Shelter for Durability

Steel framing offers superior longevity compared to traditional wood construction, providing rot-proof, termite-proof, and fire-resistant properties that make it ideal for BBQ environments. We’ll guide you through building a modern metal frame shelter that delivers exceptional durability with minimal maintenance requirements.
Weld or Bolt Steel Frame Components
Welding creates permanent, strong connections between steel frame parts, offering maximum structural integrity for your BBQ shelter. This method works best when you have access to welding equipment and experience with metal fabrication techniques.
Bolting provides flexible assembly options that allow easier adjustments or future modifications to your shelter design. Construction videos demonstrate how metal studs and tracks can be cut, joined, and reinforced using brackets and supporting studs to create stable framework structures.
Corner brackets and horizontal supports reinforce structural joints for enhanced stability, especially around openings where you’ll install countertops or storage areas. We recommend using galvanized bolts and brackets to prevent corrosion in outdoor environments.
Temporary braces during assembly keep components properly aligned while you complete the framework construction. Plan and measure carefully to ensure square and level framing throughout the build process.
Choose Polycarbonate or Metal Roofing
Polycarbonate roofing panels offer lightweight installation with natural light transmission, making your BBQ area bright and welcoming during daytime cooking. These panels provide excellent weather protection while being easier to handle than heavier alternatives.
Metal roofing delivers maximum durability and complements steel frame construction perfectly, ensuring long-lasting protection against harsh weather conditions. But, metal roofing requires more structural support due to its increased weight compared to polycarbonate options.
| Roofing Material | Weight | Light Transmission | Durability | Installation Difficulty |
|---|---|---|---|---|
| Polycarbonate | Lightweight | High | Moderate | Easy |
| Metal | Heavy | None | High | Moderate |
Weather resistance varies significantly between these materials, with metal roofing offering superior longevity while polycarbonate provides adequate protection for most climates.
Apply Protective Coatings and Finishes
Rust-resistant primers form the foundation of proper steel protection, preventing corrosion that can compromise your shelter’s structural integrity over time. Apply primer to all steel components before final assembly to ensure complete coverage.
Powder coatings provide superior durability compared to traditional paints, offering enhanced weather resistance and aesthetic appeal for outdoor metal structures. This coating method creates a factory-like finish that withstands years of exposure to elements.
Metal bases and post anchors keep steel posts secure while preventing ground contact that leads to moisture-related damage. Use these components to elevate your frame structure above ground level for maximum longevity.
Protective finishes require regular inspection to maintain their effectiveness, but properly coated steel framing can last decades with minimal maintenance compared to wood alternatives.
Add Essential Features to Enhance Your BBQ Shelter

Now that you’ve built your shelter structure, it’s time to incorporate the features that’ll transform it from basic protection into a fully functional outdoor cooking space.
Install Proper Ventilation Systems
Ventilation stands as the most crucial feature for preventing smoke buildup and maintaining comfortable air circulation in your BBQ shelter. We recommend incorporating open sides wherever possible to allow natural airflow while still providing overhead protection from rain and sun.
Installing vents near the roof peak creates an effective chimney effect that draws hot air and smoke upward and out of the shelter. Position these vents at the highest point of your roof structure for maximum efficiency.
Adjustable louvers offer the perfect solution for customizable ventilation control. These allow you to regulate airflow based on wind conditions and cooking requirements while maintaining protection from the elements.
Consider adding side vents or gaps between wall panels and the roof to promote cross ventilation. This design prevents heat from becoming trapped while ensuring smoke doesn’t linger in your cooking area.
Include Storage Answers and Work Surfaces
Built-in shelves transform your BBQ shelter into an organized cooking station that keeps all your grilling essentials within arm’s reach. Install weatherproof cabinets below counter height to store charcoal, wood chips, grilling tools, and seasonings safely away from moisture.
Adding a countertop or prep area adjacent to your grill creates the workspace you need for food preparation and plating. Use materials like treated wood, composite decking, or outdoor-rated countertop surfaces that can withstand weather exposure.
Wall-mounted tool racks maximize vertical space while keeping spatulas, tongs, and brushes easily accessible during cooking. Position these at comfortable heights on the sides of your shelter structure.
Storage cubbies built into the shelter walls provide designated spaces for propane tanks, cleaning supplies, and seasonal grilling accessories. Design these with proper ventilation if storing fuel sources.
Add Lighting and Electrical Outlets
Installing weatherproof lighting extends your grilling season into evening hours and creates an inviting atmosphere for outdoor cooking. LED strip lights mounted under roof overhangs provide excellent task lighting without generating excess heat.
Pendant lights hung from the shelter ceiling offer focused illumination over prep areas and the grill surface. Choose fixtures rated for outdoor use with appropriate weather sealing.
Electrical outlets powered from your home’s electrical system support various cooking equipment and convenience features. Install GFCI-protected outlets to safely power electric smokers, rotisseries, or outdoor music systems.
Task lighting positioned over work surfaces ensures safe food preparation during low light conditions. Consider motion-activated lights for hands-free operation when your hands are full with cooking duties.
Ambient lighting around the shelter perimeter creates a welcoming environment for guests while providing enough illumination for safe movement around the cooking area.
Maintain Your DIY BBQ Shelter for Long-Term Use

Building your BBQ shelter is just the beginning. Proper maintenance ensures your outdoor cooking investment remains functional and attractive for years to come.
Perform Regular Inspections and Repairs
Check structural components like posts, beams, and roof elements every few months for signs of wear, rot, or damage. We recommend focusing on connection points where wood meets metal or where different materials join together.
Look for loose bolts and screws that may have worked free due to thermal expansion and contraction. Tightening hardware before problems develop prevents more serious structural issues later.
Examine the foundation area around posts for signs of settling or erosion that could compromise stability. Early detection of these issues allows for simple fixes rather than major reconstruction projects.
Inspect roofing materials for missing screws, cracked panels, or damaged flashing that could allow water infiltration. Addressing small roof problems immediately prevents costly water damage to the entire structure.
Document any issues you find during inspections with photos and notes to track recurring problems. This approach helps you identify patterns and prioritize which repairs need immediate attention.
Protect Against Weather Damage
Apply weather-resistant sealants or paints to wooden shelters annually to prevent moisture absorption and decay. We suggest using products specifically designed for outdoor structures that face constant exposure to elements.
Install gutters or drainage systems to manage rainwater effectively around your shelter. Proper water management prevents pooling that can damage foundations and prolongs the life of nearby materials.
Choose durable roofing materials like metal panels or quality shingles that withstand your local climate conditions. Metal roofing with proper coatings can last 20-30 years with minimal maintenance compared to other options.
Seal all joints and connections where water might penetrate using appropriate caulks or weatherstripping. Pay special attention to areas where the roof meets vertical supports or where different materials connect.
Position your shelter to minimize exposure to prevailing winds and driving rain when possible. Strategic placement reduces weather stress on the structure and extends its operational life.
Update and Upgrade Over Time
Install lighting systems to extend your grilling capabilities into evening hours and improve safety around cooking areas. LED strip lights under roof edges or pendant lights over work surfaces create both ambiance and functionality.
Add storage racks and organizational features as your outdoor cooking needs evolve and expand. Built-in tool hooks, spice racks, and utensil holders keep everything organized and within easy reach.
Enhance ventilation with adjustable louvers or exhaust fans if you notice smoke accumulation during use. Proper airflow improvements make cooking more comfortable and prevent damage from heat buildup.
Refinish wooden components every 2-3 years to maintain both appearance and weather protection. Fresh stain or paint not only looks better but provides crucial barrier protection against moisture and UV damage.
Adapt shelter size or configuration as your outdoor entertaining grows or your equipment changes. Modular additions or extensions let you expand functionality without rebuilding the entire structure.
Conclusion
Building your own BBQ shelter transforms outdoor cooking from a weather-dependent activity into a year-round passion. We’ve shown you that creating the perfect grilling space doesn’t require advanced carpentry skills or very costly.
Whether you choose a simple lean-to design a sophisticated gazebo or a modern metal frame structure each option offers unique benefits customized to different needs and budgets. The key lies in selecting materials that match your climate and maintenance preferences.
Remember that regular upkeep ensures your shelter serves you well for years to come. With proper planning and basic DIY skills you’ll soon enjoy countless memorable barbecues regardless of what Mother Nature has in store.
Your backyard is about to become the neighborhood’s favorite gathering spot.
Frequently Asked Questions
What materials do I need to build a basic DIY BBQ shelter?
For a simple lean-to shelter, you’ll need pressure-treated lumber for the frame, metal or polycarbonate roofing panels, galvanized screws and bolts, concrete for post anchoring, and basic tools like a drill, saw, and level. Optional additions include gutters, side panels, and weatherproof sealants for enhanced protection.
How much space should I allow around my grill in the shelter?
Maintain at least 8 feet of clearance around your grill for safety and functionality. This ensures proper ventilation, prevents fire hazards, and provides adequate space for movement while cooking. Consider additional space for prep areas and storage if you plan to include these features.
Can I build a BBQ shelter without professional construction experience?
Yes, most DIY BBQ shelter projects are beginner-friendly. Start with simple designs like lean-to structures or canopy covers. Basic carpentry skills, following detailed instructions, and using proper safety equipment are sufficient. More complex structures like gazebos may require additional planning and skill.
What’s the difference between a lean-to and freestanding BBQ shelter?
A lean-to shelter attaches to an existing structure like a house or fence, making it more stable and cost-effective. Freestanding shelters offer complete flexibility in placement but require more materials and structural support. Choose based on your available space and existing structures.
How do I ensure proper ventilation in my BBQ shelter?
Design your shelter with open sides, install roof vents or ridge vents, and consider adjustable louvers for customizable airflow. Avoid fully enclosed designs that can trap smoke and heat. Proper ventilation prevents smoke buildup and maintains safe cooking conditions.
What roofing materials work best for BBQ shelters?
Metal roofing offers maximum durability and weather resistance. Polycarbonate panels provide lightweight installation with natural light. Treated wood slats offer aesthetic appeal but require more maintenance. Choose based on your climate, budget, and desired appearance.
How do I maintain my DIY BBQ shelter?
Conduct regular inspections for wear, rot, or damage. Apply weather-resistant sealants annually, clean gutters and drainage systems, and check all connections and fasteners. Address issues promptly to prevent costly repairs and ensure structural integrity.
Can I convert existing structures into BBQ shelters?
Yes, carports, sheds, and patio covers can be modified into functional BBQ areas. Add ventilation systems, designated grill stations, and prep surfaces. This approach requires minimal investment and construction time while maximizing existing resources.
What’s the ideal size for a BBQ shelter?
A 4×8 feet shelter accommodates most standard grills comfortably. Consider your grill size, desired prep space, and available yard area. Larger shelters allow for dining areas and additional storage, while smaller ones focus purely on grill protection.
Do I need permits to build a BBQ shelter?
Permit requirements vary by location and structure type. Simple lean-to shelters and temporary canopies typically don’t require permits. Permanent structures like gazebos or pavilions may need permits. Check with your local building department before starting construction.


