

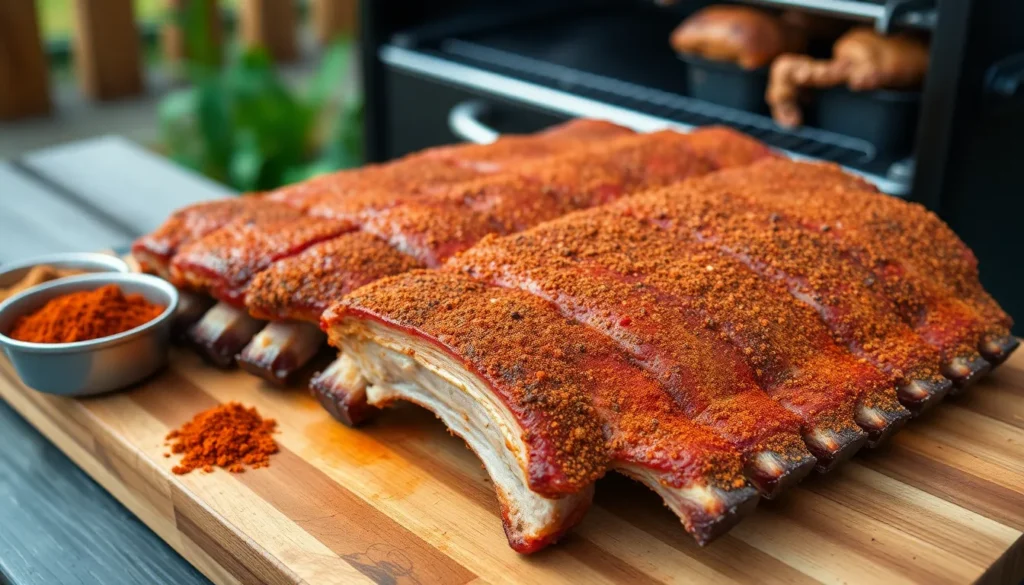
We’ve all been there – standing in front of the grill with a beautiful rack of ribs but unsure how to transform them into the mouthwatering masterpiece they deserve to be. The secret isn’t just in the cooking technique; it’s in the perfect BBQ rub that creates that irresistible crust and deep, smoky flavor that makes ribs legendary.
A great BBQ rub does more than just season your meat – it forms a beautiful bark during cooking while locking in moisture and creating complex layers of flavor. Our blend combines sweet, savory, and spicy elements that complement the natural richness of pork ribs without overpowering them.
Whether you’re preparing for a backyard cookout or competition-style smoking, this homemade rub will elevate your ribs from ordinary to extraordinary. We’ll show you exactly how to balance the spices and apply them for maximum flavor impact.
Ingredients
Our signature BBQ rub combines carefully selected spices that work together to create the perfect balance of sweet, savory, and spicy flavors. Each ingredient serves a exact purpose in building layers of taste and developing that coveted bark on your ribs.
Base Spices:
- 3 tablespoons brown sugar (packed)
- 2 tablespoons paprika
- 1 tablespoon garlic powder
- 1 tablespoon onion powder
- 1 tablespoon chili powder
Heat and Depth:
- 2 teaspoons black pepper (freshly ground)
- 1 teaspoon cayenne pepper
- 1 teaspoon chipotle powder
- 1 teaspoon mustard powder
Finishing Elements:
- 2 teaspoons kosher salt
- 1 teaspoon cumin
- 1 teaspoon oregano (dried)
- ½ teaspoon smoked paprika
Brown sugar forms the foundation of our rub by caramelizing during cooking to create that beautiful mahogany crust. Regular paprika provides mild pepper flavor and vibrant color while smoked paprika adds authentic barbecue depth. Garlic powder and onion powder deliver essential savory notes that penetrate deep into the meat.
Chili powder brings earthy warmth without excessive heat. Black pepper adds sharp spice while cayenne provides clean heat that builds gradually. Chipotle powder contributes smoky complexity that mimics hours of wood smoking.
Mustard powder acts as a binding agent and adds subtle tang. Kosher salt draws out moisture initially then helps the rub adhere to the meat surface. Cumin introduces earthy undertones while oregano provides herbal brightness that cuts through rich pork fat.


Equipment Needed

Before we start mixing our signature BBQ rub, let’s gather the essential tools that will make the process smooth and efficient. Having the right equipment ensures our rub achieves the perfect consistency and gets stored properly for maximum freshness.
For Mixing and Preparation:
- Large mixing bowl for combining all spice ingredients
- Fork or whisk to break up any clumps in brown sugar and dry spices
- Measuring spoons and cups for precise ingredient ratios
- Paper towels for patting ribs dry before applying the rub
For Storage:
- Airtight glass containers to preserve the rub’s potency and prevent moisture
- Labels to mark mixing dates and ingredients
For Rib Preparation and Cooking:
- Oven-safe wire rack for proper air circulation around the ribs
- Large sheet pan to catch drippings and support the rack
- Heavy-duty aluminum foil for wrapping ribs during the cooking process
- Instant-read thermometer to monitor internal temperature
We recommend using glass containers over plastic for storage since they won’t absorb the strong spice aromas and keep our rub fresh for at least a month. The wire rack becomes crucial when baking ribs in the oven as it allows heat to circulate evenly around the meat.
Our mixing bowl should be large enough to accommodate all ingredients with room for thorough blending. A standard medium to large bowl works perfectly for this recipe’s quantities. Keep paper towels handy throughout the process since properly dried ribs allow the rub to adhere better and create that coveted flavorful crust we’re after.


Instructions

Creating our signature BBQ rub involves three essential steps that ensure perfect flavor balance and optimal storage. These straightforward techniques will help you achieve consistent results every time.
Mixing the Dry Ingredients
We begin by gathering all our essential spices and measuring them precisely for the best flavor profile. Start with these carefully proportioned ingredients:
- 1/4 cup brown sugar
- 2 teaspoons kosher salt
- 2 teaspoons black pepper
- 2 teaspoons smoked paprika
- 1 teaspoon garlic powder
- 1 teaspoon onion powder
- 1 teaspoon ground mustard
- 1/2 teaspoon cinnamon
- 1/2 teaspoon celery salt
- 1/4 teaspoon cayenne pepper
Place all ingredients into your large mixing bowl in the order listed. This methodical approach ensures we don’t accidentally skip any components. The brown sugar serves as our base sweetener while the salt enhances all other flavors. Smoked paprika provides that essential barbecue smokiness that makes ribs irresistible.
Combining the Spices
We use a fork or whisk to thoroughly blend all ingredients until they form a uniform mixture. Break up any brown sugar clumps by pressing them against the bowl’s sides with your fork. This step prevents uneven flavor distribution when we apply the rub to our ribs.
Continue mixing until the texture appears consistent throughout. Pay special attention to areas where the brown sugar might stick together. The final mixture should flow freely without large chunks. Optional additions like cumin or coriander can be incorporated at this stage for extra complexity.
Storing the BBQ Rub
We transfer our finished rub into an airtight glass container or sealed plastic container immediately after mixing. Label the container with the mixing date to track freshness. This homemade rub maintains its potency for at least one month when stored properly.
Keep the container in a cool dry place away from direct sunlight. Before each use we shake or stir the rub to redistribute any ingredients that may have settled. The brown sugar naturally tends to clump during storage so this step ensures smooth application every time.


How to Apply BBQ Rub to Ribs

Now that our signature rub is perfectly mixed and ready to use, we need to apply it correctly to achieve maximum flavor penetration and create that coveted bark. The application technique makes all the difference between mediocre ribs and championship-quality results.
Prep the Ribs
We always start by removing the membrane from the bone side of the ribs if it hasn’t been done already. This thin layer prevents our rub from penetrating properly and creates a chewy texture that detracts from the final product. Using a paper towel for grip, we slide a knife under the membrane at one end and peel it away in one piece.
Our next decision involves whether to use a binder. We can lightly coat the ribs with olive oil or yellow mustard to help our rub adhere better to the surface. Many experienced pitmasters skip this step and apply the rub directly to the meat, which works equally well. The choice depends on personal preference and how heavily we want the rub to stick.
Application Technique
We recommend the wet hand/dry hand technique for optimal rub distribution. Our dry hand sprinkles the rub generously over the ribs from about a foot above the surface, while our wet hand rubs it vigorously into the meat. This method prevents cross-contamination and ensures even coverage without creating messy clumps.
We season the bone side first, applying enough rub so that we can still see some meat through the coating. Too thick creates uneven flavor, while too thin fails to develop proper bark. After flipping the ribs, we repeat the process on the meat side, paying special attention to get rub into all the crevices between the bones.
Salt content in our rub determines whether we need additional seasoning. Since our signature blend contains kosher salt, we skip extra salting during this step. The goal is complete surface coverage with a thick but not overwhelming layer of seasoning.
Resting Time
After application, we let the ribs rest so our rub can “sweat” and bind properly to the meat surface. We refrigerate the seasoned ribs for 30 minutes to 1 hour, which allows the rub to penetrate and create better adhesion during cooking.
Extended resting times require careful consideration. We avoid leaving the rub on for more than 12 hours because salt’s dehydrating effects can draw out too much moisture and create tough, dry ribs. The sweet spot for most home cooks falls between 1 to 4 hours for optimal flavor development.
| Resting Time | Result |
|---|---|
| 30 minutes – 1 hour | Good adhesion and penetration |
| 1 – 4 hours | Optimal flavor development |
| 4 – 12 hours | Maximum penetration (monitor closely) |
| Over 12 hours | Risk of meat drying out |
During the resting period, we keep the ribs covered in the refrigerator to prevent surface drying while the rub works its magic into the meat fibers.


Storage and Make-Ahead Tips

Proper storage techniques ensure our BBQ rub maintains its bold flavor profile long after we’ve mixed it. We can prepare larger batches ahead of time when we follow these proven preservation methods.
Proper Storage Methods
We recommend storing our BBQ rub in airtight containers to minimize exposure to air and moisture that can degrade the spices. Glass jars work exceptionally well for this purpose as do heavy-duty plastic containers with tight-fitting lids.
Location matters significantly for maintaining potency. We should keep our containers in a cool dry and dark place away from direct sunlight and heat sources. Heat and light cause the essential oils in our herbs and spices to degrade leading to flavor loss over time.
Advanced storage enthusiasts among us use vacuum sealers to remove all air from storage bags. Others add a few grains of rice to the container to absorb excess humidity and prolong freshness. Freezing our rub can further extend its shelf life by slowing down the degradation of oils and spices though this method is less commonly used.
We suggest preparing smaller batches rather than one large container to limit air exposure each time we open it. Multiple smaller containers preserve the remaining rub’s quality while we use one portion at a time.
Shelf Life
Our BBQ rubs maintain peak freshness for about 6 to 9 months after opening. Herb-based rubs have shorter lifespans because the oils from herbs dry out and lose potency more quickly than other spices.
| Storage Condition | Shelf Life | Quality Level |
|---|---|---|
| Optimal conditions (airtight, cool, dry) | Up to 1 year | Retains most aroma and flavor |
| Standard pantry storage | 6-9 months | Peak freshness |
| Extended storage | Up to 2 years | Past optimal flavor point |
Ground spices lose their potency after about 6 months making the longer storage periods less desirable for quality results. We should watch for telltale signs that our rub has aged beyond peak quality including faded aroma loss of vibrant color and clumping or hardening of the mixture.
Labeling our containers with the date we made or opened the rub helps us track their age easily. We can then use our oldest rubs first to maintain the freshest possible flavors in our cooking.


Variations and Customizations

Our signature BBQ rub serves as the perfect foundation for creating customized flavor profiles that match your personal taste preferences. We’ve developed three popular variations that transform the base recipe into distinct flavor experiences.
Sweet BBQ Rub Variation
We enhance the sweetness by increasing our brown sugar to 1/2 cup or substituting it with dark brown sugar for deeper molasses notes. Adding an extra 1/2 teaspoon of cinnamon creates warm bakery spice flavors that caramelize beautifully on the ribs.
For even more complexity we incorporate 1/4 teaspoon of allspice to complement the cinnamon. This variation works exceptionally well for those who prefer a milder heat level with a rich caramelized crust that develops during the cooking process.
The increased sugar content helps create that coveted bark while balancing any spicy elements in the rub. We recommend this version for family gatherings where diverse palates need accommodation.
Spicy BBQ Rub Variation
We amplify the heat by doubling the cayenne pepper to 1/2 teaspoon and adding 1 teaspoon of chili powder for complex spice layers. Korean chili flakes or Aleppo peppers provide unique heat profiles that differentiate this variation from standard hot rubs.
Smoked chipotle powder replaces half of our regular paprika to introduce smoky heat without overwhelming the other flavors. We increase the black pepper to 1 tablespoon for additional bite and reduce the cinnamon to 1/4 teaspoon to prevent sweetness from competing with the heat.
This variation creates an intense flavor experience that builds gradually as you eat. The combination of different heat sources provides complexity rather than just raw spiciness.
Low-Sodium Option
We reduce the kosher salt to 1 teaspoon and eliminate the celery salt entirely to create a heart healthy version of our rub. Increasing the smoked paprika to 3 teaspoons compensates for the flavor loss while maintaining the rub’s visual appeal.
Coconut sugar substitutes for brown sugar in equal amounts providing a paleo friendly sweetener with subtle caramel notes. We boost the garlic powder and onion powder to 1 1/2 teaspoons each to enhance the savory components without relying on salt.
Additional herbs like 1/2 teaspoon of oregano or ground thyme add complexity to replace the umami typically provided by salt. This variation proves that reducing sodium doesn’t mean sacrificing flavor when we balance the remaining ingredients thoughtfully.

Tips for Best Results

We’ve learned that proper technique makes the difference between good ribs and exceptional ones. Our years of testing have shown that attention to detail during preparation and storage dramatically improves the final outcome.
Store your rub in an airtight container to maintain its potency and prevent moisture from clumping the ingredients. We recommend shaking the container before each use to ensure all spices distribute evenly throughout the blend. This simple step prevents some ribs from getting more salt while others receive excessive brown sugar.
Pat ribs completely dry before applying the rub to improve crust formation during cooking. Excess moisture prevents the spices from adhering properly and can create a soggy exterior instead of the coveted bark we’re after. We use paper towels to remove all surface moisture from both sides of the ribs.
Allow the seasoned ribs to rest in the refrigerator for several hours or overnight to intensify flavor absorption. This resting period lets the salt draw out moisture initially, then reabsorb it along with the other spices. We’ve found that this process creates deeper penetration than applying rub immediately before cooking.
| Resting Time | Flavor Penetration | Best For |
|---|---|---|
| 30 minutes | Light surface seasoning | Quick weeknight meals |
| 2-4 hours | Moderate penetration | Weekend cookouts |
| 8-12 hours | Deep flavor absorption | Competition-level results |
Customize spice levels by adjusting cayenne or chili peppers to match your heat preference. We start with our base recipe and gradually increase the heat components in small increments. This approach prevents overwhelming the other flavors while building the perfect spice level for your palate.
Combine dry rub with a finishing glaze or sauce during the last 15 to 30 minutes of cooking to add complexity and moisture. The rub creates the foundation flavors and crust, while the glaze provides a sticky finish that balances the dry spices. We apply sauce sparingly to avoid masking the rub’s careful flavor balance.
Rest the cooked ribs for 5 to 10 minutes before slicing to retain the juices that make each bite succulent. This final resting period allows the meat fibers to relax and reabsorb the rendered juices, preventing them from running out when you cut into the ribs.


Conclusion
We’ve shared everything you need to create the perfect BBQ rub for ribs that’ll transform your backyard cookouts. From our carefully balanced signature blend to storage tips and application techniques this guide gives you the foundation for consistently delicious results.
The beauty of this rub lies in its versatility. Whether you prefer sweet savory or spicy flavors you can customize our base recipe to match your taste preferences. Remember that great BBQ isn’t just about the spices – it’s about proper technique patience and attention to detail.
Take your time with the process. Let the rub work its magic and don’t rush the cooking. With practice you’ll develop the confidence to experiment and create your own signature variations that’ll have friends and family coming back for more.
Frequently Asked Questions
What ingredients are in the signature BBQ rub?
The signature BBQ rub contains brown sugar, paprika, garlic powder, onion powder, chili powder, black pepper, cayenne pepper, chipotle powder, mustard powder, kosher salt, cumin, and oregano. These ingredients create a perfect balance of sweet, savory, and spicy flavors that enhance pork ribs without overwhelming their natural taste.
How long should I let the rub sit on ribs before cooking?
For optimal flavor penetration, let the seasoned ribs rest in the refrigerator for 30 minutes to 1 hour. For deeper flavor absorption, you can rest them for several hours or overnight, but avoid exceeding 12 hours as this can dry out the meat. Cover the ribs during resting to prevent surface drying.
How do I store BBQ rub to maintain freshness?
Store your BBQ rub in airtight glass jars or heavy-duty plastic containers in a cool, dry, dark place. Label containers with the preparation date and shake before each use. The rub maintains peak freshness for 6-9 months, with herb-based variations having shorter lifespans.
Should I remove the membrane from ribs before applying the rub?
Yes, always remove the membrane from the bone side of the ribs before applying the rub. This allows for better rub absorption and improved flavor penetration. Use a paper towel or knife to grip and peel away the thin, silvery membrane completely.
Do I need a binder when applying BBQ rub to ribs?
A binder like olive oil or mustard can help the rub adhere better, but it’s optional. Many pitmasters prefer applying the rub directly to dry ribs. If using a binder, apply it lightly before seasoning with the rub using the wet hand/dry hand technique for even coverage.
Can I customize the BBQ rub recipe for different preferences?
Absolutely! You can create variations like a Sweet BBQ Rub (adding more brown sugar and cinnamon), a Spicy version (doubling cayenne and adding smoked chipotle), or a Low-Sodium option (reducing salt while adding coconut sugar and extra herbs) to match your taste preferences.
What equipment do I need to make and apply BBQ rub?
Essential equipment includes a large mixing bowl, fork or whisk for breaking up clumps, measuring tools, airtight storage containers, and labels. For cooking, you’ll need an oven-safe wire rack, sheet pan, heavy-duty aluminum foil, and an instant-read thermometer for best results.


