Craving that perfect chewy protein-packed snack without very costly? Making beef jerky in your oven transforms expensive store-bought jerky into an affordable homemade treat that’s completely customizable to your taste preferences.
We’ve perfected this foolproof oven method that delivers consistently delicious results every single time. Unlike traditional dehydrators that take up valuable counter space, your standard kitchen oven becomes the ultimate jerky-making machine with just a few simple techniques.
This recipe eliminates the guesswork and expensive equipment while giving you complete control over ingredients and sodium levels. You’ll discover how easy it is to create restaurant-quality jerky that’s fresher, more flavorful, and significantly cheaper than anything you’ll find at the store. Get ready to impress your family and friends with this addictive homemade snack that’s perfect for hiking trips, lunch boxes, or satisfying those afternoon cravings.
Ingredients
We’ve carefully selected these ingredients to create the perfect balance of flavor and texture in our homemade beef jerky. Our recipe uses simple pantry staples combined with quality beef to deliver restaurant-quality results.
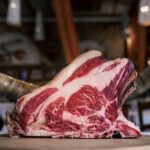
Beef Selection
Main Protein:
- 2 pounds lean beef (eye of round, bottom round, or top round)
- Fat trimmed to less than 1/4 inch thickness
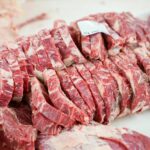
Cut Specifications:
- Slices cut 1/4 inch thick
- Cut against the grain for tender jerky
- Cut with the grain for chewier texture
Marinade Ingredients
Base Marinade:
- 1/2 cup low sodium soy sauce
- 1/4 cup Worcestershire sauce
- 2 tablespoons brown sugar
- 2 tablespoons apple cider vinegar
- 1 tablespoon liquid smoke
- 2 teaspoons garlic powder
- 2 teaspoons onion powder
- 1 teaspoon black pepper
- 1 teaspoon smoked paprika
- 1/2 teaspoon red pepper flakes
Optional Seasonings
- 1 teaspoon ground ginger (for Asian-inspired jerky)
- 1 tablespoon honey (for sweeter jerky)
- 2 teaspoons chili powder (for Southwestern flavor)
- 1 teaspoon dried thyme (for herbal notes)
- 1/2 teaspoon cayenne pepper (for extra heat)
- 2 tablespoons teriyaki sauce (for Japanese-style jerky)
- 1 teaspoon ground coriander (for unique depth)
Equipment Needed

Making beef jerky in our home oven requires exact equipment to ensure proper drying and food safety. We’ll walk you through the essential tools and setup requirements to create restaurant-quality jerky using standard kitchen equipment.
Essential Tools
We need a few key items to slice and prepare our beef for the drying process. A sharp knife stands as our most important tool for cutting meat into thin strips measuring 1/8 to 1/4 inch thick. Food thermometers become crucial for monitoring internal temperatures and ensuring we reach the safe target of 160°F before beginning the drying phase.
Aluminum foil serves multiple purposes by lining our baking sheets and catching any drips during the process. We recommend having several baking sheets or oven-safe trays available for laying meat strips flat. Skewers or hooks offer an alternative method for hanging strips vertically inside our oven to maximize space and improve airflow.
A thick wooden spoon proves essential for propping our oven door slightly open during drying. This simple tool enables proper air circulation and moisture escape. Large resealable plastic bags or containers work perfectly for marinating our beef strips before cooking. Vacuum seal sets provide optional storage answers for keeping our finished jerky fresh longer.
Oven Setup Requirements
Our oven configuration determines the success of our jerky-making process. We start by preheating to 300°F initially to ensure food safety standards. The meat bakes at this temperature for approximately 10 minutes to achieve the critical internal temperature of 160°F that eliminates harmful bacteria.
After reaching safety temperatures, we lower our oven to its minimum setting around 170°F for the slow drying phase. Air circulation becomes paramount during this stage, requiring us to keep the oven door slightly ajar using our wooden spoon prop. Convection fans enhance airflow significantly when available and speed up the overall drying time.
| Drying Parameter | Specification |
|---|---|
| Initial Temperature | 300°F for 10 minutes |
| Drying Temperature | 170°F (lowest setting) |
| Total Drying Time | 3-8 hours |
| Rotation Frequency | Every hour |
The complete drying process spans 3 to 8 hours depending on meat thickness and oven airflow efficiency. We rotate our baking sheets and racks hourly to ensure even drying throughout all pieces. Our jerky reaches completion when strips bend without breaking and develop surface cracks during bending tests.
We can choose between hanging meat strips vertically on oven racks or laying them flat on foil-lined trays with adequate spacing. Hanging methods offer superior airflow and accommodate more meat per rack, while flat arrangements provide easier monitoring and rotation access.
Preparation

Now that we have our ingredients and equipment ready, we can begin the preparation process. This crucial stage involves properly cutting the beef, creating a flavorful marinade, and allowing the meat to absorb those delicious flavors.
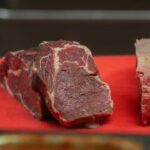
Preparing the Beef
We need to select a lean cut of beef such as top round, London broil, flank steak, or round steak to ensure our jerky dries properly and lasts longer without spoiling due to fat content. The key to tender jerky lies in slicing the beef thinly, about 1/8 inch thick, cutting against the grain to make it easier to chew.
For even better results, we recommend pounding the beef slices between plastic wrap to achieve uniform thickness. This technique ensures consistent drying throughout each piece. We should trim any visible fat from the meat before slicing, as fat can cause the jerky to spoil faster and create an unpleasant texture.
Making the Marinade
Our flavorful marinade base combines several essential ingredients for the perfect balance of savory, sweet, and smoky flavors. We start with soy sauce as our foundation, using about 1 cup for 2 pounds of beef.
| Ingredient | Amount for 2 lbs beef |
|---|---|
| Soy sauce | 1 cup |
| Lime juice | ¼ cup |
| Honey or brown sugar | 2 tablespoons |
| Liquid smoke | 1 teaspoon |
| Minced garlic or garlic powder | 2 teaspoons |
| Minced ginger or ground ginger | 1 teaspoon |
| Red pepper flakes | 2 teaspoons |
| Ground black pepper | 1 teaspoon |
| Pink curing salt (optional) | ½ teaspoon |
The lime juice adds brightness and helps tenderize the meat, while honey or brown sugar provides the sweetness that balances the salty soy sauce. Liquid smoke delivers that authentic smoky flavor without needing a smoker. We can also enhance our marinade with Worcestershire sauce and smoked paprika for additional depth of flavor.
Marinating Process
We place the beef strips in a glass dish or sealed container to begin the marinating process. Glass containers work best as they won’t absorb flavors or react with acidic ingredients in our marinade.
Next, we pour the marinade over the beef, ensuring all pieces are well coated on both sides. We gently massage the marinade into the meat to guarantee even distribution of flavors. After covering the container, we refrigerate the beef for at least 8 hours, though we prefer marinating overnight for up to 24 hours to allow the flavors to deeply penetrate the meat.
During the marinating time, we occasionally turn the beef strips to ensure even flavor absorption. This extended marinating period is crucial for developing the rich, complex flavors that make homemade jerky superior to store bought varieties.
Instructions

Now that our marinated beef has absorbed all those wonderful flavors we’re ready to transform it into perfectly dried jerky. We’ll guide you through each critical step to ensure your homemade jerky turns out consistently delicious and safe to eat.
Preheating the Oven
We start by setting our oven to 300°F and letting it preheat for 10 minutes to bring the meat’s internal temperature to a safe 160°F level. After this initial heating phase we immediately lower the temperature to 170°F for the actual drying process. Position two oven racks in the center area to maximize air circulation around our beef strips.
We need to prop our oven door open about one inch using a thick wooden spoon handle. This small gap allows moisture to escape continuously while maintaining the low temperature required for proper drying rather than cooking.
Arranging the Beef
We remove our marinated beef from the refrigerator and pat each strip completely dry with paper towels to eliminate excess marinade. This step prevents dripping and ensures even drying throughout the process.
Our beef strips can be arranged in two effective ways. We can lay them flat on wire cooling racks placed over aluminum foil lined baking sheets ensuring no pieces overlap. Alternatively we can hang the strips vertically by draping them over the oven racks or threading them onto wooden skewers. The hanging method provides superior airflow around each piece but requires careful spacing to prevent touching.
| Arrangement Method | Advantages | Time Consideration |
|---|---|---|
| Flat on wire racks | Easier setup, stable positioning | Standard 3-6 hour drying time |
| Hanging vertically | Superior airflow, faster drying | Reduced drying time by 30-45 minutes |
Oven Drying Process
We place our arranged beef into the preheated 170°F oven with the door propped open and begin the 3 to 6 hour drying journey. The exact timing depends on our meat thickness and how much airflow reaches each strip.
Every hour we rotate the baking sheets or flip hanging strips to ensure uniform drying on all surfaces. We start checking for doneness at the 3 hour mark by testing a piece. Properly dried jerky bends and cracks slightly but doesn’t break completely when folded. The surface feels dry to touch while maintaining some flexibility.
If our oven has a convection setting we can use it to speed up the process by improving air circulation. This reduces our total drying time by approximately 1 to 2 hours while producing more consistent results across all pieces.
Once our jerky passes the bend test we remove it from the oven and let it cool completely at room temperature before storing in airtight containers.
Cooking Directions

Now we’ll guide you through the precise cooking process to transform your marinated beef into perfectly dried jerky. These steps ensure consistent results while maintaining food safety throughout the drying process.
Temperature and Timing
We begin by preheating our oven to 300°F for exactly 10 minutes to reach the safe internal temperature of 160°F that eliminates harmful bacteria. After this initial heating phase we immediately lower the temperature to 170°F or the lowest setting your oven allows for the actual drying process.
Throughout the entire cooking time we prop open the oven door using a thick wooden spoon to create essential air circulation and moisture escape. This ventilation prevents steam buildup that would otherwise slow the drying process and potentially compromise food safety.
The total drying time ranges from 3 to 6 hours depending on your meat thickness and oven performance. We recommend starting to check for doneness at the 3 hour mark and continuing until the jerky reaches the proper texture. Using your oven’s convection setting will significantly speed up the drying process if this feature is available.
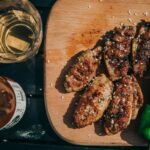
Checking for Doneness
We test jerky readiness by removing a piece from the oven and allowing it to cool for several minutes before handling. Properly dried jerky should bend without breaking while showing visible surface cracks along the bend line.
The ideal texture feels leathery and resistant to moisture but never brittle or crumbly. We avoid jerky that snaps cleanly when bent as this indicates overdrying which creates an unpleasant eating experience.
Each piece should feel dry to the touch while maintaining enough flexibility to bend at a 90 degree angle. We continue drying any pieces that feel soft or moist until they pass this bend test consistently.
Rotating and Flipping
We arrange our meat strips on wire cooling racks or hang them vertically to ensure even air circulation around each piece. This setup prevents moisture from pooling underneath the strips during the long drying process.
Every hour we flip or rotate the strips to promote uniform drying and prevent sticking to the racks. This regular attention ensures that both sides of each strip dry at the same rate and prevents uneven texture development.
For those using the hanging method we simply rotate the strips 180 degrees rather than flipping them completely. This technique eliminates the need for constant flipping while still achieving even drying results throughout the entire batch.
Storage Instructions

Proper storage is crucial for maintaining the quality and safety of your homemade beef jerky. Following the right cooling and storage methods will ensure your jerky stays fresh and delicious for weeks or even months.
Cooling Process
Allow the jerky to cool completely at room temperature on a rack or tray before storing. We recommend leaving it uncovered during the cooling phase to prevent moisture buildup that can lead to spoilage. This step is essential because warm jerky can create condensation inside storage containers, promoting mold growth and reducing shelf life.
Proper Storage Methods
For short-term storage, we place our cooled jerky in airtight containers or zip-top bags at room temperature in a cool, dry place. Glass jars with tight-fitting lids work exceptionally well for maintaining freshness while keeping moisture out.
Long-term storage requires vacuum sealing to minimize air exposure and preserve quality. We vacuum seal our jerky and store it in the refrigerator or freezer to significantly extend its shelf life. Vacuum-sealed packages prevent oxidation and maintain the jerky’s texture and flavor for months.
Moisture and humidity are the enemies of jerky storage. We always ensure our storage area remains dry and avoid placing containers in areas prone to temperature fluctuations like near stoves or windows.
Shelf Life Guidelines
| Storage Method | Temperature | Shelf Life |
|---|---|---|
| Airtight containers | Room temperature | 1-2 weeks |
| Vacuum sealed | Refrigerated | 1-2 months |
| Vacuum sealed | Frozen | 6+ months |
At room temperature in airtight packaging, our beef jerky typically maintains peak quality for 1 to 2 weeks. Refrigerated jerky extends this timeframe to 1 to 2 months when properly stored in vacuum-sealed packages.
Frozen jerky offers the longest storage option, lasting 6 months or longer when vacuum sealed and stored at 0°F or below. We recommend using curing salts during preparation if you plan to store jerky at room temperature for extended periods, as this reduces the risk of bacterial growth and enhances food safety.
Tips for Perfect Oven Beef Jerky

Following our detailed preparation and drying process, these expert tips will help you create consistently excellent beef jerky every time. We’ve compiled proven techniques to address the most common challenges home jerky makers face.
Meat Selection Tips
Choose lean cuts such as top round, London broil, or flank steak to minimize fat content. Fat causes jerky to spoil faster and become rancid, so we always trim off all visible fat before slicing to ensure longer shelf life and better drying.
Flash freeze the meat just enough to firm up the edges for easier slicing into thin strips. We find this technique makes cutting uniform 1/8-inch thick strips much more manageable with a sharp knife.
Avoid marbled cuts like ribeye or chuck roast since the fat distribution makes even drying nearly impossible. Lean cuts provide the consistent texture and extended storage life we want in homemade jerky.
Marinating Best Practices
Cut beef strips about 1/8-inch thick for even drying and optimal chewiness. Thicker pieces take longer to dry and may not cure properly, while thinner pieces can become overly brittle.
Marinate overnight or at least two hours to allow deep absorption of flavors. Longer marinating times intensify taste and create more complex flavor profiles than shorter marinating periods.
Drain excess marinade before drying to speed up the process and avoid sogginess. We pat the strips with paper towels to remove surface moisture while preserving the absorbed flavors.
Use balanced marinade ingredients including soy sauce, lime juice, honey or brown sugar, garlic, ginger, black pepper, and liquid smoke. Optional curing salts enhance preservation for extended room temperature storage.
Troubleshooting Common Issues
Uneven drying typically results from fatty or unevenly sliced meat. We ensure uniform thickness and complete fat removal to prevent some pieces from drying faster than others.
Overly tough jerky indicates over-drying in the oven. Reduce cooking time or increase marinade moisture content next time to maintain the proper chewy texture without excessive hardness.
Flavor problems stem from marinade imbalances or timing issues. Adjust ingredient ratios and marinating time accordingly if jerky tastes too salty or too mild for your preferences.
Spoilage prevention requires proper storage in airtight containers with refrigeration for long-term keeping. We check for any signs of mold or rancid odors before consuming stored jerky.
Conclusion
Making beef jerky in your oven opens up a industry of delicious possibilities right in your own kitchen. We’ve shown you that with the right techniques and a bit of patience, you can create premium-quality jerky that rivals any store-bought option.
The beauty of this method lies in its simplicity and flexibility. You don’t need expensive equipment or specialized knowledge – just your oven, quality beef, and our proven approach. Whether you’re preparing snacks for outdoor adventures or looking for a healthier protein option, homemade jerky delivers every time.
Remember that practice makes perfect. Each batch teaches you something new about your preferences and your oven’s behavior. Soon you’ll be crafting custom flavors that suit your taste perfectly while saving money and controlling exactly what goes into your food.
Frequently Asked Questions
Can I make beef jerky in a regular oven without a dehydrator?
Yes, you can easily make beef jerky in a standard kitchen oven. Set your oven to 170°F and prop the door open slightly for air circulation. This method eliminates the need for expensive dehydrators while producing consistently delicious results that are more affordable than store-bought jerky.
What cuts of beef work best for homemade jerky?
The best cuts for jerky are lean meats like eye of round, bottom round, top round, or flank steak. These cuts have minimal fat content, which prevents spoilage and ensures better texture. Always trim any visible fat before slicing to extend shelf life.
How thick should I slice the beef for jerky?
Slice beef to 1/8-inch thickness for optimal results. Cut against the grain for tender jerky or with the grain for chewier texture. Flash freezing the meat for 30 minutes before slicing makes it easier to achieve uniform thickness with a sharp knife.
How long should I marinate the beef before making jerky?
Marinate beef strips for at least 8 hours, preferably overnight. This extended marinating time allows the flavors to penetrate deeply into the meat, resulting in superior taste compared to store-bought jerky. The longer marination develops richer, more complex flavors.
What temperature should I use to dry jerky in the oven?
Preheat your oven to 300°F for 10 minutes for food safety, then reduce to 170°F for the drying process. Keep the oven door propped open with a wooden spoon to allow moisture to escape and ensure proper air circulation throughout the drying period.
How long does it take to make jerky in the oven?
Oven jerky typically takes 3-8 hours to dry completely, depending on meat thickness and airflow. Check for doneness starting at 3 hours. Properly dried jerky should bend without breaking and feel leathery. Rotate strips hourly for even drying.
How can I tell when my jerky is done?
Perform the bend test: properly dried jerky should bend without breaking or cracking. It should feel leathery and dry to the touch, not soft or moist. If pieces feel soft or bend too easily, continue drying and check every 30 minutes.
How should I store homemade beef jerky?
Cool jerky completely at room temperature before storing. Use airtight containers or zip-top bags for short-term storage (1-2 weeks). For longer storage, vacuum seal and refrigerate (1-2 months) or freeze (6+ months). Proper storage prevents moisture buildup and spoilage.
Do I need special equipment to make oven jerky?
Basic equipment includes a sharp knife, food thermometer, aluminum foil, wire racks, and a thick wooden spoon to prop the oven door. These common kitchen tools are sufficient for making professional-quality jerky at home without expensive specialized equipment.
Can I customize the flavor of my homemade jerky?
Absolutely! Start with a base marinade of soy sauce, Worcestershire sauce, and brown sugar, then add spices like garlic powder, onion powder, red pepper flakes, or liquid smoke. Experiment with different combinations to create your signature jerky flavors.